U-Pol Raptor Bed Liner in tub - Shots - Notes - Reference Threads
 07-03-2012, 02:30 PM
#1
JK Enthusiast
Thread Starter
First I would like to thank everyone who helped me out and all the great threads out there. 
U-POL Raptor - Bed Liner Basics
You can get this kit on the internet. The kits comes with 4 - 1 Liters bottles that attach directly to a spray gun (sometimes not included, at least on Amazon), and some hardener. You basically put 250ml of hardener in one of the bottles, shake for a minute and your ready to spray. The spray gun attaches to an air compressor. It also comes in a color tintable version (there's a good link below that uses that kind)


On this first picture you can see a bit of over-spray just below the hinge. I walked around the Jeep like 20 times but missed it until a good day after spraying it. I was able to get it off with some acetone and a decent amount of rubbing.
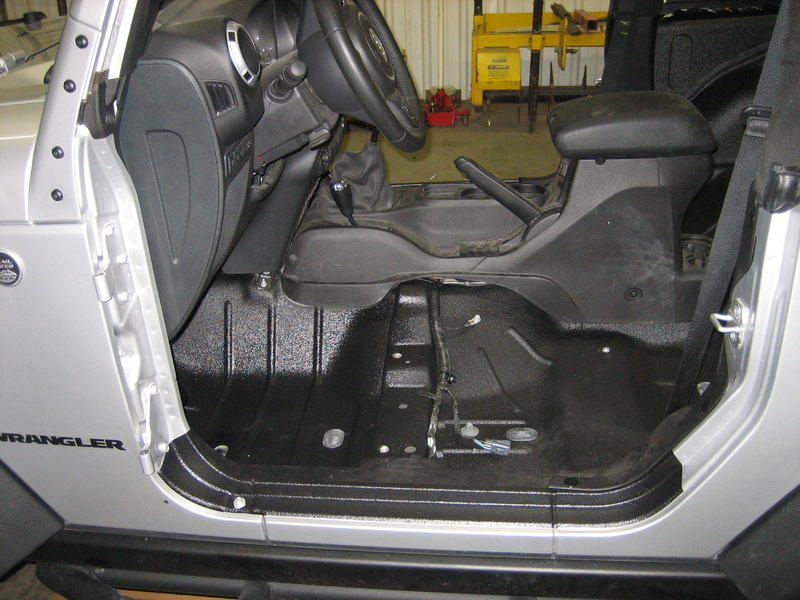
Above the rear wheel well you can see I added a 3/4" wire loom over the wires. I couldn't find "push mount cable ties" locally so I just went over the ones I pulled out and re-installed. I should have put the wire loom on before re-installing then I could have put little notches to make it tighter, but that's a bit of OCD talking. 1/2" might have worked but on the driver side shown below there is a tube for the rear washer fluid that makes that wire bundle pretty large. Another option people have done is to splice the wire and run it up the roll bar.
You'll want to tie the rear seat belts down so they don't roll all the way up when unbolted. That will create problems I have heard from someone who did that by mistake.
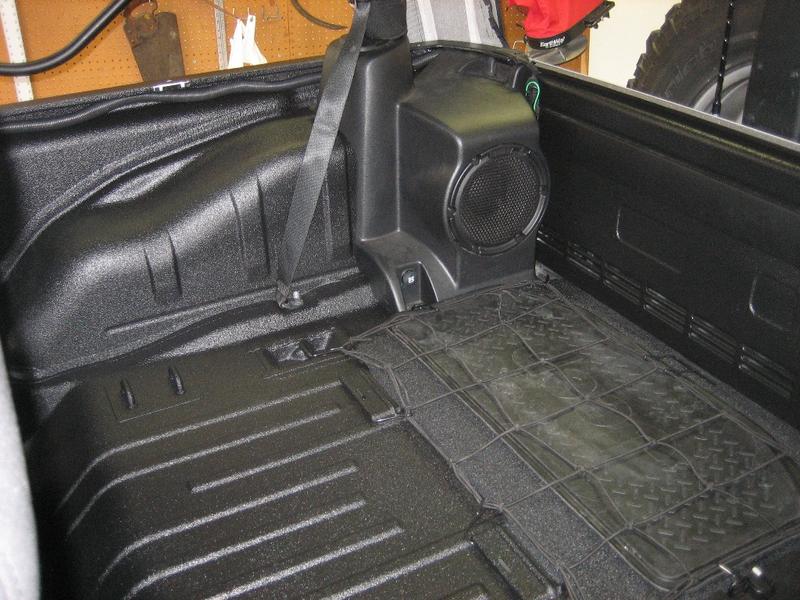
When you put the hard-top on it will totally cover this top rail it sits on.
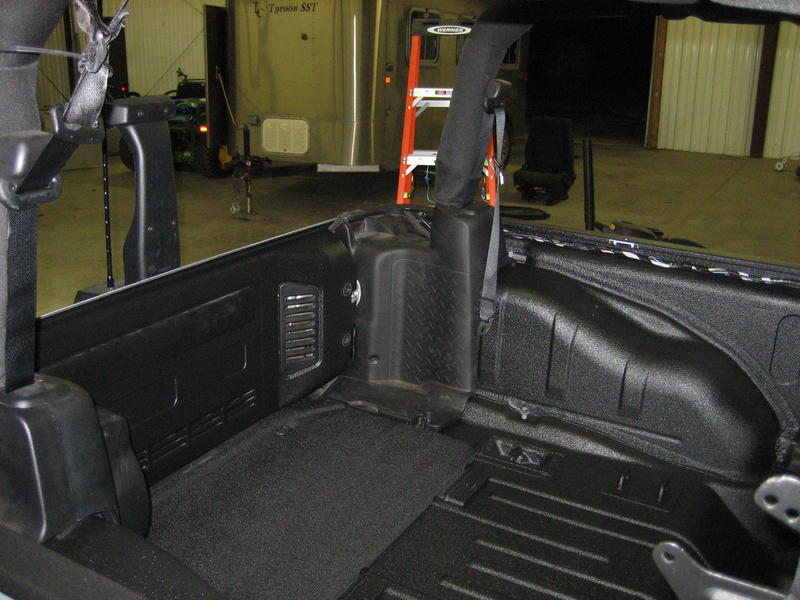
CUBBY DOOR -MELT CARPET DOWN
This is a picture with the jack flip up door bed lined. I used a heat gun on it first and the texture matches pretty good. It does show some lines from the heat gun. I should have been more careful to make it even. I also would not have melted down the carpet right where it tucks in.

TEXTURE
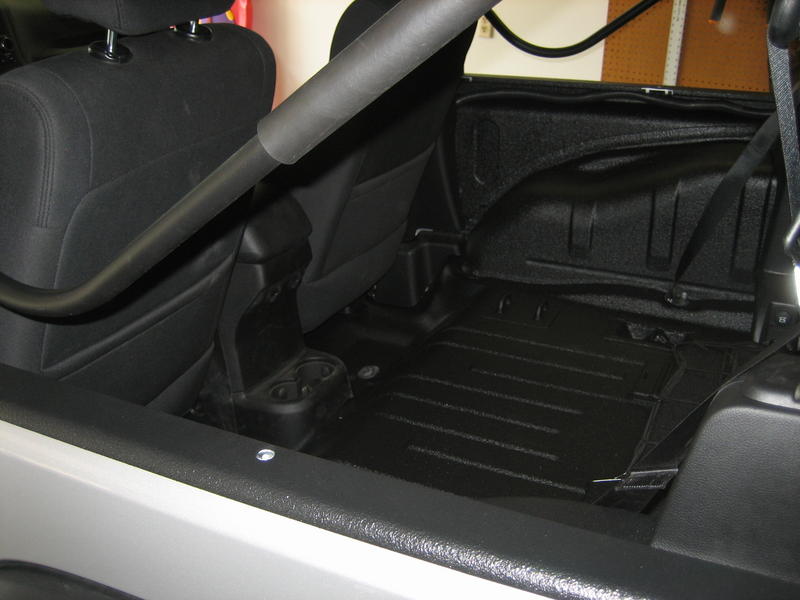
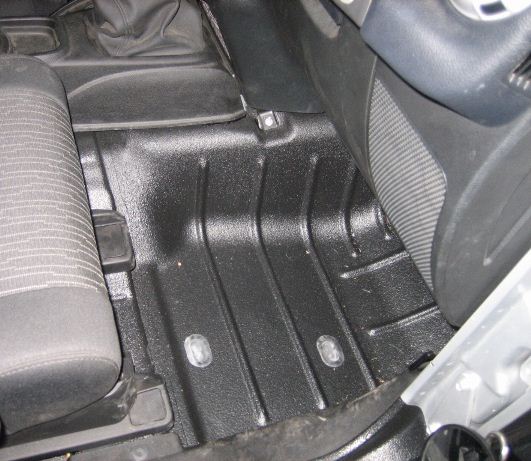
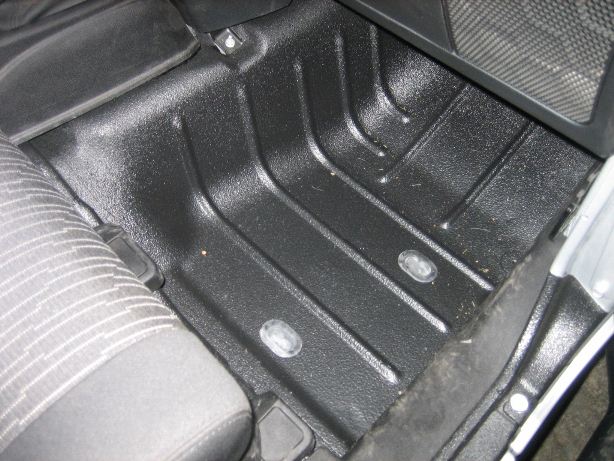
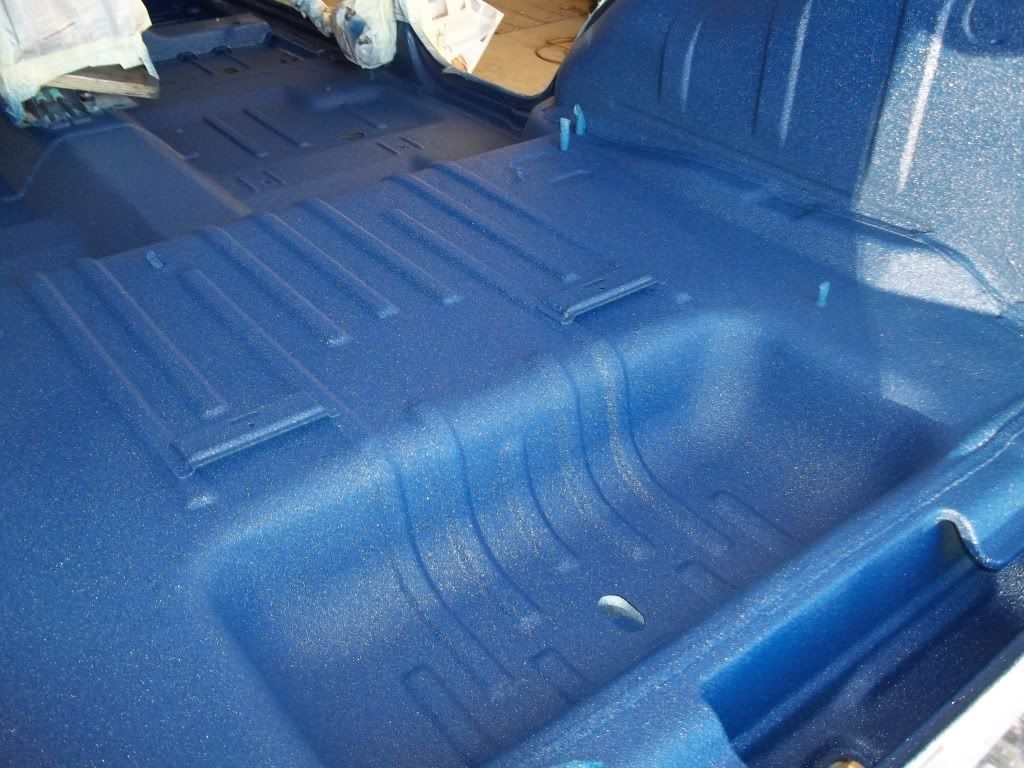
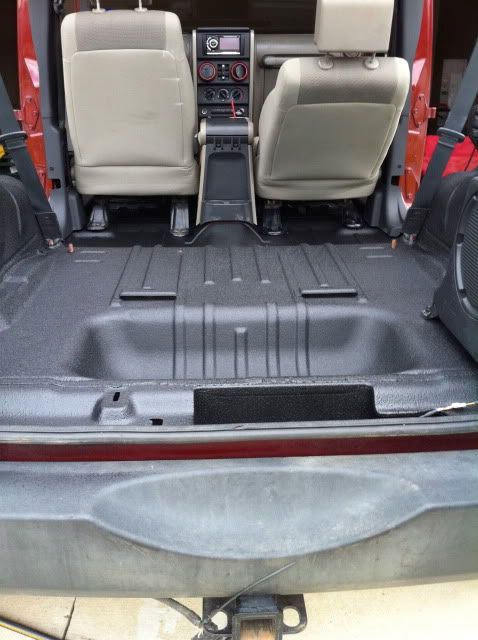
It's very easy to spray and will look very similar to Line-X. I personally think it has the best DIY texture. Spray on liner in general is easier to get a professional consistent look then a roll on like monstaliner. Raptor is a breeze to clean. Where a rustoleum spray can bed liner might require a pressure sprayer. The downside of the raptors hard smooth bumpy texture is that it is not very grippy to keep cargo in place. It's more of a surface protectant. It's thickness is about like 2 credit cards stacked. Maybe a 1/16" or so.

Don't forget to unhook the yellow wire harness under the front seats. I don't have side airbags so this harness must be on all JK's.

https://www.jk-forum.com/forums/jk-w...12-2dr-238728/ <--LINK-- I did a write-up on how to remove the carpet and plug the big hole behind the door
HERE ARE A COUPLE LINKS FOR REMOVING THE SUB AND PLASTIC PIECES
1) https://www.jk-forum.com/forums/jk-w...2012-a-231369/
2) https://www.jk-forum.com/forums/jk-w...012-jk-228098/
U-POL Raptor - Bed Liner Basics
You can get this kit on the internet. The kits comes with 4 - 1 Liters bottles that attach directly to a spray gun (sometimes not included, at least on Amazon), and some hardener. You basically put 250ml of hardener in one of the bottles, shake for a minute and your ready to spray. The spray gun attaches to an air compressor. It also comes in a color tintable version (there's a good link below that uses that kind)
On this first picture you can see a bit of over-spray just below the hinge. I walked around the Jeep like 20 times but missed it until a good day after spraying it. I was able to get it off with some acetone and a decent amount of rubbing.
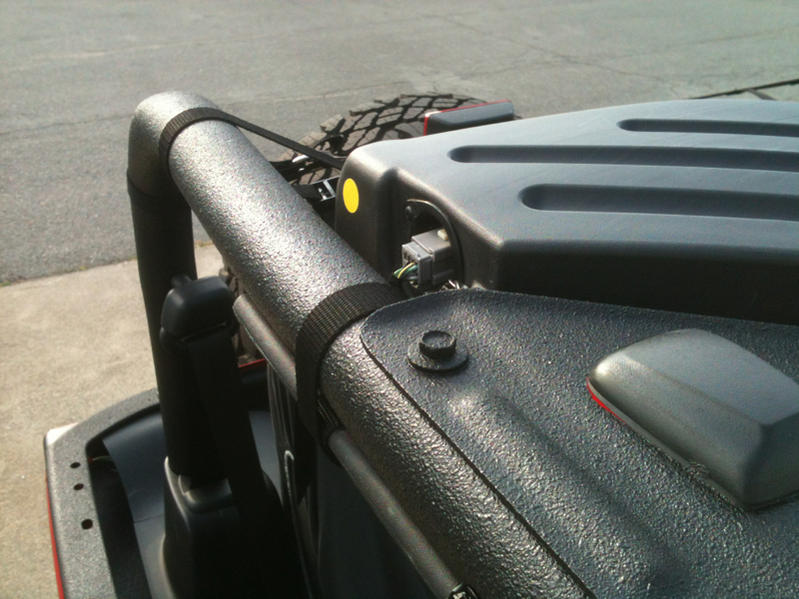
Above the rear wheel well you can see I added a 3/4" wire loom over the wires. I couldn't find "push mount cable ties" locally so I just went over the ones I pulled out and re-installed. I should have put the wire loom on before re-installing then I could have put little notches to make it tighter, but that's a bit of OCD talking. 1/2" might have worked but on the driver side shown below there is a tube for the rear washer fluid that makes that wire bundle pretty large. Another option people have done is to splice the wire and run it up the roll bar.
You'll want to tie the rear seat belts down so they don't roll all the way up when unbolted. That will create problems I have heard from someone who did that by mistake.
When you put the hard-top on it will totally cover this top rail it sits on.
CUBBY DOOR -MELT CARPET DOWN
This is a picture with the jack flip up door bed lined. I used a heat gun on it first and the texture matches pretty good. It does show some lines from the heat gun. I should have been more careful to make it even. I also would not have melted down the carpet right where it tucks in.
TEXTURE
It's very easy to spray and will look very similar to Line-X. I personally think it has the best DIY texture. Spray on liner in general is easier to get a professional consistent look then a roll on like monstaliner. Raptor is a breeze to clean. Where a rustoleum spray can bed liner might require a pressure sprayer. The downside of the raptors hard smooth bumpy texture is that it is not very grippy to keep cargo in place. It's more of a surface protectant. It's thickness is about like 2 credit cards stacked. Maybe a 1/16" or so.
Don't forget to unhook the yellow wire harness under the front seats. I don't have side airbags so this harness must be on all JK's.
https://www.jk-forum.com/forums/jk-w...12-2dr-238728/ <--LINK-- I did a write-up on how to remove the carpet and plug the big hole behind the door
HERE ARE A COUPLE LINKS FOR REMOVING THE SUB AND PLASTIC PIECES
1) https://www.jk-forum.com/forums/jk-w...2012-a-231369/
2) https://www.jk-forum.com/forums/jk-w...012-jk-228098/
Last edited by Rooster76; 09-21-2012 at 12:20 PM.

The following users liked this post:
Alextorello (09-24-2018)
07-03-2012, 02:32 PM
#2
JK Enthusiast
Thread Starter
PREP
SCUFF PAINT
I used 120 grit sand paper. I tried one of the sponge sand pads and it was trash. I wouldn't use sand paper lower then 100. You don't want to go down to bare metal if you can help it. You want to get rid of all the shiny clear coat and then stop. The factory primer the best surface you can paint on. You can use a higher grit but it will take all day. Another option is to get a red scotch-brite pad. *I ended up finding them at Ace hardware after I was done spraying. I used them later when bedlineing my grill and they worked great.

If you do go down to bare metal use one coat of self-etching primer spray. Try to keep it mostly on the metal. The etcher part isn't great on paint. I found that out after I sprayed mine.

I just used a bungee to keep the wire out of the way. Some people have disconnected it back by the tail light that lets you put it out of the way a bit more. Plus then you don't have to mask all that wire.
I was going to remove the center console but I found out you have to remove the shifter knobs (LINK tips for removing the center console). I ended up taking off a pannel on the back of the center console and removing the 2 - T30 bolts near the back. That allowed me to hoist up the back about an inch to spray under there. If your going to totally remove the console there is no good reason to take this panel off.

You can see I used some golf tees here to fill holes. I have also hear of ear plugs being used. For the gas pedals you might want to use the sacks sliced bread comes in. Probably a plastic groceries sack would work well too tapped tight. I had some skinny bags my soft-top shipped with.
TOP RAIL
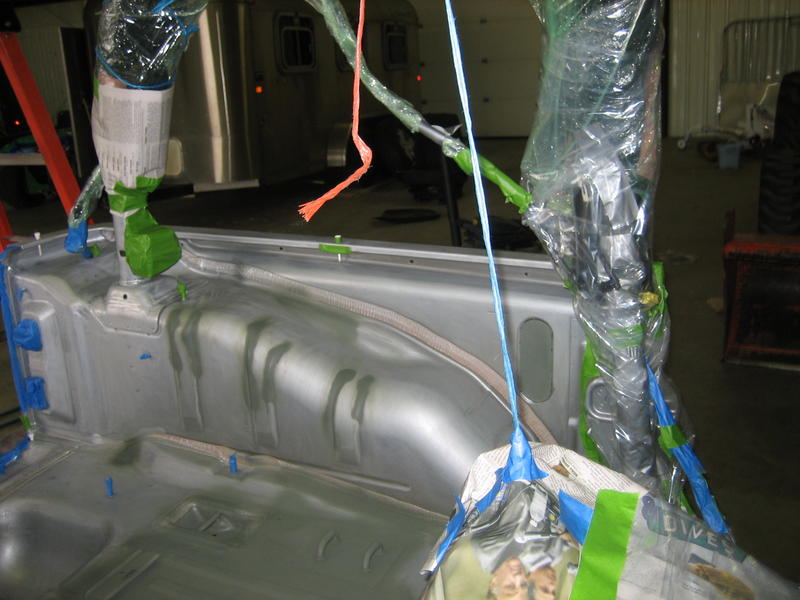
To do the top rail I masked very tight the bolts that hold the hard top on(see above-taped in green). The rear bolt I slid out. Later I had no problem putting those back ones back in, or installing my hard top.
Also I put some masking (green tape) underneath where the soft top attaches(hard plastic tucks in).
When the hard top is on the top rail is totally covered. It basically over laps it so I don't think you would run into any leak issues unless you went crazy at the seam with a pressure washer. Even then I would doubt you could get more than a drop in.
This wire that runs to the tail light can be disconnected. To remove the tail light just undo the 2 inner most screws (top and bottom). The outside screws just hold on a trim piece.
Where I masked the roll-bar to here was a bit low. I would take it up about another 2 inches. Where I did it comes out to be almost exactly where the roll-bar cover ends.

RAPTOR OVERSPRAY
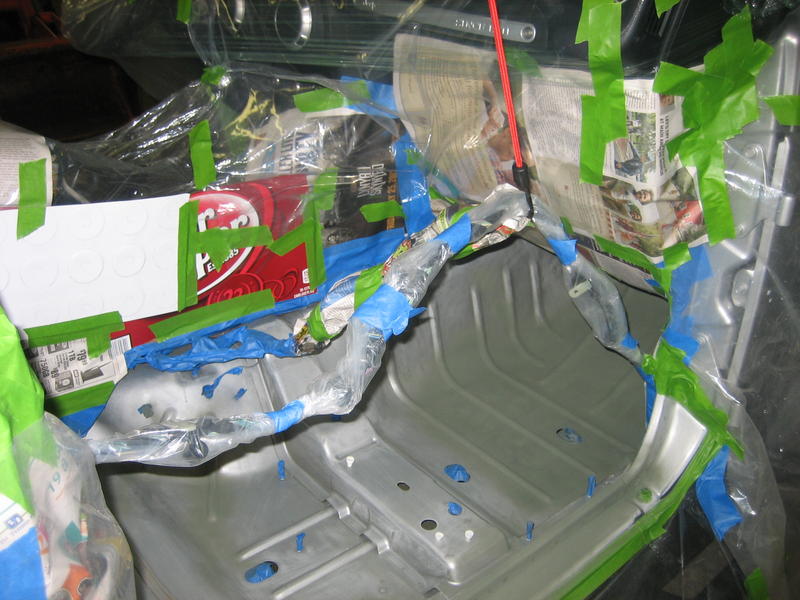
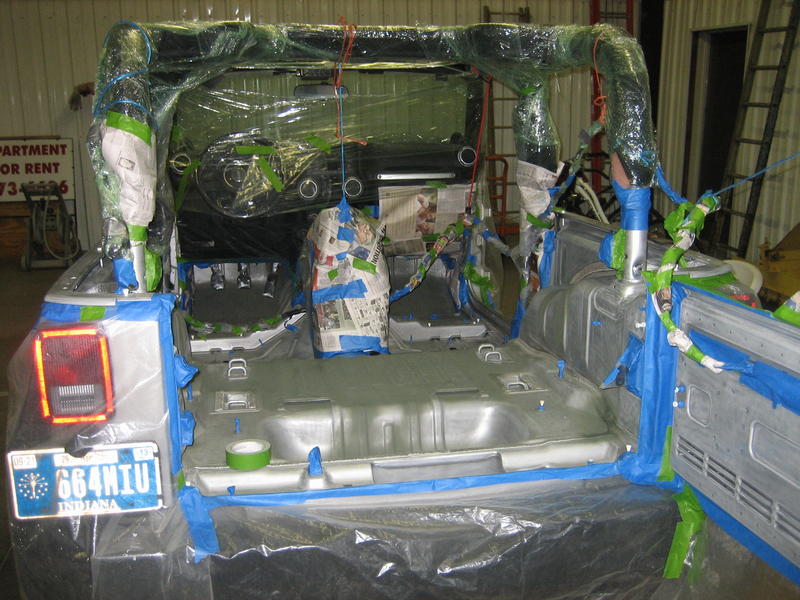
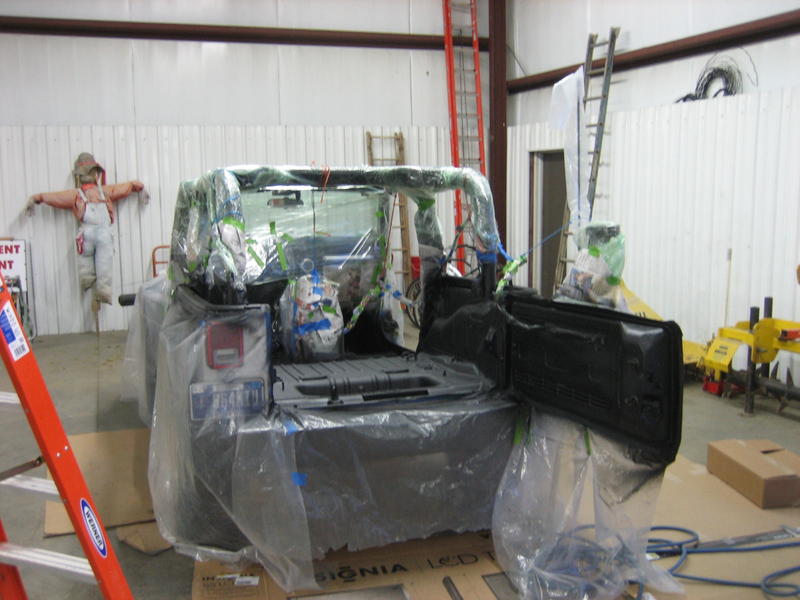
The overspray was about like a rattle can or less. Not really all that bad. It doesn't hover in the air. I would put a cover over all the paint anyways, dash, and half way up the roll bar. There is very little chance it would get up by the speaker bar. I would recommend using plastic drop cloths for the big areas. They have them at lowes you can get in 9X12 in 3 packs ($5.50). While I had some plastic to use, I would think about 2 of those 3 packs would cover most of the big areas. Cutting up trash bags would probably work better then tons of newspaper that take a lot of tape to apply.
There really wasn't a whole lot of overspray as you can see from these picture

U-POL Raptor
SUPPLIES
[TABLE="class: grid, width: 400, align: left"]
[TR]
[TD]U-Pol Raptor w/gun[/TD]
[TD]$121.00[/TD]
[TD]TP Tools and Equipment[/TD]
[/TR]
[TR]
[TD]�” Wire Loom 10’[/TD]
[TD]$5.00[/TD]
[TD]Auto-Zone[/TD]
[/TR]
[TR]
[TD]1” Black Plug(2)[/TD]
[TD]$1.40[/TD]
[TD]Lowes[/TD]
[/TR]
[TR]
[TD]Self Etching Primer - for any bare metal areas[/TD]
[TD]$6.00[/TD]
[TD]Lowes[/TD]
[/TR]
[TR]
[TD]Acetone - Cleans gun and preps surface[/TD]
[TD]7.48[/TD]
[TD]Home Depot[/TD]
[/TR]
[TR]
[TD]2” Painter Tape[/TD]
[TD]$6.27[/TD]
[TD]Home Depot[/TD]
[/TR]
[TR]
[TD]6 Rubber Gloves[/TD]
[TD]$2.00[/TD]
[TD]Home Depot[/TD]
[/TR]
[TR]
[TD]Rustolum Beadliner spray paint - Good for getting the tricky footwell area covered well[/TD]
[TD]$7.47[/TD]
[TD]Home Depot[/TD]
[/TR]
[TR]
[TD]Female quick connector nipple for sprayer[/TD]
[TD]$1.58[/TD]
[TD]Home Depot[/TD]
[/TR]
[TR]
[TD]Mask with charcoal filtering[/TD]
[TD]$4.47[/TD]
[TD]Home Depot[/TD]
[/TR]
[TR]
[TD]JB Cold Weld to plug the hole behind the b-pillar (2dr only)[/TD]
[TD]$5.27[/TD]
[TD]Home Depot[/TD]
[/TR]
[TR]
[TD]12”X18” Sheet metal 26G - Also for the hole[/TD]
[TD]$5.00[/TD]
[TD]Home Depot[/TD]
[/TR]
[TR]
[TD]Med Sand Sponge(worthless)[/TD]
[TD]$3.27[/TD]
[TD]Home Depot[/TD]
[/TR]
[TR]
[TD]3M Med 120 Sandpaper 3 sheets[/TD]
[TD]$4.00[/TD]
[TD]Lowes[/TD]
[/TR]
[TR]
[TD].7 mil plastic drop cloth 9X12 3 pack[/TD]
[TD]$5.50[/TD]
[TD]Lowes[/TD]
[/TR]
[TR]
[TD]6 Push in plastic Christmas tree plugs (Ford type)[/TD]
[TD]$2.07[/TD]
[TD]Lowes[/TD]
[/TR]
[TR]
[TD]1 Glass Measuring Cup (for measueing hardener)[/TD]
[TD]$3.00[/TD]
[TD]Target[/TD]
[/TR]
[TR]
[TD]Roll of Drawer Liner (like a yoga mat) to stop front floor mats from sliding around without the carpet clips[/TD]
[TD]$5.50[/TD]
[TD]Menards[/TD]
[/TR]
[TR]
[TD]TOTAL SPENT[/TD]
[TD]$196.28[/TD]
[TD][/TD]
[/TR]
[/TABLE]
Things I didn’t need to get
-Air compressor
-Breaker Bar 18mm 6pt socket for seats
-Needle nose pliers
-Wooden Spoon – Helped pry out plastic pieces
-Radio – your going to be spending a lot of time on this
-Torx set up to size T50 size T30 got a good workout
-Heat Gun (or torch) and a few small putty knives for removing goop
- Pallet Shrink Wrap Plastic
-Funnel for poring in the hardener
-Flash Light for checking coverage after first coat
-Golf Tee’s for filling holes (some people use ear plugs)
THINGS LEARNED
-There wasn’t a problem removing standard paint tape 3 hours after I started spraying, even in areas where it was truly being used to mask a paint line like on the door sill.
-You can get small amount of overspray off the clear coat with acetone pretty easy in the first hour. I even got some off after about one and a half days
-Don’t pour the little bit that is left over from the first bottle into the new one or it will likely overflow through the vent hole after you put the tube in
-On the back gate there were a few places where it needed to be taped into a recess and then trimmed around the edges. It’s a good idea to put a �” fold before taping to be able to pull it out after masked.
-Trying to get a certain spot with just a quick blast is prone to it going on to thick. Try to start spraying with the tip more than a foot away from the surface and sweep in for those touch up spots
-If you use black it has a couple of advantages. You can get a can of spray paint bed liner and spray the foot well areas real good before you spray the Raptor. Also you can do minor touch-ups with spray on bed-liner or a permanent marker.
- It’s good to have a flash light to get a better view.
-45 minutes to an hour after your done spraying remove all the masking and then let it sit for 6-12 hours if you can. It’s a bit too pliable and soft to really start installing stuff. I had some come off installing some of the plastic seatbelt covering.
-If you’re using a wire loom (vs. splicing the wires and running them up the roll bar) then put it on before installing it with the push plugs. I was way too excited to see it all put together and it wasn’t able to notch around the ties and it was harder to get on in spots.
-Make sure you have a good spot to hold the sprayer upright when your mixing your next bottle.
-1/4 cup of acetone sprayed though the gun will clean it out
-Use a colored permanent marker to trace around the floor plastic pieces so that you know where you need to spray too. Take note of how far in you need to go around the b-pillar seat belt plastic piece area.
-Work inside out. Try not to paint the top rail until last because your hand likes to go up there when you’re spraying.
-You can use a heat gun to prep the carpeted door over the jack to match the texture of the liner. I would be careful not to over do it because I think it is used for the hinge. If I was to do it again I wouldn’t have used the heat gun on the areas that secure it. Also do it from a distance and slowly work it so that you don’t get lines in it from parts being more melted. It will really soak up the bedliner.
-It is a rather thin coating. It’s about the thickness of a T-Shirt, or 2 credit cards stacked, an will not cover up or fill in many cracks. It should cover up all but the deepest scratches.
-I did a lot of touching up with the rattle can after the first coat. If I was to do it again I think I would have rattle can sprayed all the hard areas with a good coat before even starting with the Raptor. So that would be deep in the foot wells, under the cracks of the center console, a quick shot on the underside of the loops for the rear seat, in the jack area, the vertical surfaces that are under the front seats. The only thing that really worries me about the rattle can stuff is if it is UV color safe though I think Rustoleum is. Duplicolor bedliner will fade for sure. Another thing about the rattle can stuff is that it is much more abrasive and wouldn't lend itself to being wipe with a towel for cleaning as well.
-Since spraying my Jeep I have found that a red scotch bright pad works very well for removing the clear coat. I found one at a hardware store.
GOOD WEB THREADS AND NOTES I TOOK FROM THEM
LINK--> https://www.jk-forum.com/forums/jk-w...-liner-145214/
WRM-Anything that's going to be lined needs to be scuffed to promote adhesion of the liner material. I'm sure there's several ways to do it, but I wet-sanded everything with medium-grit sanding sponges. Once that was done, I wiped down the interior with isopropyl alcohol to remove all dirt, dust and oil.
Notes:
1. To make it easier on yourself, make sure you've got an entire weekend to do this. You could probably get it done in a full day, but it'd be a big rush and you'll likely cut some corners that you'd regret later.
2. Mask, mask, mask! I can't stress this enough. Maybe if you're jeep is black to begin with, this might not be such an issue.
3. Someone there to help would be beneficial. They could mix up the next bottle when you feel you're running low, help check for missed/light spots in the liner, fetch beers, etc.
4. Blue painter's tape is an EXACT color match for Surf Blue. Makes it difficult sometimes to determine if an area has been masked already or not...
________________________________________
DOOR SILLS DONE - https://www.jk-forum.com/forums/jk-w...4/#post1869175
________________________________________
WRM-Other than what I've mentioned, here are the only other tips: (most are common sense stuff, but it's too easy to forget...).
Once the bottle of liner is screwed onto the gun, don't shake the bottle (to maybe mix it up a little more, or to get more material out of a nearly empty can) or tilt a nearly full bottle; there's vent holes in the gun near where the bottle screws on, and that black goo will ooze out of those holes and cover your hands.
Which brings me to my next point: WEAR RUBBER GLOVES when spraying. This stuff WON'T come off no matter what you use. FYI, it takes approx. 5-7 days for the dried liner material to "wear" off of your hands.
When you feel your bottle getting low, try to spray a little of the area under the driver's pedals. It'll take some weird angles and tilting of the gun, and you don't want to do that with a full bottle (leaking mentioned above).
For masking, get one roll of the narrow blue painter's tape (1") and 2-3 rolls of the wider rolls (2-3"). It'll make the masking go quicker. It wouldn't hurt to pick up a small roll of masking paper from a painting store either, unless you've got a bunch of newspapers lying around.
________________________________________
Originally Posted by jonnyringo893 -hey im still prepping mine right now and was wondering if you guys removed the rubber cement looking stuff that lines the edges of the tub?
-WRM I removed mine, but have been told since that it's a wise idea to either leave that stuff on, or remove it and then re-seal those areas (using less silicone to make it look nicer). Supposedly, it's there to protect the seam, which isn't otherwise protected against corrosion.
________________________________________
WRM It sticks to plastic REALLY well; make sure to mask off (or remove) your center console....
________________________________________
Originally Posted by HDGreyrider
Took the back seats out. 14" breaker bar and a 18mm 1/2 inch ratchet.
I bought an impact gun, but it couldn't budge them. I musta been doing something wrong.
________________________________________
HDGreyrider-Thanks, Yeah time consuming but worth it.
Carpet out 30 mins
Remove sound material 90 mins
Seats, moldings out 3 hours
splice wires 3 hours
Sanding cleaning 90 minutes
Taping off 2 1/2 hours
Painting 30 minutes per coat with 60 minute flash time 3 hours
3 Hour dry time
Seats and molding back in 2 hours
I ball park it at about 20 hours total I spent working on this.
I carefully put the seats back in last night using cardboard to avoid
scraping the material back off.
________________________________________
Hook-Em - I decided to email U-Pol and get some more details regarding the application of this stuff. One reason is because I am interested in getting a very fine texture, similar to the texture of the plastic components on the Jeep. I am considering lining my painted fender flares in color-match Raptor Liner along with my tub, and I don't want a course finish, particularly on the flares.
I do know that the texture is dependent upon the pressure. However, I don't know what size tank they recommend or what flow rate. I have received one reply from them, but they unfortunately it left out the tank size. I will post up their recommendations once they are all received. Thus far though I know the following:
Recommended pressure range- 40-70 psi.
Lower pressures (40 psi) would be yield a courser texture, while higher pressures (70 psi) would yield a finer texture.
Distance and speed across the work surface will effect texture also.
Shooting above 70 psi will result in the product bouncing off the surface. This means wasted material.
Flow rate - The Shutz gun will consume 5.5 cfm @ 85 psi, less at a lower pressure.
Happy Raptoring y'all!
________________________________________
The_Yeti -I got everything sprayed on sunday and it looks really sharp. I ended up wasteing about 1/4 of a bottle because the tip of the gun got jammed up and i did not have any acitone to clean it quickly.
________________________________________
Masking https://www.jk-forum.com/forums/jk-w...1/#post2537210
LINK--> https://www.jk-forum.com/forums/jk-w...r-blue-157693/
Mark9998-Talks about splicing wires and taking them up the roll bar
Mark9998-The only thing to watch out for that others have mentioned as well is there is a breather hole in the top of the gun, so when the bottle is full and you are tipping it be careful not to let the mixture leak out that hole and into your tub (and all over your hands). It happen to me a few times but nothing too bad. I started just plugging that hole with a rag when I was tipping the bottle
Mark9998-Also, wear rubber gloves or some sort of gloves!! I had some on so no issue for me, but my dad was helping me with everything and didnt and got it all over his hands and had a heck of a time getting it off.
Bigge -I set mine between 50-60 psi. I think that's what's recommended. I used a 12 gallon compressor and it kept up fine
Mark9998-1 year later still holding up great, looks brand new when I clean it out with some water
Mark9998-I will say for the back it makes it kinda slick, stiff tends to slide around. I wanna put a rubber mat in the back for this reason, just trying to find one that doesnt have the little pokey things that stick into the carpet, they all seem to have that since they are designed to sit on carpets
Tippittrg -You could go to home depot or any other hardware store and buy some non-slip shelf liner to put between the floor mats and floor to keep them from sliding around. Doesn't help with mud and stuff getting through the hole, but at least stops movement. For the hole, I wold plug it with a small dowel, then spray the whole underside with more bedliner. Plug would be closed off and would also cut down on the mat slipping. Just a thought.
LINK--> https://www.jk-forum.com/forums/jk-s...ner-jk-236549/
He does the roll cage
vulcan classic - No need to mask drain holes...I used ear plugs to fill the seat and seatbelt bolt holes and used masking tape on any screw holes where needed.
I recommend doing it outside for ventilation...
I stood in the Jeep to spray tops of sound bar and roll bars first, then tailgate, then front footwells (PITA!), then rear fenders and cargo area and bottom of sound/roll bars and side pillars, then front seat areas, and then spray door sills last.
vulcan classic - When you buy the UPOL kit, it comes with 4 750mL bottles of liner and a liter of hardener (plus the spray gun); you add 1/4 (250mL) of hardener to each bottle of liner, shake the piss out of it for 2-3 minutes, LOL! and spray away! I was able to get two good solid coats of everything. Just be patient. and don't overspray on the first coat, or it tends to gloss up. I also bought a can of Rustoleum spray in bed liner for touch-up of some of my oversprayed spots and the harder to reach areas. It sprays very glossy (Rustoleum) but dries up flat and matches pretty good. The foot wells are a PITA! since its dark down under there and pedals get in the way, plus the liner drips from the vent hole on the gun so try to use up some of the bottle before the need to tip the gun/bottle sideways, etc.
Good luck! It's pretty easy once you get going.
I would suggest you start with the roll bars and sound bar first if you choose to spray them, so you can stand in the Jeep to do so; then spray the tailgate; then move up to front to hit the footwells since your bottle will be half empty by then and you can tip it if needed, then do the tub, and finally the door sills last so your compressor hose doesnt hit it. (Doh!!) You can apply a good first coat with first two bottles to everything and get good results. Let it cure for 30-45 minutes and hit everything again. You can also buy individual bottles of liner (750ml) and small can of hardener if you think you want it heavier or need more coverage.
I made the mistake of overspraying with the first two bottles so the last two bottles went quick trying to even it all out
vulcan classic …I sprayed the seat mounting points and seat release bar/catch works fine!
LINK--> https://www.jk-forum.com/forums/jk-w...ite-up-135535/
joedizzy - …
I wanted to give one helpful tip to anyone about to do this based off of my experience I had with mixing the hardener and bed liner. Make sure when you are adding the hardener to the bottles to be diligent about not getting any hardener on the outside of the bottle near the cap. In the time it takes you to spray one bottle the hardener will react with the plastic bottle and basically glue itself to the gun. When that happened to me I wrenched on the bottle and eventually got it to come loose (breaking the feeder tube of the gun in the process) If that does happen to you don't panic like i did and throw things around. If it does happen, I taped the tube together with duct tape and it held up for the other 2 coats thankfully.
SCUFF PAINT
I used 120 grit sand paper. I tried one of the sponge sand pads and it was trash. I wouldn't use sand paper lower then 100. You don't want to go down to bare metal if you can help it. You want to get rid of all the shiny clear coat and then stop. The factory primer the best surface you can paint on. You can use a higher grit but it will take all day. Another option is to get a red scotch-brite pad. *I ended up finding them at Ace hardware after I was done spraying. I used them later when bedlineing my grill and they worked great.
If you do go down to bare metal use one coat of self-etching primer spray. Try to keep it mostly on the metal. The etcher part isn't great on paint. I found that out after I sprayed mine.
I just used a bungee to keep the wire out of the way. Some people have disconnected it back by the tail light that lets you put it out of the way a bit more. Plus then you don't have to mask all that wire.
I was going to remove the center console but I found out you have to remove the shifter knobs (LINK tips for removing the center console). I ended up taking off a pannel on the back of the center console and removing the 2 - T30 bolts near the back. That allowed me to hoist up the back about an inch to spray under there. If your going to totally remove the console there is no good reason to take this panel off.
You can see I used some golf tees here to fill holes. I have also hear of ear plugs being used. For the gas pedals you might want to use the sacks sliced bread comes in. Probably a plastic groceries sack would work well too tapped tight. I had some skinny bags my soft-top shipped with.
TOP RAIL
To do the top rail I masked very tight the bolts that hold the hard top on(see above-taped in green). The rear bolt I slid out. Later I had no problem putting those back ones back in, or installing my hard top.
Also I put some masking (green tape) underneath where the soft top attaches(hard plastic tucks in).
When the hard top is on the top rail is totally covered. It basically over laps it so I don't think you would run into any leak issues unless you went crazy at the seam with a pressure washer. Even then I would doubt you could get more than a drop in.
This wire that runs to the tail light can be disconnected. To remove the tail light just undo the 2 inner most screws (top and bottom). The outside screws just hold on a trim piece.
Where I masked the roll-bar to here was a bit low. I would take it up about another 2 inches. Where I did it comes out to be almost exactly where the roll-bar cover ends.
RAPTOR OVERSPRAY
The overspray was about like a rattle can or less. Not really all that bad. It doesn't hover in the air. I would put a cover over all the paint anyways, dash, and half way up the roll bar. There is very little chance it would get up by the speaker bar. I would recommend using plastic drop cloths for the big areas. They have them at lowes you can get in 9X12 in 3 packs ($5.50). While I had some plastic to use, I would think about 2 of those 3 packs would cover most of the big areas. Cutting up trash bags would probably work better then tons of newspaper that take a lot of tape to apply.
There really wasn't a whole lot of overspray as you can see from these picture
U-POL Raptor
SUPPLIES
[TABLE="class: grid, width: 400, align: left"]
[TR]
[TD]U-Pol Raptor w/gun[/TD]
[TD]$121.00[/TD]
[TD]TP Tools and Equipment[/TD]
[/TR]
[TR]
[TD]�” Wire Loom 10’[/TD]
[TD]$5.00[/TD]
[TD]Auto-Zone[/TD]
[/TR]
[TR]
[TD]1” Black Plug(2)[/TD]
[TD]$1.40[/TD]
[TD]Lowes[/TD]
[/TR]
[TR]
[TD]Self Etching Primer - for any bare metal areas[/TD]
[TD]$6.00[/TD]
[TD]Lowes[/TD]
[/TR]
[TR]
[TD]Acetone - Cleans gun and preps surface[/TD]
[TD]7.48[/TD]
[TD]Home Depot[/TD]
[/TR]
[TR]
[TD]2” Painter Tape[/TD]
[TD]$6.27[/TD]
[TD]Home Depot[/TD]
[/TR]
[TR]
[TD]6 Rubber Gloves[/TD]
[TD]$2.00[/TD]
[TD]Home Depot[/TD]
[/TR]
[TR]
[TD]Rustolum Beadliner spray paint - Good for getting the tricky footwell area covered well[/TD]
[TD]$7.47[/TD]
[TD]Home Depot[/TD]
[/TR]
[TR]
[TD]Female quick connector nipple for sprayer[/TD]
[TD]$1.58[/TD]
[TD]Home Depot[/TD]
[/TR]
[TR]
[TD]Mask with charcoal filtering[/TD]
[TD]$4.47[/TD]
[TD]Home Depot[/TD]
[/TR]
[TR]
[TD]JB Cold Weld to plug the hole behind the b-pillar (2dr only)[/TD]
[TD]$5.27[/TD]
[TD]Home Depot[/TD]
[/TR]
[TR]
[TD]12”X18” Sheet metal 26G - Also for the hole[/TD]
[TD]$5.00[/TD]
[TD]Home Depot[/TD]
[/TR]
[TR]
[TD]Med Sand Sponge(worthless)[/TD]
[TD]$3.27[/TD]
[TD]Home Depot[/TD]
[/TR]
[TR]
[TD]3M Med 120 Sandpaper 3 sheets[/TD]
[TD]$4.00[/TD]
[TD]Lowes[/TD]
[/TR]
[TR]
[TD].7 mil plastic drop cloth 9X12 3 pack[/TD]
[TD]$5.50[/TD]
[TD]Lowes[/TD]
[/TR]
[TR]
[TD]6 Push in plastic Christmas tree plugs (Ford type)[/TD]
[TD]$2.07[/TD]
[TD]Lowes[/TD]
[/TR]
[TR]
[TD]1 Glass Measuring Cup (for measueing hardener)[/TD]
[TD]$3.00[/TD]
[TD]Target[/TD]
[/TR]
[TR]
[TD]Roll of Drawer Liner (like a yoga mat) to stop front floor mats from sliding around without the carpet clips[/TD]
[TD]$5.50[/TD]
[TD]Menards[/TD]
[/TR]
[TR]
[TD]TOTAL SPENT[/TD]
[TD]$196.28[/TD]
[TD][/TD]
[/TR]
[/TABLE]
Things I didn’t need to get
-Air compressor
-Breaker Bar 18mm 6pt socket for seats
-Needle nose pliers
-Wooden Spoon – Helped pry out plastic pieces
-Radio – your going to be spending a lot of time on this
-Torx set up to size T50 size T30 got a good workout
-Heat Gun (or torch) and a few small putty knives for removing goop
- Pallet Shrink Wrap Plastic
-Funnel for poring in the hardener
-Flash Light for checking coverage after first coat
-Golf Tee’s for filling holes (some people use ear plugs)
THINGS LEARNED
-There wasn’t a problem removing standard paint tape 3 hours after I started spraying, even in areas where it was truly being used to mask a paint line like on the door sill.
-You can get small amount of overspray off the clear coat with acetone pretty easy in the first hour. I even got some off after about one and a half days
-Don’t pour the little bit that is left over from the first bottle into the new one or it will likely overflow through the vent hole after you put the tube in
-On the back gate there were a few places where it needed to be taped into a recess and then trimmed around the edges. It’s a good idea to put a �” fold before taping to be able to pull it out after masked.
-Trying to get a certain spot with just a quick blast is prone to it going on to thick. Try to start spraying with the tip more than a foot away from the surface and sweep in for those touch up spots
-If you use black it has a couple of advantages. You can get a can of spray paint bed liner and spray the foot well areas real good before you spray the Raptor. Also you can do minor touch-ups with spray on bed-liner or a permanent marker.
- It’s good to have a flash light to get a better view.
-45 minutes to an hour after your done spraying remove all the masking and then let it sit for 6-12 hours if you can. It’s a bit too pliable and soft to really start installing stuff. I had some come off installing some of the plastic seatbelt covering.
-If you’re using a wire loom (vs. splicing the wires and running them up the roll bar) then put it on before installing it with the push plugs. I was way too excited to see it all put together and it wasn’t able to notch around the ties and it was harder to get on in spots.
-Make sure you have a good spot to hold the sprayer upright when your mixing your next bottle.
-1/4 cup of acetone sprayed though the gun will clean it out
-Use a colored permanent marker to trace around the floor plastic pieces so that you know where you need to spray too. Take note of how far in you need to go around the b-pillar seat belt plastic piece area.
-Work inside out. Try not to paint the top rail until last because your hand likes to go up there when you’re spraying.
-You can use a heat gun to prep the carpeted door over the jack to match the texture of the liner. I would be careful not to over do it because I think it is used for the hinge. If I was to do it again I wouldn’t have used the heat gun on the areas that secure it. Also do it from a distance and slowly work it so that you don’t get lines in it from parts being more melted. It will really soak up the bedliner.
-It is a rather thin coating. It’s about the thickness of a T-Shirt, or 2 credit cards stacked, an will not cover up or fill in many cracks. It should cover up all but the deepest scratches.
-I did a lot of touching up with the rattle can after the first coat. If I was to do it again I think I would have rattle can sprayed all the hard areas with a good coat before even starting with the Raptor. So that would be deep in the foot wells, under the cracks of the center console, a quick shot on the underside of the loops for the rear seat, in the jack area, the vertical surfaces that are under the front seats. The only thing that really worries me about the rattle can stuff is if it is UV color safe though I think Rustoleum is. Duplicolor bedliner will fade for sure. Another thing about the rattle can stuff is that it is much more abrasive and wouldn't lend itself to being wipe with a towel for cleaning as well.
-Since spraying my Jeep I have found that a red scotch bright pad works very well for removing the clear coat. I found one at a hardware store.
GOOD WEB THREADS AND NOTES I TOOK FROM THEM
LINK--> https://www.jk-forum.com/forums/jk-w...-liner-145214/
WRM-Anything that's going to be lined needs to be scuffed to promote adhesion of the liner material. I'm sure there's several ways to do it, but I wet-sanded everything with medium-grit sanding sponges. Once that was done, I wiped down the interior with isopropyl alcohol to remove all dirt, dust and oil.
Notes:
1. To make it easier on yourself, make sure you've got an entire weekend to do this. You could probably get it done in a full day, but it'd be a big rush and you'll likely cut some corners that you'd regret later.
2. Mask, mask, mask! I can't stress this enough. Maybe if you're jeep is black to begin with, this might not be such an issue.
3. Someone there to help would be beneficial. They could mix up the next bottle when you feel you're running low, help check for missed/light spots in the liner, fetch beers, etc.
4. Blue painter's tape is an EXACT color match for Surf Blue. Makes it difficult sometimes to determine if an area has been masked already or not...
________________________________________
DOOR SILLS DONE - https://www.jk-forum.com/forums/jk-w...4/#post1869175
________________________________________
WRM-Other than what I've mentioned, here are the only other tips: (most are common sense stuff, but it's too easy to forget...).
Once the bottle of liner is screwed onto the gun, don't shake the bottle (to maybe mix it up a little more, or to get more material out of a nearly empty can) or tilt a nearly full bottle; there's vent holes in the gun near where the bottle screws on, and that black goo will ooze out of those holes and cover your hands.
Which brings me to my next point: WEAR RUBBER GLOVES when spraying. This stuff WON'T come off no matter what you use. FYI, it takes approx. 5-7 days for the dried liner material to "wear" off of your hands.
When you feel your bottle getting low, try to spray a little of the area under the driver's pedals. It'll take some weird angles and tilting of the gun, and you don't want to do that with a full bottle (leaking mentioned above).
For masking, get one roll of the narrow blue painter's tape (1") and 2-3 rolls of the wider rolls (2-3"). It'll make the masking go quicker. It wouldn't hurt to pick up a small roll of masking paper from a painting store either, unless you've got a bunch of newspapers lying around.
________________________________________
Originally Posted by jonnyringo893 -hey im still prepping mine right now and was wondering if you guys removed the rubber cement looking stuff that lines the edges of the tub?
-WRM I removed mine, but have been told since that it's a wise idea to either leave that stuff on, or remove it and then re-seal those areas (using less silicone to make it look nicer). Supposedly, it's there to protect the seam, which isn't otherwise protected against corrosion.
________________________________________
WRM It sticks to plastic REALLY well; make sure to mask off (or remove) your center console....
________________________________________
Originally Posted by HDGreyrider
Took the back seats out. 14" breaker bar and a 18mm 1/2 inch ratchet.
I bought an impact gun, but it couldn't budge them. I musta been doing something wrong.
________________________________________
HDGreyrider-Thanks, Yeah time consuming but worth it.
Carpet out 30 mins
Remove sound material 90 mins
Seats, moldings out 3 hours
splice wires 3 hours
Sanding cleaning 90 minutes
Taping off 2 1/2 hours
Painting 30 minutes per coat with 60 minute flash time 3 hours
3 Hour dry time
Seats and molding back in 2 hours
I ball park it at about 20 hours total I spent working on this.
I carefully put the seats back in last night using cardboard to avoid
scraping the material back off.
________________________________________
Hook-Em - I decided to email U-Pol and get some more details regarding the application of this stuff. One reason is because I am interested in getting a very fine texture, similar to the texture of the plastic components on the Jeep. I am considering lining my painted fender flares in color-match Raptor Liner along with my tub, and I don't want a course finish, particularly on the flares.
I do know that the texture is dependent upon the pressure. However, I don't know what size tank they recommend or what flow rate. I have received one reply from them, but they unfortunately it left out the tank size. I will post up their recommendations once they are all received. Thus far though I know the following:
Recommended pressure range- 40-70 psi.
Lower pressures (40 psi) would be yield a courser texture, while higher pressures (70 psi) would yield a finer texture.
Distance and speed across the work surface will effect texture also.
Shooting above 70 psi will result in the product bouncing off the surface. This means wasted material.
Flow rate - The Shutz gun will consume 5.5 cfm @ 85 psi, less at a lower pressure.
Happy Raptoring y'all!
________________________________________
The_Yeti -I got everything sprayed on sunday and it looks really sharp. I ended up wasteing about 1/4 of a bottle because the tip of the gun got jammed up and i did not have any acitone to clean it quickly.
________________________________________
Masking https://www.jk-forum.com/forums/jk-w...1/#post2537210
LINK--> https://www.jk-forum.com/forums/jk-w...r-blue-157693/
Mark9998-Talks about splicing wires and taking them up the roll bar
Mark9998-The only thing to watch out for that others have mentioned as well is there is a breather hole in the top of the gun, so when the bottle is full and you are tipping it be careful not to let the mixture leak out that hole and into your tub (and all over your hands). It happen to me a few times but nothing too bad. I started just plugging that hole with a rag when I was tipping the bottle
Mark9998-Also, wear rubber gloves or some sort of gloves!! I had some on so no issue for me, but my dad was helping me with everything and didnt and got it all over his hands and had a heck of a time getting it off.
Bigge -I set mine between 50-60 psi. I think that's what's recommended. I used a 12 gallon compressor and it kept up fine
Mark9998-1 year later still holding up great, looks brand new when I clean it out with some water
Mark9998-I will say for the back it makes it kinda slick, stiff tends to slide around. I wanna put a rubber mat in the back for this reason, just trying to find one that doesnt have the little pokey things that stick into the carpet, they all seem to have that since they are designed to sit on carpets
Tippittrg -You could go to home depot or any other hardware store and buy some non-slip shelf liner to put between the floor mats and floor to keep them from sliding around. Doesn't help with mud and stuff getting through the hole, but at least stops movement. For the hole, I wold plug it with a small dowel, then spray the whole underside with more bedliner. Plug would be closed off and would also cut down on the mat slipping. Just a thought.
LINK--> https://www.jk-forum.com/forums/jk-s...ner-jk-236549/
He does the roll cage
vulcan classic - No need to mask drain holes...I used ear plugs to fill the seat and seatbelt bolt holes and used masking tape on any screw holes where needed.
I recommend doing it outside for ventilation...
I stood in the Jeep to spray tops of sound bar and roll bars first, then tailgate, then front footwells (PITA!), then rear fenders and cargo area and bottom of sound/roll bars and side pillars, then front seat areas, and then spray door sills last.
vulcan classic - When you buy the UPOL kit, it comes with 4 750mL bottles of liner and a liter of hardener (plus the spray gun); you add 1/4 (250mL) of hardener to each bottle of liner, shake the piss out of it for 2-3 minutes, LOL! and spray away! I was able to get two good solid coats of everything. Just be patient. and don't overspray on the first coat, or it tends to gloss up. I also bought a can of Rustoleum spray in bed liner for touch-up of some of my oversprayed spots and the harder to reach areas. It sprays very glossy (Rustoleum) but dries up flat and matches pretty good. The foot wells are a PITA! since its dark down under there and pedals get in the way, plus the liner drips from the vent hole on the gun so try to use up some of the bottle before the need to tip the gun/bottle sideways, etc.
Good luck! It's pretty easy once you get going.
I would suggest you start with the roll bars and sound bar first if you choose to spray them, so you can stand in the Jeep to do so; then spray the tailgate; then move up to front to hit the footwells since your bottle will be half empty by then and you can tip it if needed, then do the tub, and finally the door sills last so your compressor hose doesnt hit it. (Doh!!) You can apply a good first coat with first two bottles to everything and get good results. Let it cure for 30-45 minutes and hit everything again. You can also buy individual bottles of liner (750ml) and small can of hardener if you think you want it heavier or need more coverage.
I made the mistake of overspraying with the first two bottles so the last two bottles went quick trying to even it all out
vulcan classic …I sprayed the seat mounting points and seat release bar/catch works fine!
LINK--> https://www.jk-forum.com/forums/jk-w...ite-up-135535/
joedizzy - …
I wanted to give one helpful tip to anyone about to do this based off of my experience I had with mixing the hardener and bed liner. Make sure when you are adding the hardener to the bottles to be diligent about not getting any hardener on the outside of the bottle near the cap. In the time it takes you to spray one bottle the hardener will react with the plastic bottle and basically glue itself to the gun. When that happened to me I wrenched on the bottle and eventually got it to come loose (breaking the feeder tube of the gun in the process) If that does happen to you don't panic like i did and throw things around. If it does happen, I taped the tube together with duct tape and it held up for the other 2 coats thankfully.
Last edited by Rooster76; 09-21-2012 at 12:25 PM. Reason: make supplies into a nice table
07-03-2012, 04:49 PM
#4
JK Enthusiast
Thread Starter
I just thought this link might come in handy for someone -->https://www.jk-forum.com/forums/jk-w...2012-a-231369/
There is another good write up about taking off the plastic pieces. https://www.jk-forum.com/forums/jk-w...012-jk-228098/ . The main thing is to find the 10mm bolt that is on both sides by the rear seat belt feeds after removing the small quarter panel.
I would get one of those spray can triggers to save your finger. I don't know if it would hold up as good? Then again you could always just do touch ups super easy. Also will the rattle can stuff fade in the sun? I would rough up the clear coat surface with some medium grit sandpaper or I don't think it will stick very well.
Good Luck
EDIT:: I found a post by Croce who did the rattle can method. Here is a post that shows what it looks like. LINK->https://www.jk-forum.com/forums/modi...0/#post3121171
EDIT X2:: I was doing research about spraying my grill. I found Duplicolor bed liner will fade noticeably. There is pictures on another forum under a thread " Bedlined Front Grille longevity... " I haven't heard anything bad about Rust-Oleum.
EDIT X3:: I sprayed my grill with rustoleum bed liner. I think I will eventually go over it in Raptor because it is so much harder to clean. I read on one thread a guy used 30 cans. That seems like alot but I would think you would need at least 10.
There is another good write up about taking off the plastic pieces. https://www.jk-forum.com/forums/jk-w...012-jk-228098/ . The main thing is to find the 10mm bolt that is on both sides by the rear seat belt feeds after removing the small quarter panel.
Good Luck
EDIT:: I found a post by Croce who did the rattle can method. Here is a post that shows what it looks like. LINK->https://www.jk-forum.com/forums/modi...0/#post3121171
EDIT X2:: I was doing research about spraying my grill. I found Duplicolor bed liner will fade noticeably. There is pictures on another forum under a thread " Bedlined Front Grille longevity... " I haven't heard anything bad about Rust-Oleum.
EDIT X3:: I sprayed my grill with rustoleum bed liner. I think I will eventually go over it in Raptor because it is so much harder to clean. I read on one thread a guy used 30 cans. That seems like alot but I would think you would need at least 10.
Last edited by Rooster76; 09-05-2012 at 05:46 PM. Reason: for images of rattle can tub

Trending Topics
07-06-2012, 05:37 PM
#8
JK Enthusiast
Thread Starter
OTHER OPTIONS I'VE SEEN FOR REMOVING THE GOOP
- I have also heard that a torch will make it into goop and you can just scoop it out. I had one but didn't want to start a fire.
- I have also hear of using paint thinner and or water to soften it up.
- There is a Dremel "Multi-Max" tool with a flat plate that someone had pretty good luck with.
- Someone was saying that you could use dry ice and just hit it with a hammer. I'm not sure if he had actually done it though.
- I would stay away from chiseling or using and real extreme force on it because people have put hole in there tub. The little ridges can be hard to see with all the crap on there.
REMOVING THE SOUND HEAT GOOP
Under the front foot wells and in the back there is some thick goop that looks bad. It is prone to rusting underneath if it has ever been soaked with water. If you choose to remove this it will get pretty hot to the touch up front. About like walking in really hot sand. If you choose to remove it, I found that using a heat gun and a putty knife worked really well at removing the stuff in rather large chunks.
There is also calking that is all over the place. If you remove that you need to replace it with some good silicon to keep the seals water tight.
Here is the passenger footwell. The red line is where the plastic panel covers. I had it off for lineing. The stuff on the floor is what I'm calling goop and the stuff next to the wires would be the calk stuff.

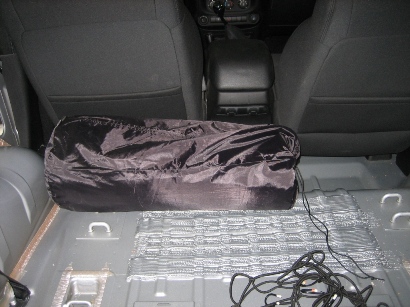
You can see the rear goop here. That is a sleeping bag stuff sack that I use to store my windows rolled in towels.
Under the front foot wells and in the back there is some thick goop that looks bad. It is prone to rusting underneath if it has ever been soaked with water. If you choose to remove this it will get pretty hot to the touch up front. About like walking in really hot sand. If you choose to remove it, I found that using a heat gun and a putty knife worked really well at removing the stuff in rather large chunks.
There is also calking that is all over the place. If you remove that you need to replace it with some good silicon to keep the seals water tight.
Here is the passenger footwell. The red line is where the plastic panel covers. I had it off for lineing. The stuff on the floor is what I'm calling goop and the stuff next to the wires would be the calk stuff.
You can see the rear goop here. That is a sleeping bag stuff sack that I use to store my windows rolled in towels.
http://www.youtube.com/watch?v=Fbb5dD98b5s&feature I'm super glad that I took the leap. It took FOREVER though. It's a major project for sure.
I would try to break it down into chunks if you don't have vacation time to give to it
- First week remove the carpet and the goop
- Then maybe do some sanding another weekend. I really think that it is important to get the clear coat roughed up good for it to last long and not peal off. It takes a good amount of time to really get it done well.
- The masking itself took me about a hole day. I think I over did it being that the over spay isn't all that bad but I would still do it that way again just to be safe. The spraying takes about 3 hours and then removing the masking takes about another 2 or so. I think all this could be done in one day. Then after you get done just try your best to resist the urge to put stuff back in for a day or two. I put my seat in a day after spraying and it knocked off one of the super small bumps. I ended up using a permanent marker spot to cover it up.
Being that it's the summer I have the doors off and the windows out so I really don't know. It's not way more noisy or noticeable to me. Edit: I just put my hardtop back on. I would say that it is a touch more noisy. No were close to as noisy as turning the ac on. Just a bit more engine noise and very faintly I can hear the rear differential. It sound about like someone left an I-pod playing through headphones in the back. It's not real loud but noticeable with windows up, no ac, and no radio.
Would you consider putting carpet back in for winter?
After taking the carpet out it's never going to go back in. It would be really hard but doable. In my opinion you would need to remove the seats. Just vacuuming all the stuff that collected on the carpet (especially dog hair) made me real glad it was out and confirmed I didn't want it back in. I'm dreaming of putting the carpet up on craigslist. I'm pretty sure I could at least get the $200 I spent back from doing the Raptor Liner.
Last edited by Rooster76; 09-20-2012 at 11:56 AM.
07-10-2012, 04:37 PM
#9
JK Newbie
Join Date: Jul 2011
Location: Oklahoma City, OK
Posts: 98
Likes: 0
Received 0 Likes
on
0 Posts
Great thread!!! I really want to do this but I will not have access to an air compressor... I used the duplicolor bedliner on my wheels but I am really not happy with how it has lasted. It is chipping up and seems to have kinda just worn really thin in places. This is probably due to me not properly prepping the plastic, in spite of my background in doing body work at a hot rod shop... I wonder if I could just do plastidip, Leave the "goop" in but still prep and sand the clear coat off? I don't have any experience with plastidip so I don't know how durable it would be in the tub for a long time.
07-10-2012, 11:42 PM
#10
JK Enthusiast
Thread Starter
Great thread!!! I really want to do this but I will not have access to an air compressor... I used the duplicolor bedliner on my wheels but I am really not happy with how it has lasted. It is chipping up and seems to have kinda just worn really thin in places. This is probably due to me not properly prepping the plastic, in spite of my background in doing body work at a hot rod shop... I wonder if I could just do plastidip, Leave the "goop" in but still prep and sand the clear coat off? I don't have any experience with plastidip so I don't know how durable it would be in the tub for a long time.
I sure hope you don't have plastic wheels
 . I think it is super important to prep the surface for paint to stick long term. In places where you go down to bear metal you need to put on some self-etching primer which is what all the olive paint was about on the photos of mine masked up. I had some over spray that I didn't get to for a full day. I'm not sure how I didn't see it. Anyways I was shocked came off of the un-sanded clear coat with just a bit of heavy rubbing and acetone. It made me glad I sanded everything really well to help it stick.
 PLASTI-DIP
I have used plasti-dip once in the past when I tried to do my grill. It left some spots with a different finish texture and I ended up peeling it off except for the logo. I wouldn't recommend it for anything but little things that you might want to change. While it is pretty darn tough, I don't think it would hold up very good as a liner and it is pretty expensive, especiallly being that you need to put a bunch of coats on for it to peel off nice later. I had spots where I didn't get a good thick 3 coats and it was like removing the crappy white residue after you peel off a sticker. Not fun. On another note you don't need to sand for plasti-dip. I would just use isopropyl alcohol or acetone to degrease it real good if you decide to use it somewhere.
WHAT I WOULD RECOMMEND INSTEAD OF PLASTI-DIP
You might be able to rent a compressor?
I did a ton of research before I chose Raptor. I would say your best DIY liner option without a compressor would be Monstaliner. People seem to really like the results. It cost about the same as Raptor and I would guess the project would be in the $200 range or below after it was all said and done. It's a roll on application that gives you a rather smooth surface like an orange. You have to be mindful about how you apply it because it can rather drastically change the texture. It seems pretty simple if you just pay attention to it. They had a thing where they would give you a free quart of there paint-over-rust stuff with there kit. If you don't need that I would call them up and ask for some extra rollers. At least it worked for some other guy without rust issues.
http://www.youtube.com/watch?v=n-CB7sFDxAA]Create Great Texture With Monstaliner Another option would be to buy some matching paint code Spray can stuff (LINK ->MOPAR 82400891 - Mopar� Touch Up Paint 5 oz Spray Can - Quadratec) and touch up the parts that look bad. With out a clear coat it would probably still look a bit weird. Then again under the carpet paint jobs in Jeeps can look really bad.
What ever you do I would stay away from Herculiner. I've heard way more bad stories then good about it (rough texture, fades, really uneven finish, etc).
Last edited by Rooster76; 07-10-2012 at 11:56 PM.

