Installing Cruise Control
 03-02-2009, 05:12 PM
#1
JK Freak
Thread Starter
Hey guys. I know there was another write up by Jake Blues for installing cruise control (https://www.jk-forum.com/forums/show...ontrol+install), and as good as it is.......all the picture links have since been broken so I thought I could help with a refresher.
I just picked up my JK about 2 weeks ago and it is about as bare bones as you can get. Even though I won't be putting a ton of miles on it, I will be using it for commuting during crappy winter weather. My commute is 120 miles a day on the highway so cruise control was an absolute must. So here we go. I picked up the kit from jeepsareus.com from their Ebay store and had it delivered just a few days after I placed the order.
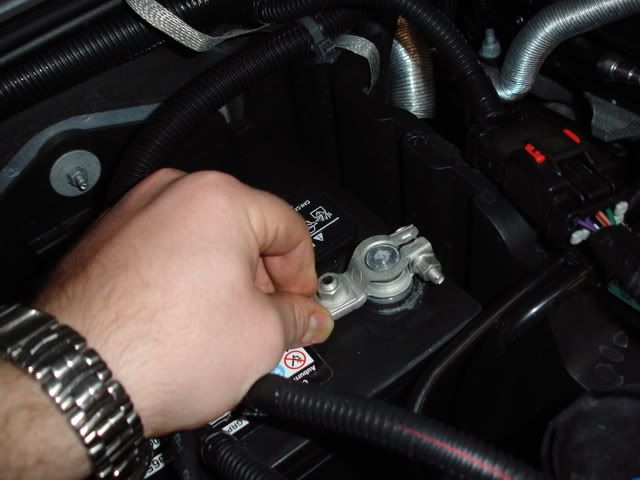
Step #1 Use a 10mm wrench and disconnect the battery's negative terminal. I would suggest laying a rag over the terminal to make sure it doesn't accidentally fall back into place and makes a connection while you are working. MAKE SURE TO GIVE IT A FEW MINUTES TO DISCHARGE THE CAPACITORS IN THE AIR BAG CIRCUIT BEFORE YOU GO TO STEP #2. I believe the directions call for 2 minutes. I work on electronics 40+ hours a week and don't trust them at all. I gave it a good 5-10 minutes. You don't want an accidental deployment of the airbag.......especially if it is sitting in your lap when it goes off.
Step #2 Jump into the drivers seat and lower the tilt steering wheel to its lowest setting

Step #3 The included instructions call for a stubby flat bladed screwdriver. As pointed out in the other thread.......this is actually what you want. It makes removing the airbag a breeze, and that is the hardest part of the install
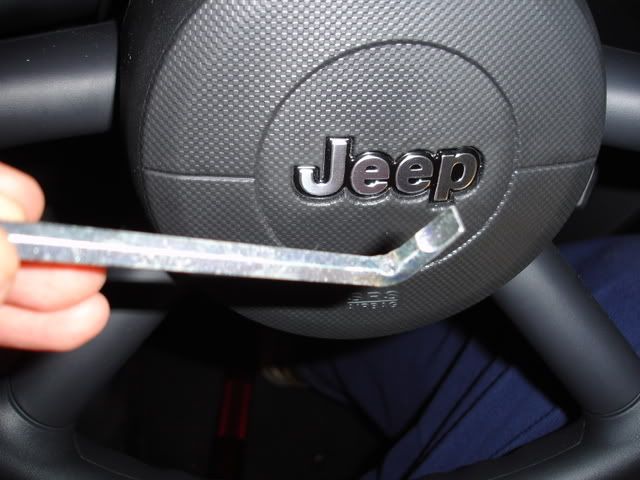
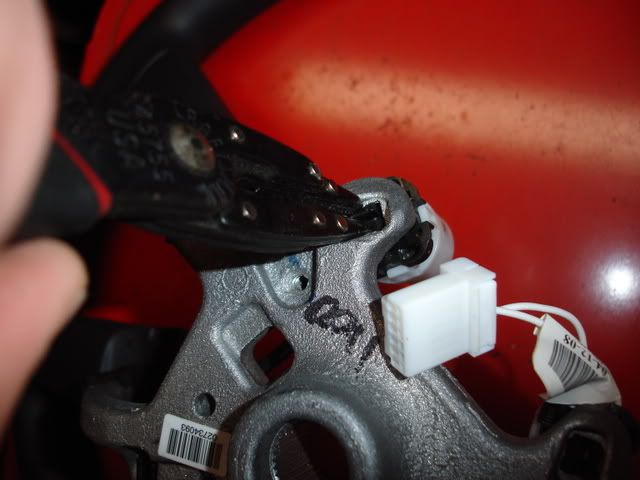
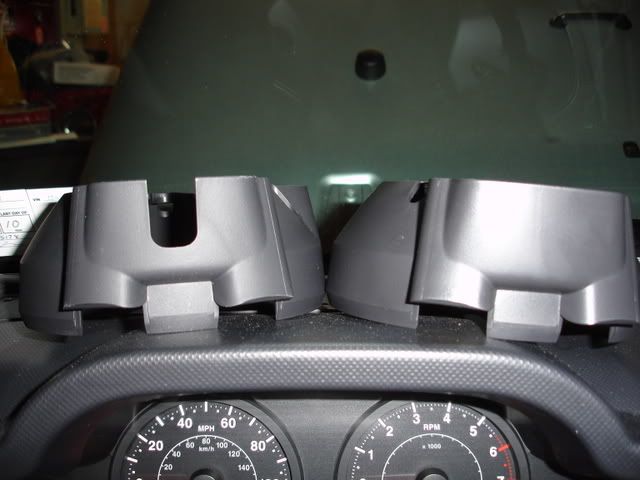
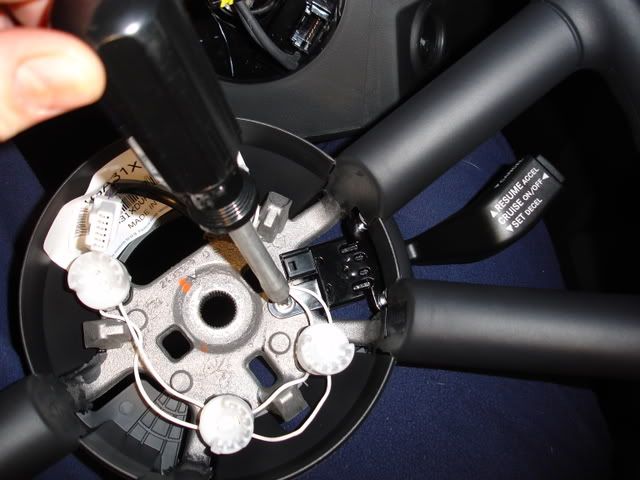
Step #4 Take your handy little S shaped screw driver and find the 3 access holes around the rear of the steering wheel shroud. Slide the screwdriver in until you feel it stop. At this point just just push the screw driver towards the front of the Jeep and you should feel it grab and pop one of the metal loops off their hooks. The next few pics will give a better explanation than I could ever do with words.
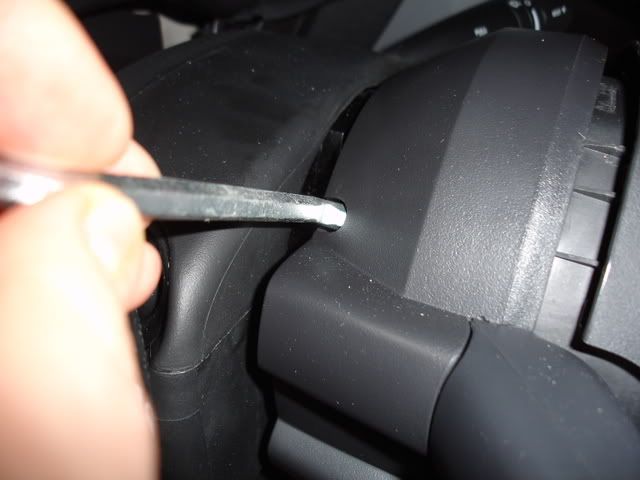
Slide the screwdriver in the access hole
Then pop the metal loops off of the hooks. There are three in total.
The metal hoop in the foreground w/ one of the hooks on the right
followed by a better look at one of the hooks
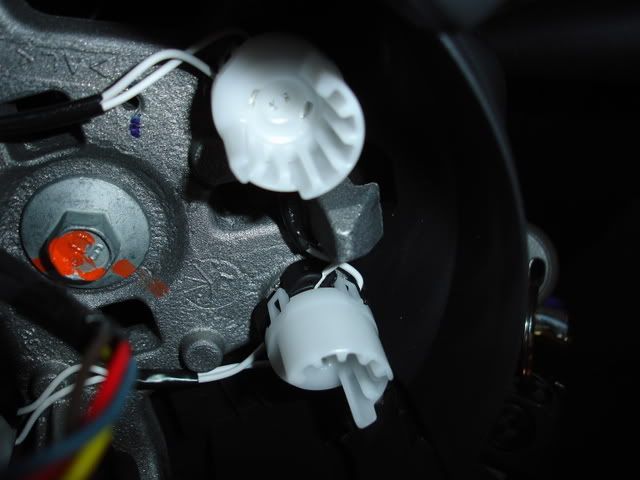
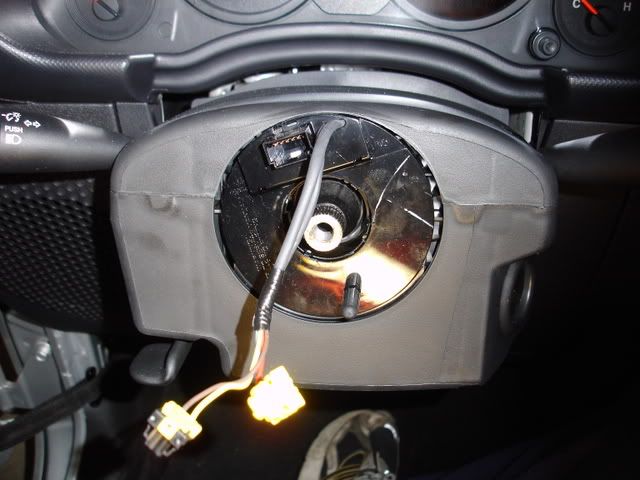
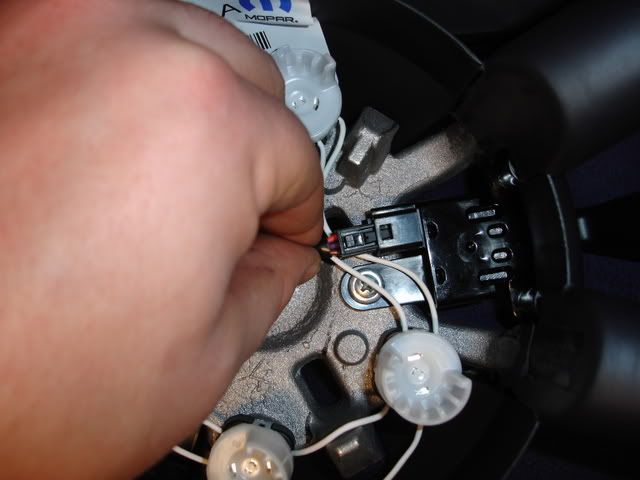
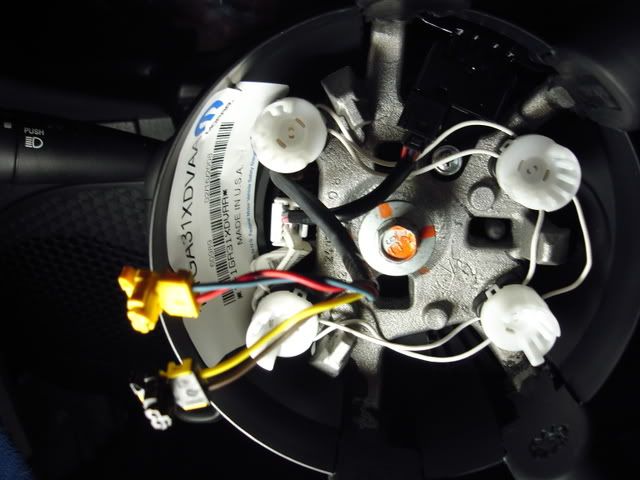
Step #5 Disconnect the two connections to the airbag. ONCE AGAIN, MAKE SURE THE BATTERY HAS BEEN DISCONNECTED FOR A FEW MINUTES BEFORE YOU TOUCH THESE CONNECTIONS. This is also a nice shot of all 3 hoops and hooks that you removed in the previous step
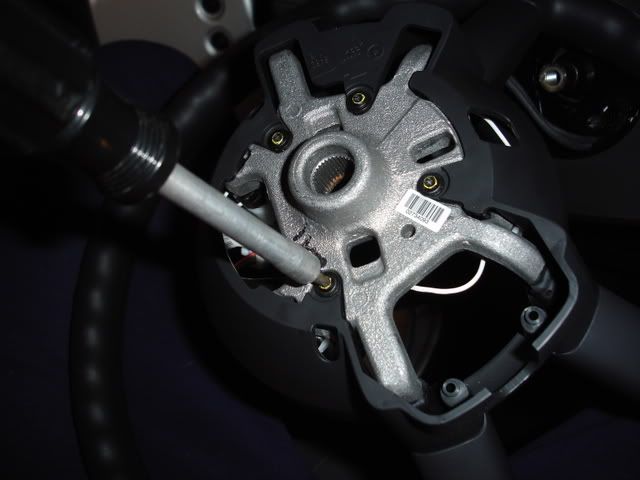
Step #6 Use a 13mm socket and extension to remove the center bolt of the steering wheel.
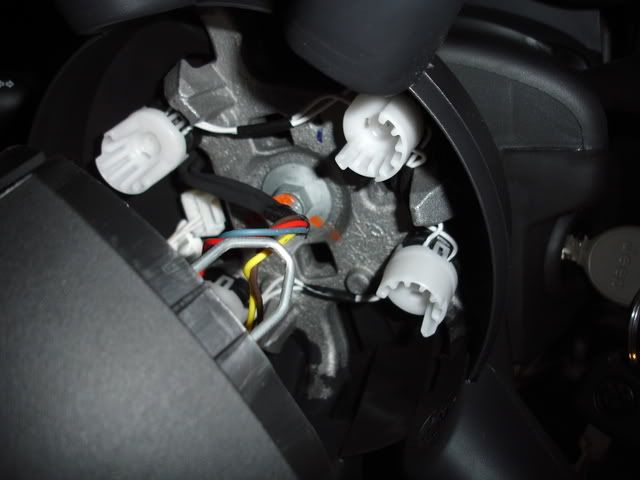
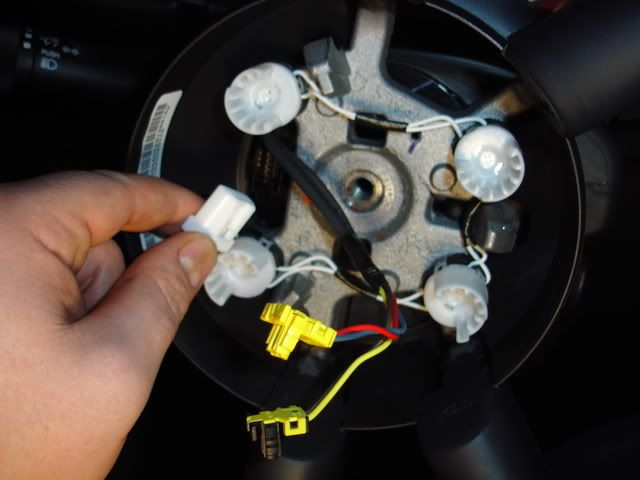
Step #7 Remove the white connector that attaches the horn buttons to the steering column
Step #8 Gently pull the steering wheel towards you. This may take a little wiggle/rocking action to remove the steering wheel from the hub, but by no means should you have to pull hard. If you yank on it, you will most likely either damage one of the wiring harnesses or give yourself a black eye when the steering wheel releases and wacks you in the face.
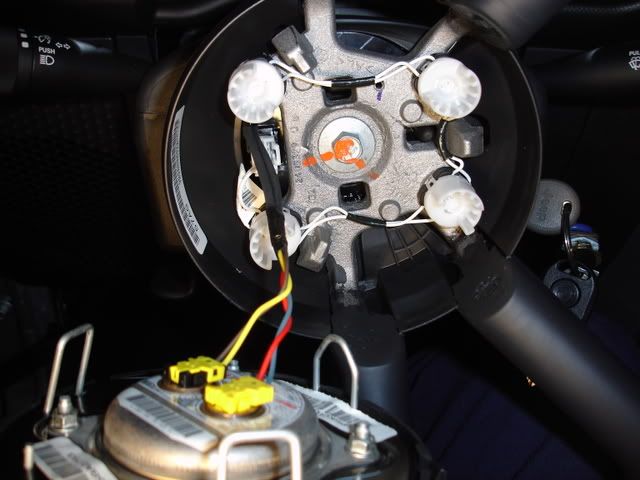
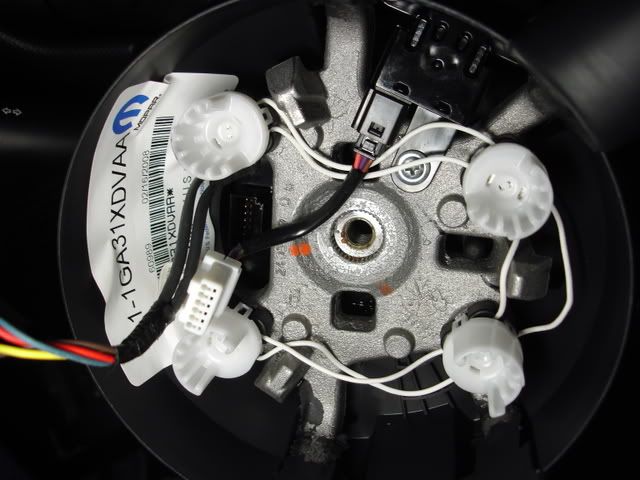
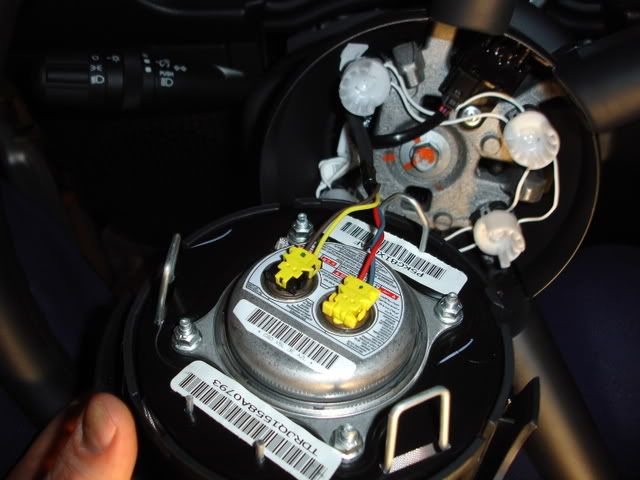
here is a view of the hub once the steering wheel has been removed
Step #9 Flip the steering wheel over and remove the 4 T20 Torx screws in order to remove the plastic shroud from the steering wheel

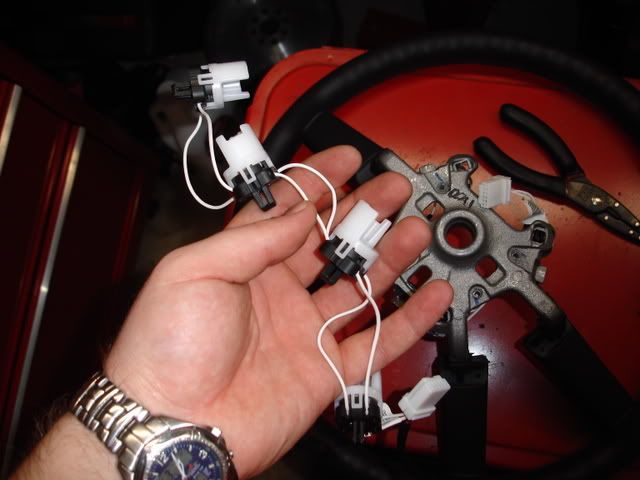
Step #10 Once you have the shroud removed, you should use a pair of needle nose pliers to pinch the backside and remove the horn buttons from the steering wheel. You will be replacing the harness with the new one that is supplied in the kit so take notice to how the wiring is run and the orientation of the horn buttons. Personally, I installed the new harness one horn button at a time as I removed the old one.
Removing the old horn buttons
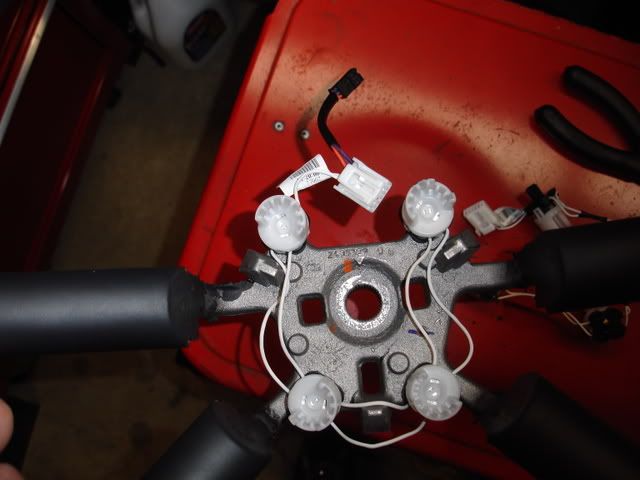
The new harness that comes with the kit. This has an added pigtail that plugs into the cruise control stalk.
The new harness installed. Notice the orientation of the horn buttons and the pigtail in the 12 o'clock position.
Step #11 Installing the new included shroud onto the steering wheel. Here are the new and old shroud side be side. Old on the right, and new on the left. Notice the cutout for the cruise control stalk on the shroud on the left.
Reuse the 4 T20 Torx screws to secure the new shroud to the steering wheel
Step #12 Install the included cruise control stalk onto the steering wheel assembly.
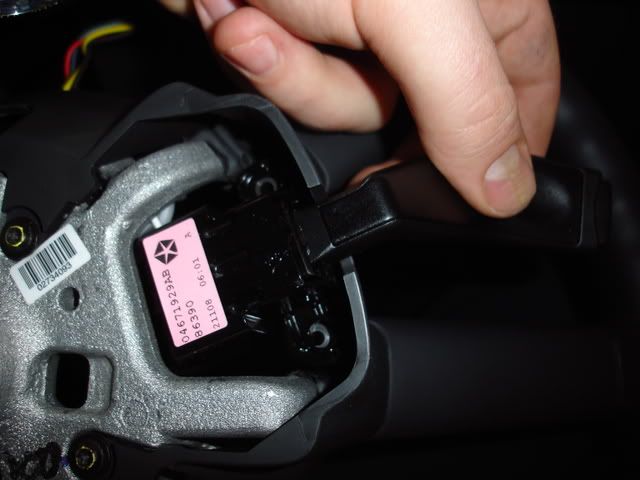
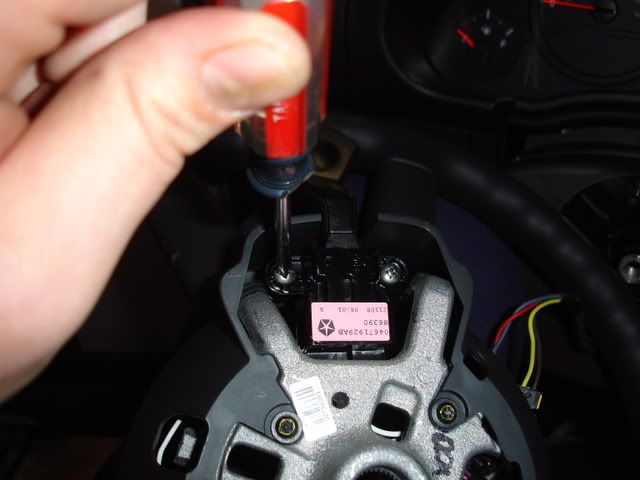
Secure it from the back of the steering wheel using the two small included screws
Flip the steering wheel over and secure the front of the stalk using the remaining included larger screw
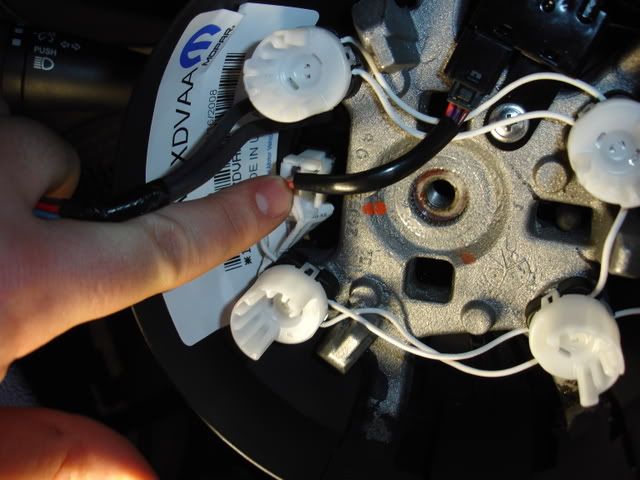
Step #13 Connect the wiring harness pigtail to the newly installed cruise control stalk
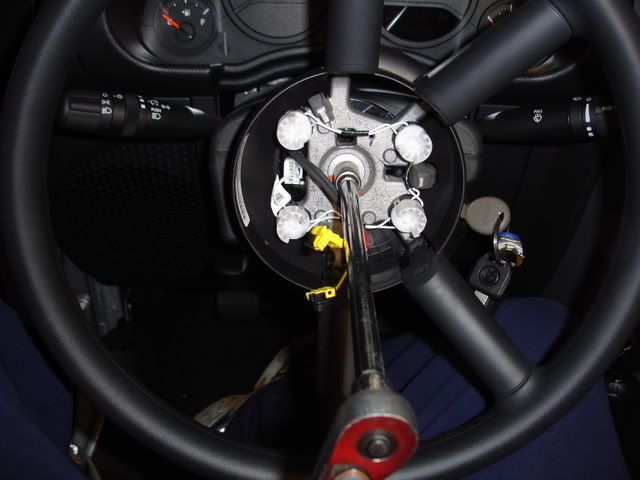
Step #14 Feed the airbag wires from the hub back through the steering wheel and align the steering wheel back onto the steering column, lining up the little arrow on the center of the steering wheel with the small alignment mark on the splined shaft of the steering column. The steering wheel should slide right back into place with almost no effort. Do not force it.
Step #15 Once the steering wheel is back in place, connect the white connector from the steering wheel harness to the connector on the hub.
Step #16 Install and torque the steering wheel center bolt to 36 ft-lbs.
Step #17 DOUBLE CHECK THAT YOUR BATTERY IS STILL DISCONNECTED. Then reconnect the two connections for the airbag.
Step #18 Inspect all of the wiring to make sure nothing will be pinched upon reassembly, line up the airbag with the steering wheel like so, and apply pressure like you are blowing the horn. This should cause the metal hoops to snap back into place over the steering wheel hooks.

Step #19 Reconnect the battery's negative terminal and tighten with a 10mm wrench. I will also WARN YOU.......for some reason as soon as I connected my battery back up, my horn let out a quick BEEEP. Not a big deal if you are expecting it, but quite startling if you are stretched across the front of your jeep and it goes off unexpectedly. Had to check my underoos after that.
Thats it. Easy as pie. Take her for a spin and try it out. The install took me a little over an hour, but that was due to really taking my time and taking pictures. Its really a 30-45 min job tops. Enjoy, and feel free to shoot me a PM if anyone has any questions.
Cheers
I just picked up my JK about 2 weeks ago and it is about as bare bones as you can get. Even though I won't be putting a ton of miles on it, I will be using it for commuting during crappy winter weather. My commute is 120 miles a day on the highway so cruise control was an absolute must. So here we go. I picked up the kit from jeepsareus.com from their Ebay store and had it delivered just a few days after I placed the order.
Step #1 Use a 10mm wrench and disconnect the battery's negative terminal. I would suggest laying a rag over the terminal to make sure it doesn't accidentally fall back into place and makes a connection while you are working. MAKE SURE TO GIVE IT A FEW MINUTES TO DISCHARGE THE CAPACITORS IN THE AIR BAG CIRCUIT BEFORE YOU GO TO STEP #2. I believe the directions call for 2 minutes. I work on electronics 40+ hours a week and don't trust them at all. I gave it a good 5-10 minutes. You don't want an accidental deployment of the airbag.......especially if it is sitting in your lap when it goes off.
Step #2 Jump into the drivers seat and lower the tilt steering wheel to its lowest setting
Step #3 The included instructions call for a stubby flat bladed screwdriver. As pointed out in the other thread.......this is actually what you want. It makes removing the airbag a breeze, and that is the hardest part of the install
Step #4 Take your handy little S shaped screw driver and find the 3 access holes around the rear of the steering wheel shroud. Slide the screwdriver in until you feel it stop. At this point just just push the screw driver towards the front of the Jeep and you should feel it grab and pop one of the metal loops off their hooks. The next few pics will give a better explanation than I could ever do with words.
Slide the screwdriver in the access hole
Then pop the metal loops off of the hooks. There are three in total.
The metal hoop in the foreground w/ one of the hooks on the right
followed by a better look at one of the hooks
Step #5 Disconnect the two connections to the airbag. ONCE AGAIN, MAKE SURE THE BATTERY HAS BEEN DISCONNECTED FOR A FEW MINUTES BEFORE YOU TOUCH THESE CONNECTIONS. This is also a nice shot of all 3 hoops and hooks that you removed in the previous step
Step #6 Use a 13mm socket and extension to remove the center bolt of the steering wheel.
Step #7 Remove the white connector that attaches the horn buttons to the steering column
Step #8 Gently pull the steering wheel towards you. This may take a little wiggle/rocking action to remove the steering wheel from the hub, but by no means should you have to pull hard. If you yank on it, you will most likely either damage one of the wiring harnesses or give yourself a black eye when the steering wheel releases and wacks you in the face.
here is a view of the hub once the steering wheel has been removed
Step #9 Flip the steering wheel over and remove the 4 T20 Torx screws in order to remove the plastic shroud from the steering wheel
Step #10 Once you have the shroud removed, you should use a pair of needle nose pliers to pinch the backside and remove the horn buttons from the steering wheel. You will be replacing the harness with the new one that is supplied in the kit so take notice to how the wiring is run and the orientation of the horn buttons. Personally, I installed the new harness one horn button at a time as I removed the old one.
Removing the old horn buttons
The new harness that comes with the kit. This has an added pigtail that plugs into the cruise control stalk.
The new harness installed. Notice the orientation of the horn buttons and the pigtail in the 12 o'clock position.
Step #11 Installing the new included shroud onto the steering wheel. Here are the new and old shroud side be side. Old on the right, and new on the left. Notice the cutout for the cruise control stalk on the shroud on the left.
Reuse the 4 T20 Torx screws to secure the new shroud to the steering wheel
Step #12 Install the included cruise control stalk onto the steering wheel assembly.
Secure it from the back of the steering wheel using the two small included screws
Flip the steering wheel over and secure the front of the stalk using the remaining included larger screw
Step #13 Connect the wiring harness pigtail to the newly installed cruise control stalk
Step #14 Feed the airbag wires from the hub back through the steering wheel and align the steering wheel back onto the steering column, lining up the little arrow on the center of the steering wheel with the small alignment mark on the splined shaft of the steering column. The steering wheel should slide right back into place with almost no effort. Do not force it.
Step #15 Once the steering wheel is back in place, connect the white connector from the steering wheel harness to the connector on the hub.
Step #16 Install and torque the steering wheel center bolt to 36 ft-lbs.
Step #17 DOUBLE CHECK THAT YOUR BATTERY IS STILL DISCONNECTED. Then reconnect the two connections for the airbag.
Step #18 Inspect all of the wiring to make sure nothing will be pinched upon reassembly, line up the airbag with the steering wheel like so, and apply pressure like you are blowing the horn. This should cause the metal hoops to snap back into place over the steering wheel hooks.
Step #19 Reconnect the battery's negative terminal and tighten with a 10mm wrench. I will also WARN YOU.......for some reason as soon as I connected my battery back up, my horn let out a quick BEEEP. Not a big deal if you are expecting it, but quite startling if you are stretched across the front of your jeep and it goes off unexpectedly. Had to check my underoos after that.
Thats it. Easy as pie. Take her for a spin and try it out. The install took me a little over an hour, but that was due to really taking my time and taking pictures. Its really a 30-45 min job tops. Enjoy, and feel free to shoot me a PM if anyone has any questions.
Cheers

The following users liked this post:
dirtbiker (02-08-2019)
03-02-2009, 05:44 PM
#3
JK Jedi Master

Join Date: Nov 2006
Location: .
Posts: 15,170
Likes: 0
Received 0 Likes
on
0 Posts
 03-02-2009, 08:55 PM
#5
JK Enthusiast
Thanks for posting this, wish you did it sooner! I installed my cruise a few weeks ago. Your write-up is spot on. Good job! Just to let everyone know, getting the center piece off the steering wheel is the toughest part of this installation. It's all downhill from there.
When I went to put the steering wheel back on, I found it the easiest to push on the wheel from the inside circle than the outside circle (where your hands usually go when driving).
When I connected the battery back up, my Jeep honked at me too.
Just a reminder to those thinking about doing this install, you do not need to get your computer flashed/updated for the cruise to work. As soon as it's installed (correctly), start your Jeep and press the button on the side of the cruise arm. You should see the word "CRUISE" light up on your dash above the odometer. I think you have to be over 30 or 35mph for the cruise to work.
03-02-2009, 09:10 PM
#6
JK Newbie
Join Date: Aug 2008
Location: Rochester, NH
Posts: 48
Likes: 0
Received 0 Likes
on
0 Posts
I also added the factory cruise control a few months back.. The hardest part was getting the clips for the bag, up off the post. I ended up cutting the cowling off... Since it came with a replacement. After cutting off cowling it all became much clearer as how those clips worked. Quite a pain in the @ss. Relatively easy after that just follow instructions. Did not have the computer flashed / updated...
works well right out the box.
Thanks for the write up.
works well right out the box.
Thanks for the write up.
Last edited by BrianJK; 03-02-2009 at 09:14 PM.
03-03-2009, 11:45 AM
#7
JK Enthusiast
Join Date: Jun 2007
Location: Murray, Utah
Posts: 275
Likes: 0
Received 0 Likes
on
0 Posts
Thanks so much for redoing this write up! I was about to order my cruise control package when I noticed that the other write up had lost its images. After reading yours (and saving the images  ) I'll be ordering my cruise unit this week.
Great job!
) I'll be ordering my cruise unit this week.Great job!
Trending Topics
03-03-2009, 01:15 PM
#8
JK Jedi Master
Thanks for posting this, wish you did it sooner! I installed my cruise a few weeks ago. Your write-up is spot on. Good job! Just to let everyone know, getting the center piece off the steering wheel is the toughest part of this installation. It's all downhill from there.
When I went to put the steering wheel back on, I found it the easiest to push on the wheel from the inside circle than the outside circle (where your hands usually go when driving).
When I connected the battery back up, my Jeep honked at me too.
Just a reminder to those thinking about doing this install, you do not need to get your computer flashed/updated for the cruise to work. As soon as it's installed (correctly), start your Jeep and press the button on the side of the cruise arm. You should see the word "CRUISE" light up on your dash above the odometer. I think you have to be over 30 or 35mph for the cruise to work.
When I went to put the steering wheel back on, I found it the easiest to push on the wheel from the inside circle than the outside circle (where your hands usually go when driving).
When I connected the battery back up, my Jeep honked at me too.
Just a reminder to those thinking about doing this install, you do not need to get your computer flashed/updated for the cruise to work. As soon as it's installed (correctly), start your Jeep and press the button on the side of the cruise arm. You should see the word "CRUISE" light up on your dash above the odometer. I think you have to be over 30 or 35mph for the cruise to work.

Last edited by ronjenx; 03-03-2009 at 01:20 PM.
03-05-2009, 06:10 AM
#9
JK Newbie

Join Date: Feb 2009
Location: south oc, ca
Posts: 79
Likes: 0
Received 0 Likes
on
0 Posts
This is one of the best write ups i have seen. Good job, and big thank you.
I am about to be doing this upgrade.
Just waiting on low price at e-bay.
I have a question though.....are the connections to the break switch already done by the factory?
Thanks again.
I am about to be doing this upgrade.
Just waiting on low price at e-bay.
I have a question though.....are the connections to the break switch already done by the factory?
Thanks again.
03-06-2009, 08:04 AM
#10
JK Freak
Thread Starter
Glad everybody liked the write up. Its a pretty intimidating job to start when you don't have any pics and the included directions are completely worthless. With the pics I think its a complete no brainer. It really is easy, and worth every penny I spent on it.

