SPAL Fan install
 05-11-2009, 02:08 PM
#1
JK Freak

Thread Starter
Join Date: Aug 2008
Location: King George, VA
Posts: 722
Likes: 0
Received 0 Likes
on
0 Posts
Installed the 30102082 SPAL fan on the weekend. Hopefully this write-up will help those wanting to try it out. Hopefully, we can come up with the perfect install.
Step 1. Remove the four retaining thingys from the radiator cap.

Step 2. Remove hose from radiator cap.

Step 3. Remove radiator reservoir.

Step 4. Remove the two small screws hold the entire fan assembly including shroud to the radiator.

Step 5. Lay the assembly on the floor and remove the nut hold ing fan blade on. Caution it is reverse thread. Next remove the three screws holding the fan onto the shroud. Sorry, I missed this photo.
Step 6. Now comes the fun part. Cut the OEM shroud to remove the protection grid over the shroud. Then clean up the left overs to look neat.

Step 7. Place new waterproof SPAL fan into the old hole.

Step 8. I drilled holes in the shroud and used stainless steel bolts with locking nuts to secure the fan to the shroud.


Step 9. I taped the fan side with ducktape and then filled the back side with expanding foam.


Step 10. After everything dries you can trim it to make it look better. Also the foam will probably expand over the protector grid so make sure you trim accordingly. I didn't take a picture of that either but you get the concept.
Step 11. I went ahead and wired it up with the original two wires. I put black to black and red to green but with a switch between the green and red.
The only problem I am running into right now is it seems like the low speed does not work for the fan. I don't know if it is because of the motor not able to go with two speeds or if it has to do something with the Jeep. I'm guessing the motor is just a one speed motor.
Step 1. Remove the four retaining thingys from the radiator cap.
Step 2. Remove hose from radiator cap.
Step 3. Remove radiator reservoir.
Step 4. Remove the two small screws hold the entire fan assembly including shroud to the radiator.
Step 5. Lay the assembly on the floor and remove the nut hold ing fan blade on. Caution it is reverse thread. Next remove the three screws holding the fan onto the shroud. Sorry, I missed this photo.
Step 6. Now comes the fun part. Cut the OEM shroud to remove the protection grid over the shroud. Then clean up the left overs to look neat.
Step 7. Place new waterproof SPAL fan into the old hole.
Step 8. I drilled holes in the shroud and used stainless steel bolts with locking nuts to secure the fan to the shroud.
Step 9. I taped the fan side with ducktape and then filled the back side with expanding foam.
Step 10. After everything dries you can trim it to make it look better. Also the foam will probably expand over the protector grid so make sure you trim accordingly. I didn't take a picture of that either but you get the concept.
Step 11. I went ahead and wired it up with the original two wires. I put black to black and red to green but with a switch between the green and red.
The only problem I am running into right now is it seems like the low speed does not work for the fan. I don't know if it is because of the motor not able to go with two speeds or if it has to do something with the Jeep. I'm guessing the motor is just a one speed motor.
 05-11-2009, 02:17 PM
#2
JK Freak
Join Date: Oct 2007
Location: Hangin in the sunshine state....staging forum..
Posts: 943
Likes: 0
Received 2 Likes
on
2 Posts
looks good, thats the way I was thinking of mounting it in the stock shroud  great idea with the spray foam

I'm not sure about the motor speed, I could email the Spal engineer.
I also was thinking of trying to remove the piece off the stock motor that makes the stock blades turn and then weld it to stem on the new motor
great idea with the spray foam I'm not sure about the motor speed, I could email the Spal engineer.
I also was thinking of trying to remove the piece off the stock motor that makes the stock blades turn and then weld it to stem on the new motor
05-11-2009, 03:04 PM
#4
JK Freak
Thread Starter
Join Date: Aug 2008
Location: King George, VA
Posts: 722
Likes: 0
Received 0 Likes
on
0 Posts
looks good, thats the way I was thinking of mounting it in the stock shroud great idea with the spray foam
I'm not sure about the motor speed, I could email the Spal engineer.
I also was thinking of trying to remove the piece off the stock motor that makes the stock blades turn and then weld it to stem on the new motor
great idea with the spray foam I'm not sure about the motor speed, I could email the Spal engineer.
I also was thinking of trying to remove the piece off the stock motor that makes the stock blades turn and then weld it to stem on the new motor
05-11-2009, 03:07 PM
#5
JK Freak
Thread Starter
Join Date: Aug 2008
Location: King George, VA
Posts: 722
Likes: 0
Received 0 Likes
on
0 Posts
I'm not sure how the foam will hold up. I'm sure it will be fine once it is completly dry. The temps here in Northern Florida is around 85 to 90 the last couple of days and it has not had any problems. I will keep you guys up to date and let you know if anything happens to it.
05-11-2009, 06:58 PM
#7
JK Freak
Join Date: Oct 2007
Location: Hangin in the sunshine state....staging forum..
Posts: 943
Likes: 0
Received 2 Likes
on
2 Posts
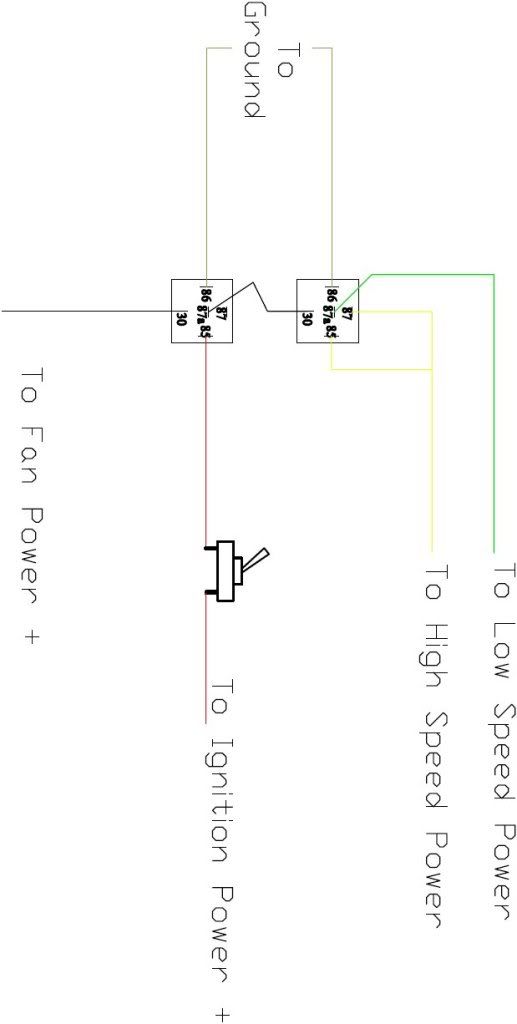
does it come on every time you turn the ac on? I dont think the stock does crap on low anyway after seeing my temps in digital with the aeroforce gauge. maybe if wired like the diagram Spal drew up with the relays it would work on high and low
Last edited by tkob1060; 05-11-2009 at 07:02 PM.
Trending Topics
 05-12-2009, 05:23 AM
#9
JK Freak
Thread Starter
Join Date: Aug 2008
Location: King George, VA
Posts: 722
Likes: 0
Received 0 Likes
on
0 Posts

I couldn't even tell you if it makes a difference. I just thought it couldn't hurt. I know when using dual fan configuration that sometimes only one fan turns. So the other fan is like having a big hole there until it starts to operate. Honestly, I'm not sure.
05-12-2009, 07:44 AM
#10
JK Enthusiast

Join Date: Jan 2009
Location: Charlotte, NC
Posts: 414
Likes: 0
Received 0 Likes
on
0 Posts
Dude, that is SUCH a better installation than my super ghetto hack job... I did mine on a wing and a prayer since I had to leave the next morning to drive to Charleston for my wedding... So I just needed something to make it that far. Seems to be holding up well though. Nice job, and I would definitely have followed your write up over mine...
For everyone worried about the two speed deal, I'm not worried about it too much. When the new fan kicks on, it cools things down in a hurry...
For everyone worried about the two speed deal, I'm not worried about it too much. When the new fan kicks on, it cools things down in a hurry...