Installed my garage door opener mod!!!
 12-04-2012, 01:39 PM
#21
JK Newbie
Thread Starter
Join Date: Nov 2012
Location: Fredericksburg, VA - New Orleans, LA
Posts: 93
Likes: 0
Received 0 Likes
on
0 Posts

 12-04-2012, 07:54 PM
#22
JK Enthusiast

Join Date: Nov 2012
Location: Westminster, CA
Posts: 231
Likes: 0
Received 0 Likes
on
0 Posts
Thanks! I am going to do that, but I'm not too familiar with using resistors. I need to look into what resistor to use to drop it to 9v from 12v. As soon as I figure it out, I'll snip the zip tie and open her up one last time. It will be an easy issue to fix when I get to it. 
12-05-2012, 02:56 PM
#23
Super Moderator
Thanks! I am going to do that, but I'm not too familiar with using resistors. I need to look into what resistor to use to drop it to 9v from 12v. As soon as I figure it out, I'll snip the zip tie and open her up one last time. It will be an easy issue to fix when I get to it.
Here's my suggestions:
Least Technical:
1. Forgot about dropping the voltage. The garage door opener "probably" could handle 12Volts. This obviously has a risk that it also "might" not be able to handle the additional voltage and burn out your opener.
2. Buy a cigarette lighter 9 volt DC cell phone charging adapter. This has all the circuitry built into it to drop the voltage for you. Wire accordingly.
More Technical better solutions:
3. Use a voltage regulator IC as Canibeat suggested.
4. Build your own voltage regulator circuit.
This would be my recommendation and is actually quite easy.
Parts Needed, available at any Radio Shack:
- 9 Volt Zener Diode (Often they come in "9.2" Volt values also)
- 1K resistor.
This works very similar to what you where thinking when you mentioned using resistors to create a voltage divider, but instead of wiring 2 resistors in series with each other, you wire the 1K resistor in series with the 9 Volt zener diode in a similar manor but don't have to do those calculations and works better. The way a 9 Volt zener diode works, is that it maintains a 9 Volt drop across it independent of the total voltage across the circuit, where anything above 9 Volts get dropped across the 1K resistor where a 9 Volt drop is maintained across the Zener Diode when they are wired in series with each other.
You would wire it like this. Wire the 1K resistor and Zenor diode in series in the following arrangement. 1K resistor leg connects to your Battery (B+). Other leg of 1K resistor gets connected to "Anode(-) side of Zener diode. Cathode(-) Side of Zener diode connect to GROUND. (Voltage Regulator circuit complete at this point). Now you connect the Red wire(+) of the opener to the Cathode side of the Zenor Diode and the Black wire(-) of the opener to GROUND. Thus, there's a 9 volt drop across that Zener Diode. You just built a Voltage regulator circuit.

B(+) ----/\/\/\/-------|<------- GND(-)
or
If you find the range on your opener seems to be weak, then that means not enough current is being supplied to the opener and to fix this, you could further reduce the value of the resistor to say 100 Ohms instead of 1K. 1K is pretty typical though, where I don't foresee you having to change anything. The resistor regardless of it's value, drops anything that exceeds 9 Volts (The Value of the Zener) and additionally regulates the current that gets drawn through the circuit. Essentially, this is the same thing that Canibeat suggested in using a voltage regulator IC, but is cheaper and gives you control of how much current you would allow the opener to draw.
A Voltage regulator IC is really nothing more than the circuit I just outlined, except it is put in a nice little silicon package and costs more. Also if you open up and look inside one of those 9 Volt cell phone charges like suggested in Suggestion 2...chances are you will see a Zener Diode and a Resisor.

Originally Posted by Canbeat
You could probably get away with just using a 7809 voltage regulator 12V goes in pin 1, pin 2 is common ground and 3 is your 9V output. Good luck!

Cheers!!!

Last edited by Rednroll; 12-05-2012 at 06:36 PM.
12-05-2012, 04:08 PM
#24
JK Newbie
Thread Starter
Join Date: Nov 2012
Location: Fredericksburg, VA - New Orleans, LA
Posts: 93
Likes: 0
Received 0 Likes
on
0 Posts
Canibeat:
I appreciate the link, I will go to Radio Shack this weekend and see what my best options are
Rednroll:
Dang, Those are great instructions and I will attempt this project this weekend. I'm not sure I totally understand them yet, but I will read it over and over till I have it. I'm sure once I actually get it, I'll smack myself for not knowing how to do this in the first place. I've wired up plenty of race cars, but never had to use diodes and resistors, only relays.
Thanks to both of you, Canibeat and Rednroll. Hopefully one day I can be of some assistance to y'all!
12-05-2012, 06:14 PM
#25
Super Moderator
Canibeat:
I appreciate the link, I will go to Radio Shack this weekend and see what my best options are
Rednroll:
Dang, Those are great instructions and I will attempt this project this weekend. I'm not sure I totally understand them yet, but I will read it over and over till I have it. I'm sure once I actually get it, I'll smack myself for not knowing how to do this in the first place. I've wired up plenty of race cars, but never had to use diodes and resistors, only relays.
Thanks to both of you, Canibeat and Rednroll. Hopefully one day I can be of some assistance to y'all!
I appreciate the link, I will go to Radio Shack this weekend and see what my best options are
Rednroll:
Dang, Those are great instructions and I will attempt this project this weekend. I'm not sure I totally understand them yet, but I will read it over and over till I have it. I'm sure once I actually get it, I'll smack myself for not knowing how to do this in the first place. I've wired up plenty of race cars, but never had to use diodes and resistors, only relays.
Thanks to both of you, Canibeat and Rednroll. Hopefully one day I can be of some assistance to y'all!
Maybe you might find some of this useful:
Beginners Guide
Scrolling down to about the middle of the page, they go over the basics of that voltage regulator circuit.
THE VOLTAGE REGULATOR
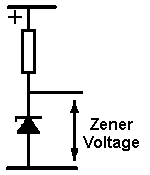
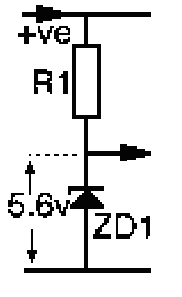
One of the most commonly used circuits is the VOLTAGE REGULATOR. The simplest design uses just a resistor and a zener diode. In the first circuit on the left you can see a resistor (R1) and a zener diode (ZD1) connected across a power supply. The resistor is connected to the positive (+ve) of the supply and the zener diode anode is connected to the zero volt (ground). At the junction of these two components the voltage is clamped by the zener diode to its specified voltage - in this case 5.6 volts and this is the output of the circuit.
One of the most commonly used circuits is the VOLTAGE REGULATOR. The simplest design uses just a resistor and a zener diode. In the first circuit on the left you can see a resistor (R1) and a zener diode (ZD1) connected across a power supply. The resistor is connected to the positive (+ve) of the supply and the zener diode anode is connected to the zero volt (ground). At the junction of these two components the voltage is clamped by the zener diode to its specified voltage - in this case 5.6 volts and this is the output of the circuit.
I've been on this site for the past 2 years with a lot of enthusiasm to lift my JK for off road use. While I have learned quite a bit from reading in this forum, in all honesty, the more I learn...the more I get overwhelmed because, when I do something....I like to do it right and I like to understand why I'm doing it.
So, I have a lot of questions in regards to lifts that seems to be general knowledge for the offroad crowd and for those who have modded their JK with a lift. I've kind of been looking for a lift kit for dummies Q&A thread. Kind of along the lines of, "What is a rear slip differential.?...Where is it located? What does it do? Why do I need it? And what should I expect if I don't have one? And what would someone recommend as the best bang for the buck for an entusiast?

So if you know those kinds of things....then I just may take you up on that offer. When it comes to electrical stuff, I can hang with the best of them. When it comes to mechanical stuff, like lifts, drive trains and suspensions.....I feel as dumb as a rock.

Last edited by Rednroll; 12-05-2012 at 06:26 PM.
12-05-2012, 09:10 PM
#26
JK Enthusiast

Join Date: Apr 2012
Location: San Diego, Ca
Posts: 107
Likes: 0
Received 0 Likes
on
0 Posts
Looks like a great mod, tho a bit complicated. For the simple minded like me, I just stick it under the roll bat padding over my left shoulder. Takes about 15 secs.
12-06-2012, 05:22 AM
#27
Super Moderator
12-06-2012, 03:20 PM
#28
JK Newbie
Thread Starter
Join Date: Nov 2012
Location: Fredericksburg, VA - New Orleans, LA
Posts: 93
Likes: 0
Received 0 Likes
on
0 Posts
Actually, when I was looking for an image on the Web to show the circuit I was describing, the web page I stole that image from was a pretty decent source for info.
Maybe you might find some of this useful:
Beginners Guide
Scrolling down to about the middle of the page, they go over the basics of that voltage regulator circuit.
How are you with understanding suspensions and lift kits?
I've been on this site for the past 2 years with a lot of enthusiasm to lift my JK for off road use. While I have learned quite a bit from reading in this forum, in all honesty, the more I learn...the more I get overwhelmed because, when I do something....I like to do it right and I like to understand why I'm doing it.
So, I have a lot of questions in regards to lifts that seems to be general knowledge for the offroad crowd and for those who have modded their JK with a lift. I've kind of been looking for a lift kit for dummies Q&A thread. Kind of along the lines of, "What is a rear slip differential.?...Where is it located? What does it do? Why do I need it? And what should I expect if I don't have one? And what would someone recommend as the best bang for the buck for an entusiast?
So if you know those kinds of things....then I just may take you up on that offer. When it comes to electrical stuff, I can hang with the best of them. When it comes to mechanical stuff, like lifts, drive trains and suspensions.....I feel as dumb as a rock.
12-06-2012, 03:26 PM
#29
JK Newbie
Thread Starter
Join Date: Nov 2012
Location: Fredericksburg, VA - New Orleans, LA
Posts: 93
Likes: 0
Received 0 Likes
on
0 Posts
12-06-2012, 07:38 PM
#30
JK Junkie
Originally Posted by SynysterHD
I found an old garage door opener that I had and decided to do the garage door opener mod. I didn't want to have to keep locking my opener in the glove box every time we got out with the top down, and then get it out to open the door. I know, I'm lazy!!! 
So, since this was an old opener that we didn't use anymore, This is what I did:
1. I opened the case up
2. Found the pins for the switch
3. Soldered 2 wires to the board where the switch connects
4. Drilled a hole in the case so the wires can run thru the case and can close correctly
5. Closed the case back up
6. Popped the panel off under the steering wheel and drilled a 11/32" hole for the button
7. Took glove box out
8. Installed the button and ran the wires behind the dash and into the compartment behind the glove box
9. Reinstalled the panel under the steering wheel
10. Soldered the wires from the opener that I installed to the wires from the button
11. Zip tied the wires and door opener out of the way
12. Reinstall the glove box
Now I have a button for my garage door that isn't noticeable unless you know where it is and what it's for. It's weather proof and last but not lease, I don't have to keep taking the opener in and out of the glove box!
I love this idea and am going to play around with this mod tomorrow, thank you for the great write up and pictures!
Matthew