Installed Windshield Lights - PIAA 520 APT
 09-05-2011, 05:59 PM
#1
JK Newbie
Thread Starter
Join Date: Aug 2011
Location: Boston, MA
Posts: 3
Likes: 0
Received 0 Likes
on
0 Posts
I just spent all day yesterday getting my windshield lights installed. I had no electrical knowledge and know nothing about cars. This is my first Jeep (and first american car), and having never been interested in modding my prior cars, I've since added lights, a fire extinguisher, grab handles, and rear brush guards (right before TS Irene to protect those taillights!!!). This is the best thing I've ever bought, much to the dismay of my fiancee (didn't help that I got manual).
Anyways, I wanted to do this install myself (although having tightened the negative battery terminal to tightly, I was unable to get the terminal loose and had a call into a roaming mechanic before eventually getting it loose and canceling the guy before getting charged $60). Since I couldn't find all of the install instructions in the various threads, I wanted to post some pics of my windshield light installation and share some tips I didn't find in the other write-ups...
The PIAA 520's came with the complete wiring harness, but I also purchased a Metric wratchet set and T-25, T-30, and T-40 heads, and plastic conduit housing from Home Depot to complete the installation myself. The brackets are the smitty brackets, modeled after the Mopar style.
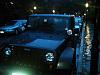
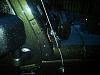
Heres the finished product:
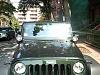
Before attaching the brackets, I cement glued rubber gaskets to the back of the brackets to protect my paint. While I cut the rubber to perfectly fit the bracket, when I screwed in the bracket, the rubber expanded and came through all around the brackets. If you use a rubber protectant, you should keep the rubber about 1/2 cm from the edges and theres no need to go to the outside ends as only about the inner half of the bracket will be in contact with the jeep's windshield.
After getting the brackets in, I screwed in the lights. To run the wires from the lights to the engine, I unscrewed the 4 outer screws of the cowl and removed the windshield wipers. I couldn't get the 4 inner screws out (couldn't get the round plastic coverings off) to fully remove the cowl(I tried everything), so I had to just jimmy the wires under.
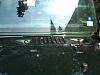
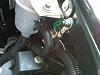
My finger is where I screwed in the relay. I just bought a little screw and nut at the hardware store and the 2011 JK has nothing bolted in that spot (hole was already there). The black conduit/tubing I'm holding is the relay power supply, which was spliced to the Passenger side High Beam light (lights only come on if high beams are running).
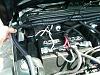
To reach the high beam, I pulled out the air filter. To remove, remove the 4 clips holding the top, pull back, remove the air filiter (lifts right out) and then slowly pull the base out, which is held in by 3 suction type clips (nothing to loosen, just pull out). This pic shows where the air filter clips out:
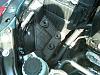
Once the air filter is out, you can reach the passenger side light socket. To remove the clip (with three wires coming out of it), slide the red tab backwards (towards the jeep's seats). Next, after pulling the red switch back, push down on the green "button", which is litterally where the red switch is pulled on to, and pull out the connector. To tap into the highbeam, I used the supplied connector and tapped into the White /Gray wire (high beams). The Wite/Tan are low beams, and Black/light green is return signal. On the drivers side headlight, the high beam is white/light green and low is White/Dark Blue. Here's a close-up:
Since I hit my 5 pic limit and the rest of the installation process has been detailed in these forums I just wanted to thank everyone for there help. It was invaluable.
-JP
Anyways, I wanted to do this install myself (although having tightened the negative battery terminal to tightly, I was unable to get the terminal loose and had a call into a roaming mechanic before eventually getting it loose and canceling the guy before getting charged $60). Since I couldn't find all of the install instructions in the various threads, I wanted to post some pics of my windshield light installation and share some tips I didn't find in the other write-ups...
The PIAA 520's came with the complete wiring harness, but I also purchased a Metric wratchet set and T-25, T-30, and T-40 heads, and plastic conduit housing from Home Depot to complete the installation myself. The brackets are the smitty brackets, modeled after the Mopar style.
Heres the finished product:
Before attaching the brackets, I cement glued rubber gaskets to the back of the brackets to protect my paint. While I cut the rubber to perfectly fit the bracket, when I screwed in the bracket, the rubber expanded and came through all around the brackets. If you use a rubber protectant, you should keep the rubber about 1/2 cm from the edges and theres no need to go to the outside ends as only about the inner half of the bracket will be in contact with the jeep's windshield.
After getting the brackets in, I screwed in the lights. To run the wires from the lights to the engine, I unscrewed the 4 outer screws of the cowl and removed the windshield wipers. I couldn't get the 4 inner screws out (couldn't get the round plastic coverings off) to fully remove the cowl(I tried everything), so I had to just jimmy the wires under.
My finger is where I screwed in the relay. I just bought a little screw and nut at the hardware store and the 2011 JK has nothing bolted in that spot (hole was already there). The black conduit/tubing I'm holding is the relay power supply, which was spliced to the Passenger side High Beam light (lights only come on if high beams are running).
To reach the high beam, I pulled out the air filter. To remove, remove the 4 clips holding the top, pull back, remove the air filiter (lifts right out) and then slowly pull the base out, which is held in by 3 suction type clips (nothing to loosen, just pull out). This pic shows where the air filter clips out:
Once the air filter is out, you can reach the passenger side light socket. To remove the clip (with three wires coming out of it), slide the red tab backwards (towards the jeep's seats). Next, after pulling the red switch back, push down on the green "button", which is litterally where the red switch is pulled on to, and pull out the connector. To tap into the highbeam, I used the supplied connector and tapped into the White /Gray wire (high beams). The Wite/Tan are low beams, and Black/light green is return signal. On the drivers side headlight, the high beam is white/light green and low is White/Dark Blue. Here's a close-up:
Since I hit my 5 pic limit and the rest of the installation process has been detailed in these forums I just wanted to thank everyone for there help. It was invaluable.
-JP
 09-05-2011, 10:11 PM
#4
JK Enthusiast
Join Date: Feb 2009
Location: WASHINGTON
Posts: 443
Likes: 0
Received 0 Likes
on
0 Posts
I am looking to put the same lights up there. Do you have anymore shots of the brackets and lights. Maybe a side shot. Thanks. Be careful, Jeeps become very addictive. I have owned 5 and i'm still in my 20's. Keep up the good work
09-06-2011, 09:22 AM
#6
Thanks for posting....I was wondering about both the PIAA's and the Smittybilt mount.
I'm thinking about doing this also.
Definately post some more photos when you can.
I'm thinking about doing this also.
Definately post some more photos when you can.
09-06-2011, 10:40 AM
#7
JK Junkie
I couldn't get the 4 inner screws out (couldn't get the round plastic coverings off) to fully remove the cowl(I tried everything), so I had to just jimmy the wires under.
Great job on the first mod.

Trending Topics
09-06-2011, 04:49 PM
#9
JK Newbie
Thread Starter
Join Date: Aug 2011
Location: Boston, MA
Posts: 3
Likes: 0
Received 0 Likes
on
0 Posts
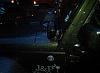
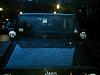
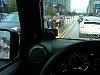
Here are some pics of the finished job. Apologies if the pics aren't clear, but they are taken on my BB in pouring rain in Boston. I thought the switch originally looked kinda of cheap, but installed it doesn't bother me. Wish I had bent the antennae first, but ohh well.
Love the Jeep!!
Love the Jeep!!
