When you click on links to various merchants on this site and make a purchase, this can result in this site earning a commission. Affiliate programs and affiliations include, but are not limited to, the eBay Partner Network.
The first real mod to my JK came around the one year of ownership mark and was 100% an impulse buy but I love it all the same. If I remember right there was a slate gray Rubi with a Mopar 10th Anniversary Rubicon Hood on my way to work that I always thought was cool so the hood upgrade was a pretty early add to the wish list but was no where near the top. I think it was the decals that drew me to this hood which is kind of dumb because nothing prevents you from buying them and applying to any hood but after getting this thing on I realized just how nice the lines and overall look really is. I think the SRT Viper inspired vents are mean as hell, especially with the high contrast against a white paint. I don't know what the actual performance advantage is with a heat reduction hood (would be curious if anyone has any feedback on that) and I can't really say I notice the engine running any cooler but it definitely stays seated better than the stock hood if hit head on with a strong gust of wind. So the aero might be a little better than stock but ultimately this was done for looks and not much else so any performance gain would be icing on the cake.
As far as what took this low priority mod to the top of the list, I think I saw that Mopar had the hood on sale or something so I got all jazzed up about making it happen because apparently I thought the price was amazing (who knows if it actually was) until I found out that they wanted something like $1200 to ship. After some minor sulking I decided to call the local Jeep dealer to see if they would honor the Mopar price and actually got hooked up with the service shop manager. He was a Wrangler guy himself and was super cool, helpful and ultimately shot me a price I could live with so I had him get one ordered. I decided pretty early on that I was going to have their body shop do the paint (as long as they didn't quote me something stupid) because I had zero experience with anyone else in town, I bought the Jeep off their lot and figured they probably had at least a few of these hoods under their belt. The body shop quoted me something like $900 to paint and install, I asked them to knock off $100 and we shook hands. I think it took maybe 3-4 weeks for them to get the hood in, prepped and painted, another couple days to get me in and one day to install. The body shop manager even delivered the stock hood to my house believe it or not. When it was all said and done with I think I was in $1850 which is probably not a great price (feedback anyone?) but within what I was willing to spend. Overall I have to say the whole process was a pretty good experience. They did nice quality work on the hood and the customer service really was top notch. It did kind of suck to just write a check and never get my hands dirty but this was way out of my league so whatevs.
So like I said, total impulse buy but had I not done this so soon into my build I could see it being one of the last things I did which would really have been a shame because I'm pretty sure it will go down as one of my favorite mods. I am seeing a lot more Rubi's on the road sporting this hood (stock) so it doesn't feel all that special anymore but I think it nails the look I'm going for. Below are some pics so you can see how it turned out.
After completing the hood I tried to dial back my impulsiveness by completing a high level build list. I spent a few weeks just researching anything that caught my eye, typically starting by browsing the Quadratec catalog followed by hours on the web looking at different brands, solutions, etc. This exercise went a long ways in helping me determine the general look I would be working towards in addition to the mechanical mods I wanted to invest in. I would highly recommend completing a build list if you are an overly detail oriented person (aka freak) like myself.
As for the look I landed on, I think I always knew that I wanted to build a white Jeep with black bolt-on�s (wheels, bumpers, rock rails & other hardware) and red accents. Even back in my YJ days I remember looking through the Quadratec catalog and having my eyes on red leaf spring bushings just because I loved the look of red accent on black hardware on a white body. Now with the red in the hood decal of the JK I had a starting point to work from as I crafted my vision.
Anyway, my first crack at a build list yielded a good number of smaller ticket items, many of which I snatched up over the next year+.
Red Mopar Trail Rated Badge
I wanted my trail rated badge to match the red hood accent, as simple as that.
The install was pretty easy after a little bit of research online for the proper method for removing the OEM badge. I had read that most people were using either fishing line or dental floss to complete the removal, of which I went with the floss. I guess I felt that the waxy coating on dental floss might be a little easier on the paint but who knows. I simply wrapped the two ends of the floss around both index fingers and used my thumbs to press/stretch the floss flat (horizontally) against the body above the black badge. I then slowly worked the floss down behind the badge, from top to bottom, until it came off. If I remember right I think the floss did break on me a couple of times which could be justification for fishing line over dental floss but I never felt like I was fighting getting it off clean, just had to get a new length of floss once or twice. I did have a couple spots where the floss cut into the foam tape backing rather than under it, leaving a couple small chunks behind that had to be cleaned off before I could install the new badge. If you are deleting or replacing badges via this process I would recommend taking your time and trying your best to keep the floss in the �adhesive� layer, not allowing it to stray up into the �foam� layer if possible. After the old badge was off I did use a little mild solvent to clean the remaining adhesive/foam off before applying the new badge. The whole process took maybe 30 minutes. The red badge was $40 through Quadratec.
GraBars Front Bar Set with Red Grips
For this next item I was trying to solve getting up into the Jeep once lifted (I plan to run rock rails so no steps in the long term plans) and adding the oh so necessary red accents to the cab without looking cheesy. At the time I think the GraBars brand in the Quadratec catalog came in black powder coat with either black, pink or red grips (I think they come in something like 100 colors now). Black hardware, red accent, $100� sold! I did do some research online rather than just blindly ordering from Quadratec. At the time there were several options available on Amazon for around $50 (which look identical to the GraBar brand) and other than comments acknowledging that they were Chinese knock-offs I think most of the reviews were pretty good but ultimately I decided to go with the ones on Quadratec. I guess I just felt like $50 wasn�t worth risking an inferior product.
When the bars arrived they were nicely packaged in plastic vacuum seal & cardboard and were noticeably heavy. After getting them opened and inspected I was very happy with my purchase. The textured powder coat looked great and because of the nice packaging there were no noticeable nicks or scratches on any of the hardware. I believe the grips came uninstalled but were easy to slip on. Pretty sure there were simple instructions supplied as well.
There really wasn�t much to the install. You basically remove the OEM bolts, configure the spacers and bar as the instructions describe, get both of the new bolts started and then tighten everything up. It took a little bit to get the new bolts started without cross-threading but once I got it everything tightened down nicely. I�ve had these on the jeep for 2 summers now with no color fading of the grips what so ever. They are super sturdy and don�t budge or flex a bit. Even though I don�t have the lift on yet I still find myself using these to get in rather than the steering wheel which is nice. The only thing that might annoy some is that the sun visor does make contact with the grip when rotating down (but is easily passed) and does limit the full rotation of the visor (won�t rotate past straight down). I personally down�t mind this at all and consider the visor issues a minor trade-off for a functional, high quality mod with red accent. Now I just need to decide if I want to add rear GraBars as well.
Bartact Paracord Front, Rear and Head Rest Roll Bar Grab Handles
I had only had the GraBars on for a couple of months when I decided to add grab handles as well. The bars were perfect for entry and exit assist but were not in a comfortable position when cruising around. There are many, many different brands to choose from but I quickly gravitated to the Bratact Paracord handles. I really liked the look of the braided paracord, red on black color option as well as rear and head rest handle options. The full set of 6 handles was $100.
The product I received was pretty nice. The paracord coloring was bright and saturated and all of the stitching looked strong and clean. I really like that the rear handles are attached to the roll bar via existing bolts making them feel very secure and the head rest handles are nice for the kids since they can�t reach the ones on the roll bar. I did choose to fold the loops of the front handles in and rerun the velcro straps so that they didn�t hang down quite so much and knock my hat off so its worthwhile to note that the fronts hang down a little lower than I preferred if installed exactly as recieved. After having these installed for a few weeks, especially with the doors/top off I guarantee I would have said I loved them cause they look sharp as hell but fast forward 2 summers later and here is why I would not recommend. The red paracord has faded to pink, especially the fronts where the windows are not tinted. I did flip the fronts around this last spring so the pink side is in and less noticeable but I have to say I�m pretty disappointed in these handles. I suppose they function well enough but fading red to pink is a deal breaker for me.
SpiderWebShade SW1 JK-4D Top
I picked up a sunshade a couple summers ago to help with the wind and resulting complaints of messy hair (daughters ). I didn't do a ton of research but knowing that I only wanted something to help with the wind and sun (didn't have to be waterproof) I quickly landed on the SpiderWebShade one-piece bikini. This shade claimed good durability, came in many color options, used these bungie-balls to install (which seemed like a great design) and also came in a tube door cover option for later in my build so I ordered one in white from Quadratec.
The shade arrived in good condition, folded and packaged as a square. The manufacturers website does state that the creases caused by the packaging will come out within the first few weeks or something which is pretty close to accurate. I would say they were maybe 90% gone by the end of the first summer and even though they have never really improved beyond that its not something I�m concerned with at all. The shade came with a good number of spider balls (their term, not mine lol) in two different lengths. All of the materials used (mesh, gromets, bungie, etc.) looked really nice so my early opinion was very good.
The initial install was easy, which really shouldn't surprise anyone, but I do want to recommend to anyone who gets one of these to watch the install video on the manufacturers website. Following the order of operation they lay out does make the whole process much easier than winging it. The shade is nice and taught once installed and doesn�t flap around and make a bunch of racket at in-town speeds. This is not as true at highway speeds (still not bad) but would probably be fine had I actually secured the center with the supplied adhesive velcro squares. After two summers the shade is holding up really well and really just needs a good washing (as you can see in the pics).
Really the only knock I would give this shade is that they claim on the site that it can be left on permanently with both hard and soft tops. I would say this is pretty much true for the soft top but I do find it easier to remove the front spider balls that attach to the front latch anchors before I put the top up and reinstall after I put the top down. You also have to kind of pull the shade down in order to lock and unlock the soft top latches. None of this is a big deal and who knows, maybe I�m doing something wrong but I would�t say its hands off once installed. As for the hard top, I�ve never tried because I can�t really see how it is possible. The back latches for the freedom tops are centered enough that it doesn�t seem like there would be anyway to lock them down with the shade in your way. Maybe there is a place along the roll bar where you can fish your arm back in there but it doesn�t seem to me like they would be very easy to get locked/unlocked. I have just gone to taking the shade off for the hard top season.
Overall I have really liked this shade. Well worth the $100!
Quadratec Tail Light Guards
I really don�t have much to say about the tail light guards. I bought a set off of Quadratec for $50 and they are pretty much what I expected. Reasonably strong with decent paint but really nothing special. The screw heads have turned light gray and started to corrode a little but that�s nothing a little paint every couple of years can�t correct. I do think they add a little personality to the rear of the Jeep until I get a bigger tire and new bumper on there.
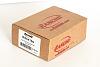
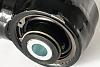
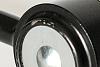
Shortly after Christmas 2016 I threw good planning out the window once again and notched my second impulse buy and most recent mod. I had decided on JW Speaker headlight and foglight upgrades for the build list but unlike most of my list, these were not a placeholder for additional research but an iron clad final decision. I could not get over the look of these lights (I'm pretty sure it was the black bezel option that did me in). One of my first cars was a late 80's GMC Jimmy and the very first thing I did was throw some blacked out GTS headlight covers on that bad boy (it screamed 1995). So I have always really liked the blacked out headlight look but if you had GTS covers you know that they cut your headlight output significantly which I hated. These LED's made all things right in the world for me with their blacked out look and improved LED light output. I personally think the half-halo and disc shaped inner lenses are cool as hell and the J series no longer required the separate anti-flicker harness so when 4wd.com put them on sale I didn't hesitate. I think I was able to get the headlights and foglights for around $700 shipped which basically meant buy the heads get the fogs for free. It looks like there is now a J2 series out which allows you to run the high and low beams together which is kinda cool.
I mentioned in my first post that I would work in some of my experiences with the different vendors I have used so here you go. Up to this point I had only ordered from Quadratec but 4wd.com was having this sale so I jumped online and got both sets of lights ordered. After a few days they delivered and I opened them up as soon as I got home from work. To my shock and horror the headlight box was missing the freaking headlights! After staring for a good while at the empty cardboard circles that should have held my new, very expensive (even on sale) lights, I gathered my senses and called customer support. I spoke with a customer service/sales rep via the number on their website who was of coarse shocked by how this could have happened and offered to look into it and call me back. That was January 6th.
After sending pics of the empty boxes, discovering that the shipping confirmation from Fedex showed that the box was shipped grossly underweight and sending him screens of that, multiple attempts to get an update via email and one voicemail I finally got the dude back on the phone on 1/10. He tells me that the claim must be sent to their customer complaint department to be thoroughly researched and tells me it could be another week+ before they could get a replacement shipped out even after I made it clear the package was shipped underweight proving that this was not a con on my part. He didn't budge so I promptly thanked him for his help and asked to be transferred to a manager which he did without any resistance but all I got was someone's vm. I left a message and then sent the CSR a follow-up email requesting the direct extension of the manager. A day passed, he never replied so I dug around on the 4wd.com website until I found employee profiles and the phone number of the highest level manager I could muster. I called and left a vm explaining the situation and expressing my displeasure and wouldn't you know it I received a call-back from the manager I was transferred to the prior day within the hour.
From this point on everything went pretty smooth and they had my lights shipped out within a day or two but I have to say that this was a horrible customer service experience. I get that this was a weird issue that, from their perceptive, could have been someone trying to pull a fast one but as soon as I was able to prove that the package was shipped underweight another set of lights should have been shipped out immediately, especially since they had already charged my cc. Now, I have since used them for my 35's without issue so not saying buyer beware but this one experience was pretty darn bad.
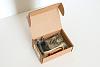
8700 Evolution J Series LED Headlights
The install on these was a sinch, just like replacing the headlights if one burned out. I removed the grill to fully access the headlights which are secured in place with a metal ring and some screws. Once I got the screws out and fought disconnecting the wiring harness I pulled the lights, swapped the rings over to the LED's and popped them back in (plug & play). One good bit of advice I read online was to adjust the beam before reinstalling the grill as there are horizontal and vertical adjuster screws, one of which is no longer accessible when the grill is on. I made some minor adjustments against the garage door at something like 20 ft. and called these good after reinstalling the grill. Whole deal was probably an hour.
I have loved the look of these lights ever since getting them on and I've had no issues with them whatsoever. I really like that they are not crazy bright which was most noticeable to me in town where there are plenty of street lights but rest assured they light up the night on the highway. If you are hoping to blind the person sitting at the stop light ahead of you, these might not be for you. I also love how they have a noticeably unique look both during the day and at night. I did find the beam pattern to be kind of interesting so I included a pic below. These lights are great and you should go buy a pair of J2's right now!
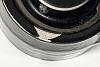
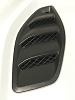
6145 J Series LED Foglights
The install on these did not go as smoothly. JWS supplied good install instruction and I'm sure I had a youtube video going as well but I made an error right out of the gate thinking I would take them out through the top of the bumper. I missed a note in the instructions about rubi's and the ESD so after destroying the philips head clips that hold down the top plastic cover of the bumper (buy the damn tool already) and really having to work to get all of the screws out of one foglight housing I realized that the extra ESD equipment would not allow the whole assembly to exit through the top. After a couple four-lettered words I gathered myself and went to removing the lights from below which is noticeably more cramped as there are lots of suspension stuff in the way. Once I got the lights out and the LED's swapped into the OEM housing I reinstalled and started on the wiring. I don't know if the J2's are still this way but the J's require you to wire in an adapter wiring harness which I soldered in so after getting the loose wiring cleaned up with a couple zip-ties (I plan to go back in with some heat shrink tubing or something this spring when I have the front end tore apart), I made a couple minor tweaks to the beam and called it good after about 2 hours invested.
My only complaint about these foglights is that I don't get to run them more. The 3 inner lenses look awesome when illuminated and the glass looks nice and blacked out when not. They are nice and bright and really light up the street out to about 10-15 ft. Just like the headlights these things are great and I would highly recommend.
Now that I'm done with the trip down memory lane its time to talk the current project. Like a lot of jeepers I aspired to run bigger tires on my JK and I decided pretty early on that I'd go with 35's. That size tire really seemed to fit well with my plans to get into some off-roading while also using the Jeep as my daily driver, at least for the foreseeable future. In order to run 35's I knew I would need to invest in a lift and oh boy are there a lot of options out there. I ruled out all of the budget boost and sport lift options early on in my research. It seemed to me (based on the accumulation of everything I had read and watched) that if you are going to lift your Jeep and you want to retain the stock ride (as much as possible anyway) that it's all about the geometry, so lift options without adjustable upper and lower control arms were out. I also knew I wasn't looking to get into a long-arm lift so I landed pretty squarely in the 3" - 4" short-arm camp with upgraded shocks (of coarse). In addition to suspension geometries, I wanted to be cognizant of steering and driveline geometries as well so add new drive shafts, knuckles, flipped drag link and relocated/upgraded steering stabilizer to the list. Top it all off with steel braided extended brake lines and I was feeling pretty good about being able to get plenty of lift without sacrificing a ton of ride quality or fighting vibrations (at least in theory). I did measured the garage door height and it appears that I have 10"+ to work with so fingers crossed that garage door mods stay off my build plan! I also threw in some new wheels, lugs, wheel spacers (to address a backspacing issue), tailgate hinge/tire carrier upgrade (for lugging around 35" #5), a programmer (to address the spedo at a min), a shorter antenna, paint pens (for rock chips) and what the hell, lets replace that Lange hoist while we are at it.
I also took this opportunity to build up the arsenal of tools that I would likely need to install this all on my own. I have a reasonably good collection of power tools, ratchets, sockets, wrenches, etc. but I knew I'd be setting myself up for twice as many impromptu trips to the hardware store, interrupting the actual build if I didn't step it up some. I started off by downloading all of the install instructions for the parts purchased and compiling a list of "required tools" that I was missing. This ranged anywhere from sockets sizes I was missing to a puller kit, grease gun, wheel chocks, etc. Without any air tools at my disposal I will be relying on my DeWalt impact driver (when needed) so I made sure to grab impact ready deep sockets and accessories while also filling in holes I had in my combination and torque wrenches. At the very least I'm hoping the extra planning and tool hoard will limit the impact of any surprises encountered. Under the pic below is a complete list of parts and tools/supplies purchased for this build if interested.
As of the time of this posting I have ordered and received everything except the drive shafts, antenna, hoist and a few minor items on the supplies list. I went into this build with the goal of "saving" at least $1000 across the entire build (parts & tools) so I hit the holiday sales hard at first, jumping on a great sale/rebate offer 4WD.com was having on tires and decent black Friday sales on the spacers, hinge upgrade and knuckles but the bulk of what I have in-hand was bought on a single invoice from Northridge 4x4 in early December. I've yet to order the drive shafts only because Northridge doesn't deal in Tom Wood and I was hoping to luck into a sale elsewhere (nothing yet). The antenna and hoist are both relatively late adds to the plan and I'll drop into AutoZone or something for the diff fluid, etc. As for the tools, the Sears black Friday sale was amazing for about a third of the list but most of the purchases since then have been with Home Depot, Harbor Freight and Northern Tool. While I think home Depot's retail prices were quite good, I will admit that I never did catch a sale for anything I bought there or on their website. Harbor and Northern on the other hand have had several sales that I took advantage of. I am preparing for the possibility that I may want to (or have to) replace the ball joints while I have the knuckles off so I will either rent a press from AutoZone or I will try to find one that I can borrow. With all that said, I feel like I've done pretty good with everything purchased so far, saving over 16% on the parts (when compared to the retail price listed by the seller) and 27% on the tools. Maybe 16% doesn't sound super impressive on the parts but considering AEV sets the price on their wheels (meaning I paid retail, discounts are apparently a thing of folklore), I am pretty stoked about saving over 30% across the rest of the parts (including rebates). Right now I'm forecasting around $1500 saved overall so all the hustling over the last 2 months has paid off pretty good.
Real quick... I did want to say that this was my first time working with Northridge 4x4 and they were great! I worked directly with the companies president on the pricing and was handed off to sales to execute the order. Half the parts were being shipped from their warehouse and the other half from the manufacturer yet everything showed up at the same time on the same truck (probably luck). I really couldn't be happier working with these guys, they are top notch. Really, everything else delivered without a hitch as well. All 5 tires showed up together from 4WD.com and all the tools were as expected. Sears packaging could be a little nicer but no harm no foul. More to come...
*updated 08/26/2018* Parts Purchased:
- Mickey Thompson Baja MTZP3 315/70R17
- ORO-TEK Generation II TPMS Sensors
- AEV Pintler 17x8.5 - Black
- McGard 1/2"-20 Thread Regular Cone Seat Lug Nut Installation Kit with 3/4" Hex
- Rancho 4" Crawler Short Arm Lift Kit
- Rancho RS9000XL Shocks
- Rancho High-Steer Knuckles
- Rancho Flipped Drag Link
- Rancho RockGEAR Front Track Bar Bracket
- Rancho RS7000MT Steering Stabilizer
- Rancho Extended Length Brake Lines
- Rancho High Clearance Steering Stabilizer Bracket Kit (removed)
- SteerSmarts Yeti XD 1�-Ton Tie Rod
- SteerSmarts Yeti XD Steering Damper Bracket
- Rare Parts Dual Load Carrying Ball Joints
- Spidertrax 1.5" Wheel Spacer Kit
- Teraflex HD Hinged Carrier & Adjustable Spare Tire Mounting Kit
- Teraflex Adjustable Tire Carrier Wheel Spacer Kit
- Superchips Trail Dash 2
- Superchips TD2 Dash Pod
- Tom Wood Front 1310 Drive Shaft
- Tom Wood Rear 1310 Drive Shaft
- AntennaX CB (24-inch) AM/FM Antenna
*updated 08/26/2018* Tools/Supplies Purchased:
- Powerbuilt 23-Piece Ball Joint/U-Joint Service Kit
- Powerbuilt Front End Service Kit
- Tekton Dead Blow Hammer Set (3-Piece)
- Estwing 2.5lb Blacksmith Hammer
- Capri Tools Torx and E-Torx Bit Socket Set (35-Piece)
- Grip Heavy-Duty Pry Bars (4-Piece)
- Craftsman Micro-Clicker Torque Wrench 10-75 Ft Lbs 3/8" Drive
- Craftsman Metric 12-Point Deep Socket Set 3/8” Drive (6-Piece)
- Craftsman Metric 36mm Socket 1/2” Drive
- GearWrench 12-Point Standard Socket 1-1/16" - 1/2" Drive
- Master Mechanic 12-Point Standard Socket 1-1/8" - 1/2" Drive
- Master Mechanic 12-Point Standard Socket 1-1/4" - 1/2" Drive
- GearWrench 12-Point Standard Socket 1-5/16" - 3/4" Drive
- GearWrench 12-Point Standard Socket 2" - 3/4" Drive
- Craftsman Drive Tool Accessory Set (20-Piece)
- Craftsman Full Polish Metric Combination Wrench Set (24-Piece)
- Craftsman SAE Offset Ratchet Wrench Set (5-Piece)
- Craftsman Metric Offset Ratchet Wrench Set (5-Piece)
- Craftsman 13 watt Fluorescent Work Light
- Pittsburgh Pro 25” Breaker Bar 1/2” Drive
- Pittsburgh 24” Adjustable Jumbo Wrench
- Pittsburgh Metric Impact Deep Socket Set 1/2” Drive (13-Piece)
- Pittsburgh Pro Impact Wobble Socket Extension Set 1/2” Drive (3-Piece)
- DeWalt SAE Impact Socket Set (10-Piece)
- Milwaukee Impact Driver Socket Adapter 1/4” Drive
- Milwaukee Impact Driver Socket Adapter 3/8" Drive
- Irwin Hanson 1/4”-1/2” Tap Wrench
- DeWalt 5/16” Drill and 3/8” x 16 NC Tap Set
- Kobalt 5-Piece 5" Steel Screw Extractor Set
- Pittsburgh 9” Safety Wire Twisting Pliers
- Harbor Freight 0.041" Stainless Steel Lock Wire, 1 lb. Coil
- Empire 48" Magnetic I-Beam Level
- Central Tools Magnetic Angle Finder
- Wagner Furno 300 Heat Gun
- AutoCraft 2-1/2" Heat Shrink Tubing Kit 185 Pcs
- Dorman Conduct-Tite 3/8" x 5 Ft. Black Flex Split Wire Conduit
- GearWrench Upholstery Clip Pliers
- Lincoln Pistol Grip Grease Gun (7,500 PSI)
- ToughOne Engine 1/4" Grease Fittings, 10 ct.
- Hotchkis Sport Suspension Zerk Cap - 1790 - Red
- Performance Tools Assorted Cotter Pins, 1000 ct.
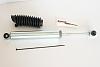
- Ironton Steel File and Wire Brush Set (7-Piece)
- Ironton Double-Sided Pyramid Rubber Chock (x2)
- Ironton Mechanic's Roller Seat
- Strongway Double-Locking 12-Ton Jack Stands (x4)
- John Deere Multi-Purpose Medium Utility Gloves
- K&N Cabin Air Filter
- Royal Purple 5W-30 High Performance Synthetic Motor Oil
- K&N Pro-Series Oil Filter
- FloTool Super Multi-Purpose Funnel
- Royal Purple 75W-90 Max-Gear Synthetic Gear Oil
- VersaChem Mega Black High Temp Silicone Gasket Maker
- VersaChem Anti-Seize Thread Lubricant
- Amsoil Synthetic Polymeric Off-Road Grease, NLGI #1
- Loctite Threadlocker Red 271
- Loctite Threadlocker Blue 242
- Blaster PB Penetrant
- Simple Green Pro Series Automotive Cleaner and Degreaser
- Rust-Oleum Automotive Gloss Black Enamel Spray Paint
- Rust-Oleum Automotive Self Etching Primer Spray Paint
- Mopar Touch Up Spray Paint - Red, Clear
- Mopar Touch Up Paint Pen - White, Red, Clear
- PaintScratch Primer Paint Pen
- PaintScratch Rubbing Compound
- PaintScratch Tack Rags
- Decals (when not supplied with parts)
So I’m a couple months out from the install and getting pretty excited to start turning some wrenches (a little nervous too if I’m being honest). I took a little time over the last few weekends and setup a “studio” to snap some good pics of the parts pre-install. I’m lucky enough to be married to a photographer so she setup her Nikon DSLR for me and I played product photographer for a few hours, lol. I thought this might be a good way to share/document the initial quality of everything going on my Jeep in the spring.
Right out of the gate I’ll tell you I'm pretty happy with everything I purchased. Between parts, tool and supplies I worked with maybe 10 vendors, ordering most everything online and having it shipped to my house or local store. I might have gotten lucky but everything went super smooth across the board. My only complaint is with some of the packaging decisions made by Rancho but I’ll get into that later. Anyway, here we go.
Mickey Thompson Baja MTZP3 315/70R17
For the 35’s I decided to go with a set of 5 Mickey Thompson mud terrains. When researching tires I briefly looked at Nitto Trail Grapplers and BFG mud terrains in addition to Mickey Thompsons. I know a couple guys with the Nittos who both gave me good reviews and I’ve been running the stock BFG’s for 45k miles with no issues but something drew me to the MT’s. Most of the reviews I read online were pretty good and they seemed to be one of the top brands plus they offered the tires in OWL so my mind was made up.
Just a few days after getting the okay to start ordering parts I ran into a pretty good sale at 4WD.com. They were advertising up to $250 off a set of 4 and Mickey Thompson was offering a $150 rebate card with purchase of 4 which all together sounded like a hell of a deal (they were running $334/ea. on Quadratec). When it was all said and done with the 5 tires ran me $1275 ($255/ea.) with free shipping, no tax and a $150 gift card. I knew going in that the tires would be where I would need to make up a large portion of my “savings” quota and I think I did pretty good (looks like a similar sale is going on now if anyone is in the market).
All 5 tires delivered together less than a week after ordering. They literally just rolled them out of the back of a FedEx truck. A quick inspection revealed no shipping rash or defects (as far as I could tell) so I rolled them into the garage. I did read online that it is best to store tires, when off the wheel, standing up rather than stacked and that wrapping them in plastic will help keep the oils from evaporating off (and from stinking up your basement which I learned the hard way). I’m assuming the blue stuff on the lettering is intentional and maybe protects the white but thats just a guess. I really like the look of these tires and can’t wait to get them on.
AEV Pintler 17x8.5 in Black
For wheels I pretty much knew from day one that I wanted Pintler’s. I honestly didn’t look at anything else. I love the simple 5 spoke design as well as the recessed/protected valve stem feature. I went with the flat black which is paintable but I plan to run them as-is. Like most of you (I’m betting anyway), when you think Pintlers you think yellow center cap. Well, I’ve never been a big fan of yellow so I had planned to buy replacement black caps but lucky me, they come with black instead of yellow now (who knew). AEV seems like a very well respected brand so I had no concerns going in outside of possible shipping damage.
I purchased the wheels as part of the package deal I made with Northridge 4x4. Like I mentioned in an earlier post, AEV sets their pricing so 5 wheels ran $1175 ($235/ea.) with free shipping and no tax. All 5 wheels shipped from the NR 4x4 warehouse in Washington and delivered all-together in seperate, nicely packed boxes. The boxes all had minor damage from shipping but all 5 wheels looked great once unpacked.
The overall quality of these wheels appears to be great. The black coating has been applied evenly and with good coverage throughout. Even though the wheels were not a required upgrade for the tires/lift, I’m glad that I made the investment now. I know some are not a fan of white jeeps with black wheels but I think its gonna look ba.
Spidertrax 1.5” Wheel Spacers
Wheel spacers… the unfortunate outcome of two wheels and a lift that don’t play well together. In all seriousness I’m not terribly butt hurt about putting these on my JK even though they do represent another possible point of failure as well as extra maintenance and expense (also hoping I like the look). I became aware, well before purchasing anything, that the lift had a backspacing requirement of 4.5” and the wheels were spec’ed at 5.20” of backspacing which I figured would be a problem. After confirming my concern with Rancho and AEV (both said the wheels and/or tires would rub), I did a little bit of research to better understand what the heck terms like backspacing and offset meant which introduced me to correcting my issue with wheel spacers/adapters. I read strong opinions both for and against wheel spacers, most of which addressing safety concerns but after reviewing all the evidence I felt like the best advice I could find was that they are okay as long as you invest in good hub and wheel centric spacers/adapters (not the thin metal spacers that shorten your OEM studs) and made sure to re-torque shortly after install and with every tire rotation. There were a few different options out there but most of the recommendations pointed to the Spidertrax 6061T6 Aluminum Wheel Spacers.
At the time, Spidertrax had two options available; 1.5” in black or 1.25” in blue. Even though I only needed to pick up a little under .75” to clear the upgraded suspension I went with the 1.5” spacers mostly because I didn't like the blue of the 1.25" and didn’t feel that the extra 1/4” the tires will stick out would be a big deal. Northridge 4x4 ran a pre-black Friday sale, advertising them for 15% off so I jumped on a couple sets ($170, no tax, free shipping).
They arrived after just a few days without issue. The boxes were relatively small and nicely packed, with obvious thought given to both protecting the content and layout efficiency. Everything inside was complete and in great condition. The production quality of the actual spacers is really, really good. They serve a very simple purpose so they aren’t terribly complex but were still quite impressive. The mill work is super precise, they utilize a super strong chromoly wheel stud and the black anodized aluminum looks fantastic. I started out feeling forced to put these things on my Jeep but now am actually kind of proud to own a set. These appear to be a great product!!
McGard 1/2"-20 Thread Regular Cone Seat Lug Nut Installation Kit with 3/4" Hex
I wanted to go with a black lug to match the black wheels. My initial research yielded a few options but one of the McGard kits seemed like my best option based on reviews and name recognition. The kit I chose comes with 18 lug nuts, 5 wheel locks and a lug key and hopefully fits the Pintlers without issue. I wasn’t looking for a locking lug to start but in the end I feel like I will really appreciate this feature. Most of the reviews I read on these were good but I did see a few recent reviews stating issues with the lugs rusting so here’s to hoping I don’t experience the same.
I bought these as part of the package deal I made with NR4x4 (they run around $70 retail). They arrived in a nice box with everything individually packed in plastic, inside two thick plastic bags. I opened one lug, one lock and the key and each looked really nice.
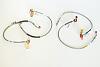
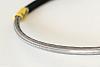
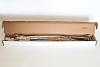
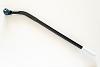
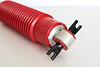
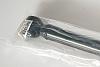
Rancho Extended Length Brake Lines
I feel like extended brake lines are a pretty standard upgrade with most lifts. The Rancho lift I bought came with extended length steel braided front brake lines but only a relocation bracket for the rear. I wanted to make sure that I had high quality, steel braided brake lines all around so I was prepared to buy a really nice set of 4 and just store the Rancho's away. I tried to really dig deep during my online search but I honestly struggled to find anything that I felt stood out. I wonder if the longer length limits the options or maybe I just never hit the right google search. I did take a good long look at the Crown Performance steel braided brake lines. From what I read online they seemed to be a mechanically high quality brake line and the ability to get them in red nearly had me sold but I just couldn’t get past all the reviews I read about the colored layer cracking and breaking off, in some cases within the first year. I just couldn’t pull the trigger on another red accent potentially doomed to look like crud way too soon (damn grab handles). So, I decided I’d just limit my spend and buy a set of Rancho extended length steel braided rear brake lines to go with the fronts. These were also part of the package deal with NR4x4 (retail around $85).
The rear brake lines arrived in a small box, each in a separate plastic bag and the fronts arrived with the lift. Neither came with much packing material to keep things from moving around during shipping but I'm not sure there is much risk of damage with these as long as the outer box doesn't get crushed. I was a little surprised to discover the yellow Goodrich USA branding on both front and rear sets. Now, I wasn’t concerned with the Goodrich brand, after all I didn’t figure Rancho was manufacturing these in-house but had I know I might have saved another $10 by just buying the Goodrich brake lines in the first place (although I can’t say they are exactly the same). With that said, I still think the brake lines look pretty good and I’m happy with my purchase. Hopefully I feel the same post install.
There have been a couple small things this week/weekend that has me pretty jazzed for things to come. I scheduled my vacation days for the install (which made it feel way more real), the new hoist arrived (I went with the 12ft Harken Hoister) and the weather man is forecasting 60�+ and sunny both days this weekend so I’m gonna dig my tools out of cold storage (aka my garage) so I can get the hard top hanging from the ceiling and the soft top on for the warm weather season. I’ve been feeling a little stir crazy and in need of a good weekend project so the timing is perfect. I’ll snap some pics during the install and of the final product and post them here sometime next week when I get a minute. Hoping for smooth sailing on the first project of the year. Now, back to the parts!
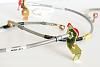
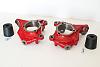
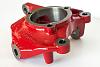
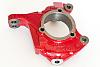
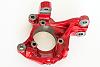
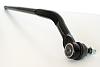
Rancho High-Steer Knuckles
As I said earlier, I wanted to do all I could to maintain a good on-road ride which meant addressing any potential bump steer/death wobble issues caused by lifting my JK. I spent a good bit of time last fall reading up on how geometry issues caused by lifting a Jeep can create bump steer and how upgrades like high steer knuckles and a flipped drag link can help correct those issues. Pretty much a no brainer considering nothing below is all that expensive. I figured I’d be best served to stick with Rancho across the board so I’d know everything was gonna play nice with the lift. Didn’t hurt that Rancho’s knuckles were bright red either.
I ordered these during a pre-black Friday sale from Northridge 4x4. I think I received an email or something advertising them for 10% off so I snatched up a set without much thought. In hindsight I probably could have done a little better on them if I had waited and included them in the big order with NR4x4 but I also don’t feel like I did too bad at $370 with no tax and free shipping. These did take a little longer to arrive which is actually how I got in touch with the NR4x4 president for the big order. I guess during the holidays even the top dogs have to answer the “where is my order” emails. If I remember right, they were delayed from Rancho but did show up in good shape after 2-3 weeks.
The knuckles arrived in separate, heavy-duty cardboard boxes along with a couple bump stop spacers, hardware and a printed set of install instructions. I have nothing to compare these to and zero previous experience with any of this stuff but both knuckles looked really good to me. I think it’s fair to say that out of all the Rancho mods going on during this install, these are the nicest. All of the mill work looks sharp and what I think is powder coat looks great as well. They weigh a good bit and while I can’t say yet how they compare to stock, I did just read a review on Quadratec stating they are much more “heavy-duty”. Zero complaints so far.
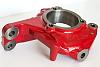
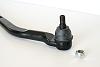
Rancho Flipped Drag Link
The flipped drag link was a requirement for the knuckles and was purchased as part of the NR4x4 package (retails a little under $160). It arrived packaged in its own box saving it from banging against other components during shipping and damaging the paint. Looks like it will do the job.
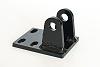
Rancho RockGEAR Front Track Bar Bracket
Another required part purchased as part of the NR4x4 package ($112 retail). Shipped in its own box along with bags of hardware. The bracket appears to have good welds, the paint looks great and the hardware is… hardware (although it all looks pretty nice too).
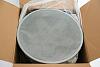
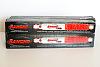
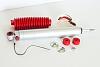
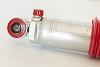
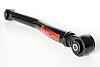
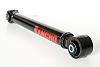
Rancho RS9000XL Shocks
Staying inline with all the other suspension upgrades, I chose to stick with Rancho for the new shocks as well. Having had a set of RS5000�s on my YJ I felt pretty good going in that the Rancho�s would yield a stiffer ride without feeling like a dump truck. I did choose to step it up for the JK and went with the RS9000XL�s over the RS7000MT�s or RS5000X�s. I�m eager to see how well the built-in 9-position ride adjustability allows me to tune for the conditions at hand. These were purchased as part of the big NR4x4 order (set of 4 runs around $450 retail).
My first impression after opening up the boxes was kind of� meh. I still feel confident that I will like these shocks once they are on but I felt underwhelmed holding them in my hands. The materials used, welds and post shipping condition (just a few light dings here and there) all leave a little to be desired. The front shocks each came with a loose red rubber boot and the rears came with a red plastic boot already mounted on the shock. Throw in a little hardware and a sticker and that�s pretty much it for each box. Hopefully these shocks will make up for a lackluster first impression once installed.
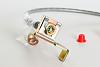
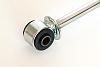
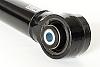
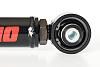
Rancho RS7000MT Steering Stabilizer
I figured if I was upgrading the shocks I might as well upgrade the steering stabilizer as well. I was sticking with Rancho for this upgrade as well and the RS7000MT is the top shelf of Rancho stabilizers so I included one in the big NR4x4 order (retails a little under $90).
For the most part all my feedback above on the shocks holds true for the steering stabilizer as well so I won�t go over all that again. I do wish this stabilizer had come with a red boot rather than black as to keep it consistent with the shocks but I think I saw that I could order a red one from Rancho (or somewhere) so I�ll probably do that in the coming weeks.
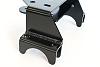
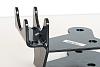
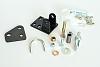
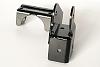
Rancho High Clearance Steering Stabilizer Bracket Kit
To be honest I�m not 100% sure what prompted me to buy this kit now that I�m thinking about it. I thought it was a requirement of the knuckles but I just looked and it�s not. It probably came up as a suggested item when I was researching the knuckles or possibly the steering stabilizer but I guess it doesn�t really matter, still a good idea to get the stabilizer up and out of the way which this kit should do just fine. Like the two items above, it was also purchased as part of the big NR4x4 order (retails a little over $50).
This kit consists of a single bracket, a small plate and a bunch of hardware. The bracket had decent welds and nice paint, the hardware looks good and is consistent with the hardware from all the other Rancho kits but the paint on the plate is pretty weak. I�ll probably give it a quick spray paint touch-up before the install. I did just notice that the bracket I received doesn�t quite match the one in the pic on Quadratec. Possible I received some older inventory which is fine except the one in the pic on Quadratec appears to be a solid piece rather than welded together. Hope what they sent me is equally as strong as the part pictured.
At $1199 retail, price was definitely the biggest factor in me deciding to go with this lift. It also helped that Rancho offered a relatively complete system with the lift, knuckles, drag link, etc., all designed to run together. At the same time I was considering the Rancho kit I was also looking at Clayton Off Road and Rock Krawler lifts. Both of those other kits did look to have a little nicer and/or beefier components but at $700-$1000 more for a comparable kit, I figured the Rancho would do just fine for now. I can always upgrade the control arms or whatever at a later time if I feel I need to. Plus, when you figure in the extra saved from packaging this into a single large order with NR4x4, I really ended up getting a lot of stuff pretty damn cheap.
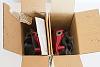
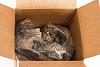
The lift was shipped directly from Rancho and arrived within a few days spread across 3 large boxes. I was present when the FedEx driver was unloading each off her truck and I noticed pretty quickly that there was a good bit of clanking around going on inside the boxes as she got them on the ground. Each box was quite heavy and as I dragged them inside I could feel the contents slide around with little resistance (plus one of the boxes was busting open and nearly spilling its contents by this point) so I was a little concerned my stuff was gonna be dinged up. A few days after getting the boxes inside I had some time to open up and inspect the lift and sure enough, every control arm, track bar and end link had several chips, dings or scrapes in the paint. There did not appear to be any structural damage to any of the components but I was still feeling pretty bummed about the condition of the centerpiece of my build. What was crazy is that each component was only packaged in something like a .6 mil plastic bag, with only a few pieces of crumpled up craft paper per box to keep the contents from moving and contacting one another. The boxes being much longer than most of the components within also allowed everything lots or room to slide around and make contact. I’ve included pics of the carnage below.
After a couple of weeks I decided to reach out to Rancho to see what my options were. I really didn’t know if they would do anything for me or not but I figured I should probably try so I sent a nice email explaining my concern and received this equally nice response offering to do nothing;
I completely understand the situation you are experiencing. It is disappointing that the paint has been affected by the packaging and shipping of the product With that being said, typically our Warranty department does not cover visual defects that are not affecting the operation or function of the product. The components in this suspension lift system are covered under Lifetime Warranty. If and/or when the control arms experience structural failure or defects due to rust, corrosion, or deterioration they can be replaced under warranty. Visual surface rust alone is not something that our Warranty department will cover either, unfortunately.
While I understand the situation and agree with your concern, I am only able to outline what our options are with our Warranty department. It may be worth contacting the retailer and expressing the concern to see if they can provide replacement control arms for you directly through them. Again, we apologize for any frustration or inconvenience that this may have caused.
It sounded to me like this Rancho Tech was not surprised at all with what I had described but followed protocol and responded with what might be an over utilized standard response to shipping damage. It was good to know that if a control arm prematurely rusted through and failed, tearing up a bunch of other stuff, that Rancho would replace that control arm. Hey Rancho, charge an extra $100 for this kit and put that directly into your packaging, your customers will be much happier with their purchase.
I have since moved on with life and plan to give all the affected components a quick touch-up paint job in the next few weeks. I bought a starter kit of POR-15 for the big chips and a couple spray cans of Rust-oleum Auto gloss black for the larger area touch-ups. The one silver lining to this is that I do have a few chips in the Jeep’s paint that I need to fix so this little project will be good practice. I did not reach out to NR4x4 as suggested by Rancho because they never handled any of the boxes and I didn’t feel this should be their problem.
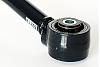
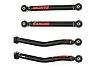
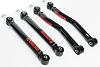
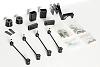
Adjustable Upper Control Arms
Outside of the bumps and bruises these looked pretty good. Rancho upgraded the bushings in this kit to a new D2 synthetic high articulation bushing which is fully rebuildable. Looks like they sell a rebuild kit too so if these stay on my JK for a bit that will be a nice little perk. There is an interesting little bend in the rear control arms to address clearance for larger tires which is nice. The tube welds all look nice and strong as do the ends but a bright red Rancho decal on each control arm would have been nice (even if I’m the only one who knows they are there). Pretty happy with these overall.
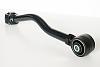
Adjustable Lower Control Arms
As they should be, these are noticeably heavier and thicker than the upper control arms. Same as the uppers these have D2 bushings but this time the bend is in the front control arms and each has the performance enhancing red Rancho decal missing from the upper control arms. All of the welds look good as well. If it wasn’t for the damage, the paint on all the control arms would have easily met if not exceeded my expectations. Given that I can correct any flaws without a ton of effort or expense, I feel pretty good about all of the control arms.
Progressive Coil Springs
I like that Rancho upgraded the springs in this kit (compared to all their other lifts) to a progressive rate spring. Hoping these help with maintaining a comfortable ride post lift. These were packed in the 3rd box with the end links and other hardware keeping the paint intact on all four of the springs.
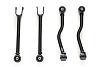
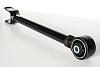
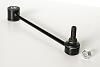
Adjustable Track Bars
I really liked that this kit came with both front and rear adjustable track bars. Both the Rock Krawler and Clayton kits only came with a front.
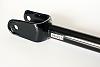
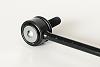
Sway Bar End Links / Hardware
The end links might be the first component I upgrade further (they look a little wimpy). Thinking a nice set of disconnects would be cool. All of the other hardware looked nice, staying consistent with all of the kits I purchased.
Damage
I think most would agree that these issues appear to have occurred during the storage, packaging and/or shipping of the kit and not a manufacturing flaw which is so crazy to me. As a reputable and recognizable brand, why would you invest in producing a quality product only to skimp on your packaging, causing your product to arrive noticeably damaged. I mean I get it, someone thinks they are saving a ton on packaging but damn. That’s pretty much all I can say.
 12-22-2017, 05:37 PM


 ). I didn't do a ton of research but knowing that I only wanted something to help with the wind and sun (didn't have to be waterproof) I quickly landed on the SpiderWebShade one-piece bikini. This shade claimed good durability, came in many color options, used these bungie-balls to install (which seemed like a great design) and also came in a tube door cover option for later in my build so I ordered one in white from Quadratec.