2014 JKU "Stormtrooper-Leia" build
 04-03-2017, 03:09 AM
#1
JK Newbie
Thread Starter
Join Date: Nov 2016
Location: Lake Charles
Posts: 14
Likes: 0
Received 0 Likes
on
0 Posts
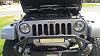
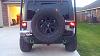
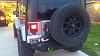
Lets start at the beginning:
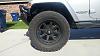
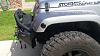
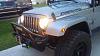
JKU 2014 Sahara (42+K)
lifted 3 or 4 inches (no clue; no stickers on any of the componets)
Smittybilt XRC 9.5 Winch (no controller)
SmittyBilt XRC front bumper (76806) (14" light bar) (no place for fog lights )
)
SmittyBilt XRC read bumper with Tire Carrier
20" XD wheels Addict 798 Matte Black
35" tires Federal Couragia M/T
Body Armor 4x4 Rack system with Basket
Also on the rack I have 4 in the front 2 in the back aux cube lights 3" (Eyourlife)
Attachment 669624
This how I bought it..... I love it! But there is several changes I need to do.
This is will be a more milder build compared to most... but will see what happens.
That's it for now.
MM
OUT.
JKU 2014 Sahara (42+K)
lifted 3 or 4 inches (no clue; no stickers on any of the componets)
Smittybilt XRC 9.5 Winch (no controller)
SmittyBilt XRC front bumper (76806) (14" light bar) (no place for fog lights
SmittyBilt XRC read bumper with Tire Carrier
20" XD wheels Addict 798 Matte Black
35" tires Federal Couragia M/T
Body Armor 4x4 Rack system with Basket
Also on the rack I have 4 in the front 2 in the back aux cube lights 3" (Eyourlife)
Attachment 669624
This how I bought it..... I love it! But there is several changes I need to do.
This is will be a more milder build compared to most... but will see what happens.
That's it for now.
MM
OUT.
Last edited by madmatt21; 04-03-2017 at 03:12 AM.

 04-03-2017, 06:02 AM
#3
JK Newbie
Thread Starter
Join Date: Nov 2016
Location: Lake Charles
Posts: 14
Likes: 0
Received 0 Likes
on
0 Posts
I will try this out, this weekend.
Thanks!
MM
OUT
Thanks!
MM
OUT
04-03-2017, 03:55 PM
#4
JK Newbie
Thread Starter
Join Date: Nov 2016
Location: Lake Charles
Posts: 14
Likes: 0
Received 0 Likes
on
0 Posts
So here is the Plan....
I want an everyday driver with trailing on the weekends;plus a Star Wars theme.
Nothing crazy, but something different.
1st stuff I will change:
Stubby antenna
Locking lug nuts
Locking gas cap
Locking hood latches
Hothead Headliners (full set)
Adjust Speakers
"Black Out" Turn signals, Side-marks, and Taillights
2nd stuff I may change:
Tires (I need something all terrain)
Selling the rack and rack system (I love how it looks, it's just not practical)
LED headlights
Add steering Stabilizer
Change shocks
Full wheel and tire set change (less likely but.... maybe)
Ok, that is the plan for now.
MM
OUT
Last edited by madmatt21; 04-03-2017 at 05:36 PM. Reason: I don't have fog lights......
04-03-2017, 05:31 PM
#5
JK Newbie
Thread Starter
Join Date: Nov 2016
Location: Lake Charles
Posts: 14
Likes: 0
Received 0 Likes
on
0 Posts
Last weekend I started screwing with my Jeep.... Here is what I got done.
Changed my bent antenna to my new stubby $16.99 (1)

Bought 2 more D-Rings (3/4") for the rear bumper. ($17.99)
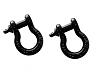
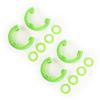
A set of D-Ring Isolating Kit for all D-Rings -green ($24.99)
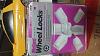
Bought and installed McGard 24538 Chrome Cone Seat Wheel Locks ($28.80)
That's it for now. I have more items to install this week and more items ordered.
It will be a jeep-weekend.
MM
OUT
P.S. All of the items I buy are usually from Amazon.com, if not I will let you guys know.
Changed my bent antenna to my new stubby $16.99 (1)
Bought 2 more D-Rings (3/4") for the rear bumper. ($17.99)
A set of D-Ring Isolating Kit for all D-Rings -green ($24.99)
Bought and installed McGard 24538 Chrome Cone Seat Wheel Locks ($28.80)
That's it for now. I have more items to install this week and more items ordered.
It will be a jeep-weekend.
MM
OUT
P.S. All of the items I buy are usually from Amazon.com, if not I will let you guys know.
Last edited by madmatt21; 04-03-2017 at 05:34 PM. Reason: pics.
04-08-2017, 04:50 AM
#6
JK Newbie
Thread Starter
Join Date: Nov 2016
Location: Lake Charles
Posts: 14
Likes: 0
Received 0 Likes
on
0 Posts
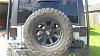
So, lets talk about my wheels....... they are 20" XD wheels Addict 798 Matte Black 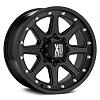

I love the look, the size and style but they have this cheap, fake plastic bolts all around the inside of the wheel. I'm sure they looked great brand new but time has moved on
and my look like totally crap. I decided to carefully removed all the fake bolts and repaint them; easier said then done.
The first wheel I only broke 1, trying to pull them out.
The second wheel I broke 4 and the third wheel i broke 4 more. After the third wheel I did care. I just ripped them out!!!
At this point I was very mad. But made it worse was each broken bolt left a solid piece of plastic still in the wheel!
For every F-ing plastic bolt I broke, I had to drill it out. This alone took me an hour and I was done screwing with the jeep that day.
I need a large beer.
But in the end result was worth it. The wheels look so much better cleaned and ripped of all that plastic.
MM
OUT
04-08-2017, 05:04 AM
#7
JK Newbie
Thread Starter
Join Date: Nov 2016
Location: Lake Charles
Posts: 14
Likes: 0
Received 0 Likes
on
0 Posts
I just wrote a post about my wheels and it disappeared.
What the Hell...
It said something about getting approved??? maybe.......
(magically it appears)
Moving on
Yesterday I did the bungee cord headrest mod....... it worked. I used Nite Ize Knot Bone adjustable bungee 48" 2 for $24.
I installed my Mopar "0527 8655AB" locking gas cap $22
In-addition I found some blue, used, grab handles off ebay $14
Making progress....... little by little.
MM
OUT.
Last edited by madmatt21; 04-09-2017 at 04:33 AM. Reason: magic
Trending Topics
04-12-2017, 02:59 AM
#8
JK Newbie
Thread Starter
Join Date: Nov 2016
Location: Lake Charles
Posts: 14
Likes: 0
Received 0 Likes
on
0 Posts
So, I live in a nice small city and a nice subdivision. I have little worries that someone will break into my jeep. But I travel a bit and I never know where she'll be parked. In the vain of the locking gas cap I decided I wanted to lock the hood.
To my surprise there was several different:
RAMPAGE 76336 LOCKING HOOD CATCH KIT $75
(mixed reviews and tales of lock getting stuck)
BOLT 7026128 HOOD LOCK $59
(did not want to use rivets, nor do I have a rivet gun)
E-COWBOY HOOD LOCK $52
(did not want to use rivets, nor do I have a rivet gun)
TUFFY 292-01 JK HOOD LOCK $44
(looks good)
MOPAR HOOD LOCK 82213051AB $133
(Too much money)
So, with a low price point, great reviews and no riveting TUFFY was the winner.
The install was very easy:
- Unplug your front turn signals and pop your grill off
- cut threads into 2 top holds, SLOWLY
- bolt everything together
- close hood and lock with supplied key.
Again, very easy, maybe took me 30 minutes. One "mod" I did do to the lock was black-outed the silver lock with a paint marker and ripped off the sticker. It's much harder to see the lock.
Well that's it for now. Next time is smoking the lights.
MM
OUT
04-18-2017, 03:35 AM
#9
JK Newbie
Thread Starter
Join Date: Nov 2016
Location: Lake Charles
Posts: 14
Likes: 0
Received 0 Likes
on
0 Posts
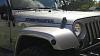
After much of looking on Amazon and Quadratec, I came to the conclusion to smoke my lights myself. Most of the sets I found were either too cheap, or crazy expensive; this mostly retains to the turn signal and side marker lights.
Like most people I was a little worried I would smoke the lights too dark.... but I think they turn out well.
Here were my steps:
1. Remove and clean light...
(soap and water,dry and little bit of rubbing alcohol to remove anything left over)
2. One light coat of VHT Nightshade (dry for 30 minutes)
3. Second (light) coat of Nightshade (dry for 30 minutes)
4. Third coat of Nightshade (dry for 3 hours)
5. 4 coat of Clear with 30 minutes of drying in-between
6. Let dry overnight
7. Install and be happy.
Below on my pictures.
MM
out
Last edited by madmatt21; 04-19-2017 at 02:45 AM. Reason: changed pictures
04-19-2017, 03:04 AM
#10
JK Newbie
Thread Starter
Join Date: Nov 2016
Location: Lake Charles
Posts: 14
Likes: 0
Received 0 Likes
on
0 Posts
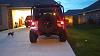
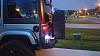
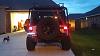
More pictures....
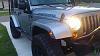
Smoked, lights on during the day.
I love the smoked look but I was a little worried I would get pulled over, so I upgrade my
side markers to LED bulb and bought "super white" bulbs for the tail light. It did make both
sets of light.... 30% brighter; it's hard to tell with the camera.
Smoked, night, old tail lights bulbs:
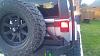
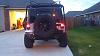
Smoked, night, new tail light bulbs:
It's hard to tell, but it looks better in person.
Smoked, night side markers LED:
Bulbs I used
I used 2 sets of Sylvania 3157 SilverStar High Performance bulbs ($6.00)
Two set of Sylvania 194 T10 W5W white LED bulb ($18)
That is it.
MM
OUT
Smoked, lights on during the day.
I love the smoked look but I was a little worried I would get pulled over, so I upgrade my
side markers to LED bulb and bought "super white" bulbs for the tail light. It did make both
sets of light.... 30% brighter; it's hard to tell with the camera.
Smoked, night, old tail lights bulbs:
Smoked, night, new tail light bulbs:
It's hard to tell, but it looks better in person.
Smoked, night side markers LED:
Bulbs I used
I used 2 sets of Sylvania 3157 SilverStar High Performance bulbs ($6.00)
Two set of Sylvania 194 T10 W5W white LED bulb ($18)
That is it.
MM
OUT

