When you click on links to various merchants on this site and make a purchase, this can result in this site earning a commission. Affiliate programs and affiliations include, but are not limited to, the eBay Partner Network.
Eleven months into the 'transmission swap' and there's enough going on to justify a thread about this ten-year overhaul, both for myself to help keep things straight and to share with you fine folks.
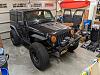
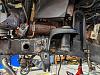
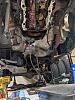
In November of last year I pulled the Jeep into the garage to change the transmission. The input shaft bearing was bad and, due to many factors, I opted to just replace the trans rather than change the bearing. This was almost exactly eleven months ago today:
I had the freshly rebuilt trans ready to go before opening up the Jeep. The last transmission removal job took me eight months, not because it takes that long, but because I just don't get the time to put into it. I didn't want that to happen again and I had planned for a two week swap. Yeah, right.
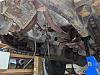
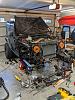
I had a buddy giving me a hand and we had everything apart in short order. We had to cut the exhaust out, it was welded front to back and there was no way to work around it. That's something that I'll have to address down the line.
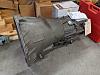
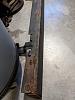
I have a RK long arm lift and, in order to pull the trans, I had to remove the three front links. When they came out they were NASTY, especially the upper link which is closest to the exhaust. Just brutally rusted and pitted. The lowers were pretty gnarly too, but I gave them a pass because they get scraped and pebble blasted. My initial plan was to clean them up, have them recoated and then reinstall. I figured it was a nice opportunity to swap out the joints though, so I started looking into that. I had been wanting to try Metalcloak's Duroflex joints and I figured I'd be able to shoehorn them into the RK arms. Not so much. After kicking around a few ideas I decided to bail on the RK arms and have a custom set made, which I've posted about here before. Here are the RK arms:
This was about the time the project slowed down and other things started peppering into my free time. Looking at the photos, I rebuilt an espresso machine, built a few rifles, my dad did a month stint in the hospital for an autoimmune disorder which was very taxing on everybody, and I coach wrestling for our town's rec league over the winter. I drove the F-350 for the winter and parked the Miata in an open bay at my grandfather's garage. I'd spend an hour or two here and there with the Jeep, and the list of 'while I'm in there' items kept growing. The RK springs were a mess of rust so I picked up some Metalcloak springs. I bought replacement shocks. I ordered a clutch because, at 167k miles (last replacement at 80k), I figured it was prudent. We pulled the gas tank and did the fuel pump. I got new hubs/bearings for the front since one of the wheel speed sensors wasn't working and it cost almost as much as the whole unit. I ordered a rear track bar from Steer Smarts, mostly just to match the front. I ordered new hardware for everything I took out. I forget which seal was leaking but the oil pan and dipstick tube are out right now. Both Odyssey batteries were shot in short order but I think they were five years old so I guess I'll stomach that replacement. I'm sure I'm forgetting plenty but I'll get a more complete list together as it goes back in.
The spring was full of track days and Miata mods so the Jeep sat longer. I ordered a Tesla Model 3 in March and picked it up in May to alleviate the absurd cost of daily driving a Superduty pickup during the $5/gallon gas days. Yes, I know I had to buy the whole car but it's neat and that's a story for another time.
Just for Kicks, here's the Yatta out at Pocono
And here's the 3 at Lime Rock
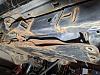
So I was busy! So busy that the garage filled up with stuff around the Jeep to the point where I couldn't reasonably work on it. I took a week off in August and spent the entire time in the garage, cleaning, organizing, and paring down what I had. I ended up with a good work space. Based on the photos I started back in on the Jeep in September. One of my big focuses is rust mitigation, with everything out and open it's the best time I'll ever get to address it. I want to control the rust and get everything sealed and protected, I'm not looking for a show finish. I scrape, brush, and sand whatever I can wherever I can reach it. I've tried two rust converters, Ospho and Rust Kutter. Both are different mixtures but basically phosphoric acid. I have to say, the Rust Kutter does a better job. This is from today - there is some bare metal from the wire brush, but most of the black and gray areas are rust that's turning into iron phosphate.
The general process (after much trial and error) is a good scrub with a damp rag, a few rounds of degreaser and rinse, scraping/sanding/wire brushing loose and deep rust, another wipe with a damp rag, and finally a brushed coat of converter. Once I'm satisfied that the rust is under control, I have a brush-on paint for the frame. The deeper I got into it, the more convinced I am to get some parts to the powder coater. I pulled the front bumper today and disconnected the front axle to hit all the link brackets.
This is as it sits now:
The current powder coat list is: Bumper, sway bar, sway bar brackets, winch plate, and SPOD and compressor brackets, and upper control arms. The upper arms are being made now, out of 304 stainless, and since they don't get dragged across rocks I figure why not. I'm tempted to pop the knuckles off and have them done also.
I may try to swap out some body mounts, they are in sad shape and I have good access. I'm going to pull the Rubicon rails and clean them up and either paint or powder coat. And then I have the rear to do! There are other items on the list too, I need to replace the A/C condenser and drier, I'd like to redo the exhaust, and I feel like I needed to drain the coolant again for something that I'm forgetting.. I also have diff breather extensions, clutch master and slave cyls, and an oil catch can.
My plan is to finish this before the cold sets in. I need the garage space for the Tesla and for winter Miata projects, so the pressure is on. Updates from here should be a little more coherent and in-depth, but this is the quickie year recap. If any of you more knowledgeable folks have advice or notice that I'm doing something stupid (beyond the planned, documented stupidity), please shout it out.
Canada has a product called Rust Check. Not sure if you have something like that - Krown was a name I remember. Stuff works good. Just have to spray once a year if you live in the rust belt.
Ideally that's where I'd like to end up. Just a once a year application to keep the rust at bay.
I pulled the Rubicon rails yesterday and started cleaning underneath. There are four larger bolts that bolt into the frame rails, the front bolt on each side broke. This brings the broken-bolt-in-the-frame total to four. The stock gas tank skid is practically dissolving from rust, that may be worth replacing. Which is a pain because the tank was just down for the fuel pump. The Rock Hard gas tank skid is doing ok, but it needs a lot of attention.
I stopped by the powder coater yesterday and had a chat about all these parts. Once everything is out and cleaned up I'll have to decide what's worth coating and what I'll just paint and maintain. He made a valid point that the cost of stripping, prepping, and coating some parts might not be worthwhile from a dollar standpoint, and it might be more cost effective to just replace those parts. I'm going to try stripping them at home to see what I'm left with in bare metal. At least that only costs me time and effort. I'd like to replace a good deal of the hardware. I do know that every bolt I put in will get anti-seize from top to tail and I'll brush paint the bolt heads after installation. All the hardware that I had previously installed with anti-seize came out without a problem and all the stock hardware came out.. with problems. Jeep also decided on some very long bolts in places, with as much as an inch of extra thread. When I replace the hardware I'll try to get more appropriate lengths so there's not so much extra thread exposed. It's difficult to reconcile getting deeper and deeper into this work while also trying to finish as quickly as possible. We'll see how it goes.
I pulled the drag link and front sway bar today, mostly just for better access. The rest of the exhaust was hung by one hanger so I pulled that out too. The floor space I had made is dwindling. I put a few hours in scraping and sanding rust. On areas with good access I'm just going down to bare metal. I also found that I can sit up in the trans tunnel under the Jeep and work more comfortably than on my back. The rust is consistent all the way back. Not bad at all, but patchy and I feel like if I'm going to address it, I might as well do it all. I'm trying to keep in mind that the paint job is 95% prep, and I'm in that 95% right now. It's hard to get a great shot under there but this is the idea
You can see the RK control arm brackets on the sides, and some of the sanding on the driver side frame rail. I know there are some opinions about Rock Krawler out there and I'd like to add one tidbit of my own - their powdercoat sucks. It's held up probably the worst of the pre-coated aftermarket parts I've installed. It seems to be a poor prep situation, in the odd places the coating is adhered, it's a pain to get off. The frame paint has held up better in the same areas and comes off more easily.
I'm on the fence about:
Putting the Rubicon rails back on. I have a set of VKS sliders for after this is all together, they'd be fine on their own. I do like the look of the Rubicon rails though.
Keeping and refinishing the front bumper. To strip it and powdercoat it will cost a couple hundred bucks. A brand new BFH II should run me about $600 on sale, already coated, no rust pitting, with fog light holes.
High steer knuckles. I'm kinda on the 'might as well' train on that one but at ~$700 for Reids or less for others, do I really need them for the slight tie rod lift?
Those are fun decisions though. Prepping rust isn't fun. But onward and upward.
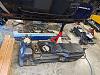
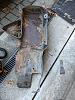
Got some time in today. Scraping and sanding rust is a disheartening thing. I can scrub for hours and it just seems like nothing gets done. I know there's progress but it's so gradual. So to break up the monotony today I cleaned the oil pan and tcase skids and took down the fuel tank. Those stupid fuel line clips are a giant pain, and I broke one. Is this the best that we, as a society, as a species, can come up with?? Aside from the clips, the tank came down without a hitch. I'll tell you what, this transmission jack has been coming in handy. Once the tank was down, I gently wedged in some 2x4 blocking to get the tank separated from the skid. Some jackwagon left a half tank of gas in the Jeep when he parked it, so now I have to lug all that fuel around. Here's the bare tank, free from its shackles:
And the stock skid, after a quick scooping of all the rust and debris. You can see it in the catch pan actually, there has to be at least five pounds of it.
The tcase skid is a little bit in the above pic as well. I sprayed it down with degreaser (that's where all the leaking oil from the oil filter housing ended up) and scraped it and it's not in bad shape. The bottom side is worse and it has a good bend in it that I have to get out. But that just means it's loved.
I don't know if anyone has experience with Under Cover Fab, but they make a full gas tank skid replacement. I'm not familiar with the company, they seem to do mostly earlier generation stuff. Information and photos are pretty slim, but they did answer my email in a very timely fashion so that bodes well. I'm thinking instead of spending ~$600 for a new stock skid and some additional time, effort, and money to strip and powdercoat the RH skid, maybe I'll try this one piece replacement. They have it for $773, it's 3/16" and it's a single piece that should fit pretty closely to the stock dimensions so I think it will work with the RH tcase skid. I prefer the single piece rather than having that sandwich between the stock skid and an overlay for water and debris to sit, abrade, and corrode. I'm just not a big fan of guinea pigging it since I can't find a photo of it at all besides the render on the website. I'd have to get it coated so on top of the price of the part and shipping, so it would definitely be more expensive than the other options.
I'm also leaning towards replacing the front bumper. The BFH II has fog light holes and I'd really like fog lights. I've missed them.
It's been a few days since I got any work in. Sunday my body was very angry with me about all this grinding so I took the day off. My son was sick and home from school Monday and Tuesday so down time went right out the window. It was around freezing temps last night so I'm really itching to continue.
That's kinda interesting....hadn't run across those before. They didn't have this same angle on the 2dr listing so that is the 4dr pic. The one thing that is apparent, which may or may not matter to folks, is that the interior side of the tank (towards the driveshaft) is a bit more exposed relative to the factory.
^^ got me thinking and a quick search looks like Clayton Offroad has a similar one that is 3/16 as well, a bit cheaper, and looks like that interior side is taller.
I think the structure of the mounting locations looks more stout on that Clayton model too rather than essentially tabs of flatstock with a couple bends that come up to bolt to the underside of the body on the UCF one.
The one thing I don't care for as much on that Clayton model is the extra piece and how it attaches to the crossmember.
Last edited by resharp001; 10-19-2022 at 09:41 AM.
That got me curious so I did some digging. A few manufacturers make full replacement gas tank skids. As per the usual, no single one seems to be the clear favorite, not for me anyway. Rough Country makes one, but it has short walls and it's attached with brackets and bolts instead of the brackets being part of the skid. It's dirt cheap at $250 though. Synergy makes/made one (can't find it in stock or on the manufacturer website), it's also short walled on the inside, and the brackets are also bolted on. They are much beefier brackets but they are still bolted on. Then there are the above options from Clayton and UCF. I have my doubts that the Clayton skid would work with the RH tcase skid, the UCF looks more promising there. I don't care for the linguini style brackets but I think it's probably the best option for me, if I'm not going to go back with a double-skid solution.
Ahhhh, I see what you're talking about mating with the RH TC skid now. That Clayton version is straight right up at that inner forward corner.
IDK, I have that same RH skid. I don't think I'd be opposed to cutting that part to a straight line so it lined up, but that's just me. I think the mounting on that Clayton skid looks so much beefier, but the gas skid on the 4dr takes a bit more beating I think than you 2dr guys.
Even if you had to do something like this -
IMO, that TC skid isn't as important as the gas skid. I just don't think you're coming down on that skid much and that is more about maybe sliding over something where as the gas skid could take a few more hits....but again, my mind is more 4dr experience.
Food for thought anyhow. The bolt-on or spaghetti brackets would sure be the main concern for me......but then again, that is how oil/tranny skids mount at the front.
OR....notch the Clayton gas skid for the RH clearance.
I had considered trimming as you describe, or gusseting the brackets on the UCF skid. It's funny, I think the tcase skid gets the most abuse but, like you said, mine's a 2 door. I'll take a look today since they're out and cleaned up and see where I'm taking the hits. I was also concerned that the Clayton skid might not bolt up properly at the front two bolts. They specify repeatedly that it's meant to be used with their other skids and HD crossmember. I guess I could shoot them an email and put that to bed though. I appreciate the insight!
 10-11-2022, 09:07 AM