2015 JK Sport aftermarket heated seats using OEM factory switch mod
 02-21-2016, 07:04 PM
#1
JK Newbie
Thread Starter

More of a pictorial really. Sorry not a better write up.
I have been trying like heck to put heated seats in my Jeep and use the factory switches. There is a thread somewhere that mentions a guy in FL that can re-program the computer if you want to add all of the factory parts. IIRC, it was a $ hundo or a little over? Too rich for my blood. (Actually I want auto lights too and thought about having him program both but still too much $ for me). I saw a video of a guy adding a micro switch between the OEM switch cover and the PCB board behind it. Looked promising so I studied the circuit forums for a while and designed a momentary clicky switch layout using micro relays and a debouncer but it quickly became too complex and I was still not sure I could get a momentary switch to do Off-low-hi-off again. I know our switch panel has a PCB sandwiched behind the switch covers. I assumed (HA HA) that my lowly little sport was not using all of that PCB and it was just there for Jeeps with more options than mine. So long story short, I hacked off the ends of the PCB behind the blank switch covers, gutted the switch holes, glued the blank switch covers on the heated seat switches, and then glued the switches in the now gutted holes. Everything worked as planned. See pics:
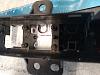
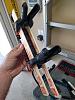
Our switch panel is pretty neat design actually. All of the switch covers not being used are already hinged and ready to be used but the sides are left long and won't allow the switch to move. Just requires a little trimming and they actuate as Jeep designed them too. The pics should show the slide and rocker hinge mechanism of the switches.
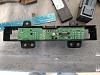
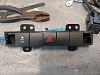
Took out the PCB measured and hacked off the ends. Then I gutted the two end switch slots to make room for the aftermarket switches. I did not use the factory hinge parts, I used the aftermarket switches to provide the rocking action.


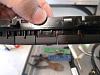
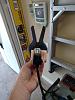
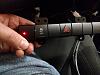
I pulled the switch covers off of the aftermarket switches and glued them to the underside of the OEM Jeep blanks. I forgot to take a pick before starting so I included a generic of the switches that came with my kit. I also wanted a way for the LED to show when turned on so after the glue set I drilled through the LED holes in the aftermarket switches through the OEM blanks. I broke a tong or tine or whatever off of a clear plastic acrylic dinner fork. I sanded it down and rounded it until it snuggly pierced the aftermarket switch hole and stuck out of the front of the OEM switch blank. I then cut off the excess flush with the switch cover.
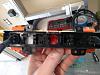
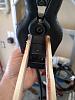
Reassembled the switch covers with the switch body and placed them in the switch panel and clamped them up with some paint sticks. Made sure they were square and plumb and glued the switches in the jeep switch panel. In that last pic you can see the new LED hole and clear fork thingy.
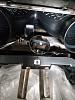
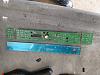
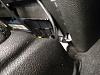
Bonus pics. Remember boys and girls, if you take your dash apart, there is one more hidden screw behind the power window switch area. If you forget it and just pull it will break your dash in two. Hard to tell in the pics, but I bent up a piece of scrap aluminum and clamped and glued the broken area back together while I had the glue out. I forgot to take a pic of the alum before gluing in place. Terrible write up, I know.
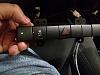
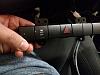
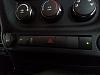
Test run - glue all dried up, time to see if they actually work. Yep, little brighter than I would have thought also. Up is normal, middle is off, and down is inferno. (yes, I nicked the shit out of the TSC switch )
)
No worries though, I will be replacing this set up with a switch panel from a JK with OEM heated seats to get the real heated seat switch covers with the little heater picture on it. And I know I'll have to rework the LED layout too.
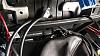
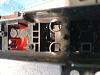
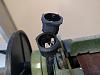
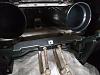
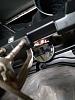
I have to say, Jeep has come a long ways. This was way harder and tighter spaces than any old CJ or TJ. I found it much more difficult to run wires and what not. Here you see damn near no room for relays behind the net panel. But there was one little nook that fit them perfect once I attached the relays together.
All done. All I need now is a little heated seat sticker or a switch panel from a JK that came with heated seats. Maybe I can find a graphics company that can make me a transfer sticker or something. Right now they are my "secret" switches!
Hope it helps someone.
I have been trying like heck to put heated seats in my Jeep and use the factory switches. There is a thread somewhere that mentions a guy in FL that can re-program the computer if you want to add all of the factory parts. IIRC, it was a $ hundo or a little over? Too rich for my blood. (Actually I want auto lights too and thought about having him program both but still too much $ for me). I saw a video of a guy adding a micro switch between the OEM switch cover and the PCB board behind it. Looked promising so I studied the circuit forums for a while and designed a momentary clicky switch layout using micro relays and a debouncer but it quickly became too complex and I was still not sure I could get a momentary switch to do Off-low-hi-off again. I know our switch panel has a PCB sandwiched behind the switch covers. I assumed (HA HA) that my lowly little sport was not using all of that PCB and it was just there for Jeeps with more options than mine. So long story short, I hacked off the ends of the PCB behind the blank switch covers, gutted the switch holes, glued the blank switch covers on the heated seat switches, and then glued the switches in the now gutted holes. Everything worked as planned. See pics:
Our switch panel is pretty neat design actually. All of the switch covers not being used are already hinged and ready to be used but the sides are left long and won't allow the switch to move. Just requires a little trimming and they actuate as Jeep designed them too. The pics should show the slide and rocker hinge mechanism of the switches.
Took out the PCB measured and hacked off the ends. Then I gutted the two end switch slots to make room for the aftermarket switches. I did not use the factory hinge parts, I used the aftermarket switches to provide the rocking action.
I pulled the switch covers off of the aftermarket switches and glued them to the underside of the OEM Jeep blanks. I forgot to take a pick before starting so I included a generic of the switches that came with my kit. I also wanted a way for the LED to show when turned on so after the glue set I drilled through the LED holes in the aftermarket switches through the OEM blanks. I broke a tong or tine or whatever off of a clear plastic acrylic dinner fork. I sanded it down and rounded it until it snuggly pierced the aftermarket switch hole and stuck out of the front of the OEM switch blank. I then cut off the excess flush with the switch cover.
Reassembled the switch covers with the switch body and placed them in the switch panel and clamped them up with some paint sticks. Made sure they were square and plumb and glued the switches in the jeep switch panel. In that last pic you can see the new LED hole and clear fork thingy.
Bonus pics. Remember boys and girls, if you take your dash apart, there is one more hidden screw behind the power window switch area. If you forget it and just pull it will break your dash in two. Hard to tell in the pics, but I bent up a piece of scrap aluminum and clamped and glued the broken area back together while I had the glue out. I forgot to take a pic of the alum before gluing in place. Terrible write up, I know.
Test run - glue all dried up, time to see if they actually work. Yep, little brighter than I would have thought also. Up is normal, middle is off, and down is inferno. (yes, I nicked the shit out of the TSC switch
)No worries though, I will be replacing this set up with a switch panel from a JK with OEM heated seats to get the real heated seat switch covers with the little heater picture on it. And I know I'll have to rework the LED layout too.
I have to say, Jeep has come a long ways. This was way harder and tighter spaces than any old CJ or TJ. I found it much more difficult to run wires and what not. Here you see damn near no room for relays behind the net panel. But there was one little nook that fit them perfect once I attached the relays together.
All done. All I need now is a little heated seat sticker or a switch panel from a JK that came with heated seats. Maybe I can find a graphics company that can make me a transfer sticker or something. Right now they are my "secret" switches!
Hope it helps someone.

The following users liked this post:
Jeepsr4me19 (05-11-2022)
02-17-2017, 07:19 AM
#3
JK Newbie
Thread Starter
Hey, thanks! They work well and to be honest, I just sort of forgot to continue. I didn't find any stickers right away and just quit looking. I kept thinking I would just order a switch panel with the actual heated seat buttons and swap the switch covers to my panel. I just never got around to it though.
02-27-2017, 06:26 PM
#5
JK Newbie

Join Date: Sep 2016
Location: Nazareth, PA
Posts: 45
Likes: 0
Received 0 Likes
on
0 Posts
Ok so I'm stumped. I gutted the old switch bays and tried to glue the new switches in but they aren't taking. What kind of glue or epoxy did you use? I tried a 5min two part epoxy from the auto parts store and all it did was create a stinky mess.
Any guidance is appreciated.
Any guidance is appreciated.
02-28-2017, 05:33 AM
#6
JK Jedi

Hadn't run across this write-up before.....kudos for the effort. I just installed the switches by my cup holders and it looked great to me. Easy location to access. This looks like too much effort, but I get that sometimes it's the fun of the project and figuring it out. Cheers 
02-28-2017, 03:01 PM
#7
JK Newbie
Join Date: Sep 2016
Location: Nazareth, PA
Posts: 45
Likes: 0
Received 0 Likes
on
0 Posts
Yeah it's a mix of my desire for things to look stock as well as the challenge of making things look stock.
Although I have to admit it's a lot more fun in the beginning of the task than it is when things aren't working as planned. For instance I'm fighting getting these things glued down and to top it off I broke one of my seat bolts which means I get the fun of drilling out the broken bolt and tapping a new one to replace it. Oh the joy.
Db
Trending Topics
03-02-2017, 04:54 AM
#8
JK Newbie
Join Date: Sep 2016
Location: Nazareth, PA
Posts: 45
Likes: 0
Received 0 Likes
on
0 Posts
Got it figured out. Gorilla glue! Still very messy to use so if anyone attempts this be sure to mask off the original buttons to prevent them from getting messy.
Also another option for clamping the new switches to the old for alignment when setting them, I used scotch tape to tape them to the adjacent switches. It allows you monitor the gap between as well as the alignment.
Now I just need to put them in tonight and put it all back together.
Also another option for clamping the new switches to the old for alignment when setting them, I used scotch tape to tape them to the adjacent switches. It allows you monitor the gap between as well as the alignment.
Now I just need to put them in tonight and put it all back together.
03-02-2017, 05:28 AM
#9
JK Super Freak

Excellent job. I'm impressed with your patience. I ended up putting mine in the space between the power window switches and the vents. I like yours much better.
03-03-2017, 06:57 AM
#10
JK Newbie
Join Date: Sep 2016
Location: Nazareth, PA
Posts: 45
Likes: 0
Received 0 Likes
on
0 Posts
Well I got everything looking good on the factory switch panel. Tested the switches to ensure they were making contact and put it all back together. Then I flipped one on and green lights glow then red lights after flipping the other direction.
SUCCESS.......NOT EXACTLY.
After testing the second switch I pop a fuse. Damnit. Maybe dumb luck tiring them to the cigarette lighter outlet thing. so I replace the bad fuse and test my power inverter in the lighter outlet. As soon as I flip the switch on the inverter it goes into protection mode and a little alarm goes off. Got a damn short somewhere!
Now I need to pull the dash back apart and chase down the short. I'm thinking I should possibly wire this directly to the fuse panel rather than tap off of the lighter to simplify the wiring and access to the fuses and relays.
Never ending.