Chopped hardtop

Thread Starter
JK Super Freak
Joined: Oct 2011
Posts: 1,208
Likes: 0
From: ca
Backstory: have a trektop nx but due to hot California sun I rarely run with the top down. But I like to run doorless and without the rear windows. I also camp with a large family and need storage space that is not easily accomplished with a soft top. Hence: the desire for a stubby hardtop that will also accommodate a roof rack direct bolted to the sport bars. This thread will track this build until I'm done or until I give up, whichever comes first.
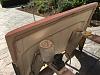
Step 1: procure a broken hardtop. Took me about 6 months of looking until I found one locally. $150 bucks and I was on my way
Step 2: make a giant mess in the driveway with an angle grinder cutting off all the un necessary pieces. Wear full clothing, gloves and eye protection. This stuff is naaaasty to breathe
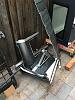
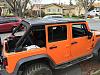
Step 3: place on jeep and eyeball the cuts to see if they make sense
more to follow
Step 1: procure a broken hardtop. Took me about 6 months of looking until I found one locally. $150 bucks and I was on my way
Step 2: make a giant mess in the driveway with an angle grinder cutting off all the un necessary pieces. Wear full clothing, gloves and eye protection. This stuff is naaaasty to breathe
Step 3: place on jeep and eyeball the cuts to see if they make sense
more to follow
Last edited by orangedude71; Jun 11, 2016 at 04:51 PM.

Thread Starter
JK Super Freak
Joined: Oct 2011
Posts: 1,208
Likes: 0
From: ca
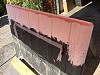
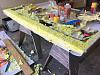
So I didn't like the look of the cut edge and decided it needed to be filled in. I'm new to fiberglass work but here we go: Step 4: fill in the edge with foam. I used multiple cans of spray foam. This took way longer because it's very porous. As you started to carve, pores and hollows would be uncovered that needed to be filled again. In hindsight I should have used sheet foam 
Last edited by orangedude71; Jun 11, 2016 at 05:39 PM.

Thread Starter
JK Super Freak
Joined: Oct 2011
Posts: 1,208
Likes: 0
From: ca
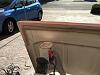
The two front bolts of the hardtop hold the front nicely, and the back right now just sits on the rear roll bar with the rib i added. However thats not exactly secure. Eventually, its getting some sort of a bracket that mounts to the sport bar and will bolt through the roof. As I'm going to add a roof basket so il be drilling through the roof for that. Another one of those in hindsight things, but if i had made the roof like 6" longer there are off the shelf brackets like those for the rackworks baskets which would have done nicely. oh well
Thread Starter
JK Super Freak
Joined: Oct 2011
Posts: 1,208
Likes: 0
From: ca
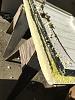
Step 5. Final shaping of the foam and filling with bondo. The bondo makes a decent sandable layer and fills in all the foam holes from the spray foam. not shown here was that I decided to insert some wood strapping into the foam layer so that I have something underneath the fiberglass to screw into. I may build a canvas top to close off the back and wanted to have the ability to add c channels if necessary.