
Chopped hardtop

Thread Starter
JK Super Freak
Joined: Oct 2011
Posts: 1,208
Likes: 0
From: ca
Well, this is the part of the thread where i get to say: it's going to be a while until the next update. Off on a biz trip for two weeks followed by some wheeling over the 4th. That said, it does give me lots of time to think about how to finish it off and order parts needed. For starters, I've decided I'm going to integrate a third brake light into the back edge and get rid of the carrier mounted one. I was looking for along time for a flush mounted brake light/reverse light combo, but couldn't find anything appropriate. So ordered these strip LED. Ill put one on my regular hardtop, and one on the shorty.
https://www.amazon.com/gp/product/B0...?ie=UTF8&psc=1
next, I'm struggling with what rack to put on it. Ive got enough room for about 44" long by 52" wide.. its actually fairly hard to find a rack in this dimension. Ive talked to the rackworks folks about ordering a custom length one.. its one solution albeit a little pricey
Ive also thought about getting a rhino pioneer platform and seeing if I can cut it down to length. Seems that the design is modular enough i might be able to do that
At the bottom end of the spectrum: Theres the Smitty Defender rack.. And it does come in some sizes that i think would work.
Anyone want to weigh in on these?
JK Newbie
Joined: May 2016
Posts: 7
Likes: 0
From: st. louis, mo
are you going to mount the third light on the top or the rollbar? Seems like you could save yourself some work by mounting it on the bar and avoid messing with the top or creating a disconnect for it, if removed. I imagine you are running the wiring through the rollbar anyway?
Last edited by aquaboy; Jun 22, 2016 at 05:54 AM.
JK Freak

Joined: Oct 2014
Posts: 750
Likes: 1
From: Huntington Beach, CA
Well, this is the part of the thread where i get to say: it's going to be a while until the next update. Off on a biz trip for two weeks followed by some wheeling over the 4th. That said, it does give me lots of time to think about how to finish it off and order parts needed. For starters, I've decided I'm going to integrate a third brake light into the back edge and get rid of the carrier mounted one. I was looking for along time for a flush mounted brake light/reverse light combo, but couldn't find anything appropriate. So ordered these strip LED. Ill put one on my regular hardtop, and one on the shorty.
https://www.amazon.com/gp/product/B0...?ie=UTF8&psc=1
next, I'm struggling with what rack to put on it. Ive got enough room for about 44" long by 52" wide.. its actually fairly hard to find a rack in this dimension. Ive talked to the rackworks folks about ordering a custom length one.. its one solution albeit a little pricey
Ive also thought about getting a rhino pioneer platform and seeing if I can cut it down to length. Seems that the design is modular enough i might be able to do that
At the bottom end of the spectrum: Theres the Smitty Defender rack.. And it does come in some sizes that i think would work.
Anyone want to weigh in on these?
https://www.amazon.com/gp/product/B0...?ie=UTF8&psc=1
next, I'm struggling with what rack to put on it. Ive got enough room for about 44" long by 52" wide.. its actually fairly hard to find a rack in this dimension. Ive talked to the rackworks folks about ordering a custom length one.. its one solution albeit a little pricey
Ive also thought about getting a rhino pioneer platform and seeing if I can cut it down to length. Seems that the design is modular enough i might be able to do that
At the bottom end of the spectrum: Theres the Smitty Defender rack.. And it does come in some sizes that i think would work.
Anyone want to weigh in on these?
Thread Starter
JK Super Freak
Joined: Oct 2011
Posts: 1,208
Likes: 0
From: ca
Answering both questions: I don't want to mount the brake light to the roll bar because it limits my ability to close off the back with canvas which is in the cards. And on the rack side I also am leaning towards the defender rack. Mostly for cost reasons because I might want some money to install a jeep backbone cargo cover(or attempt to fab my own)
Thread Starter
JK Super Freak
Joined: Oct 2011
Posts: 1,208
Likes: 0
From: ca
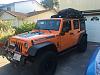
Well, i made my decision on the basket.. I went with a smittybilt defender.. Why you ask? well, for starters, i needed one for camping this past weekend. So i ordered the 4.5x5 ft three piece version. But guess what, i can take the middle section out and it will fit perfectly on my shortened top as well. As I already had yakima rails installed on my hardtop, wouldn't you know it that the bolt holes lined right up with the rails.. Which probably means, ill do something similar on this top. Bolt some yakima rails to the glass top, then fabricate some supports underneath so i can get add a little more weight to it. Back from the trip, hopefully can finish up the fiberglass this weekend.
Thread Starter
JK Super Freak
Joined: Oct 2011
Posts: 1,208
Likes: 0
From: ca
So. Still doing prep work but I want to share something I learned while doing this: fiberglass is hard work to get right. I now know what I'd do differently next time.
1. Never use spray foam for the substrate. It's too hard to carve straight and Inevitably you end up with surfaces with waves in them. Next time will use sheet foam and cut correctly. Corners and edges will look so much better as a result
2. Epoxy resin does not sand off smc surfaces well. It's actually harder than the substrate. So when you try to sand out all those drops and drips, you end up distorting the area around it. Next time I will get much more aggressive with masking off the area where I don't want resin and will end up with a much nicer result.
3. Invest in a vaccum bag setup. A lot of my problems would have been solved by bagging and pulling the air out during curing.
Overall, when I'm done it will be a good ten footer job and the rack will cover a lot of my mistakes, but lesson learned
Thread Starter
JK Super Freak
Joined: Oct 2011
Posts: 1,208
Likes: 0
From: ca
So. Still doing prep work but I want to share something I learned while doing this: fiberglass is hard work to get right. I now know what I'd do differently next time. 1. Never use spray foam for the substrate. It's too hard to carve straight and Inevitably you end up with surfaces with waves in them. Next time will use sheet foam and cut correctly. Corners and edges will look so much better as a result 2. Epoxy resin does not sand off smc surfaces well. It's actually harder than the substrate. So when you try to sand out all those drops and drips, you end up distorting the area around it. Next time I will get much more aggressive with masking off the area where I don't want resin and will end up with a much nicer result. 3. Invest in a vaccum bag setup. A lot of my problems would have been solved by bagging and pulling the air out during curing. Overall, when I'm done it will be a good ten footer job and the rack will cover a lot of my mistakes, but lesson learned