
Cool Tech UltraMount

Thread Starter
JK Newbie
Joined: Sep 2010
Posts: 95
Likes: 0
From: Clovis, CA.
I’ve been surfing the JK website for awhile now and thought I should contribute something. Well, I needed a new CB antenna after picking up a used Cobra radio so I figure I’d take some pics of the installation and post them here. After deliberating which mount to get I had decided that the Cool Tech UltraMount would work best for me. It only took two days for the mount to arrive after ordering it from their web site. They sent it via FedEx and provided me the tracking number. The UltraMount arrived in the box you see here, with everything I needed for the install. The welds on the bracket are very nice and appear to be very strong. The instructions are very well written and include color pictures of all the steps involved. Pictures are numbered with the corresponding step.

Some of the tools you’ll need. You’ll also need a sharp knife, some needle nose pliers, a screw driver and some zip ties.

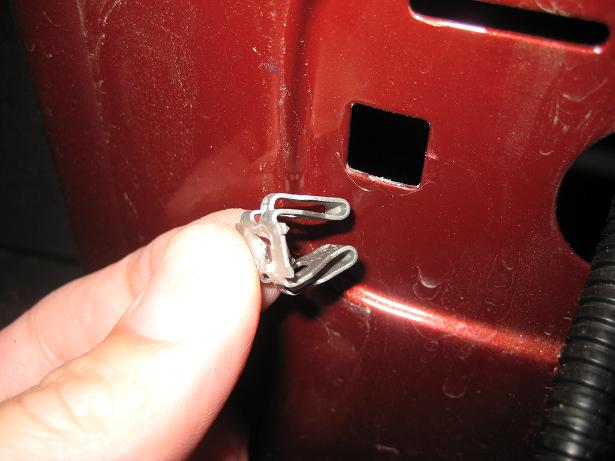
After removing the license plate, inner plate, license plate mount, and tail light, you remove one of the clips for the new mount.

The clip is made of metal and is pretty stout; it required me to use some pliers to compress the keepers inside to remove it.
After disassembly it’s time to cut away some plastic inside the license plate mount to make room for the UltraMount bracket. I found it easier to use my band saw to make a clean cut of the mounting ear, but used a hand saw to remove another plastic tab inside.

The instructions include a template of where to drill the hole for the antenna stud. I first transferred the template to a 3x5 card, lined up the corner of the card with the inner corner of the license plate mount, and marked the hole. I was a little nervous of drilling a hole in the plastic mount, but the template and the instructions provided were reassuring. I used a step-bit to make the hole as it doesn’t grab the plastic when drilling.

Once the hole has been made, position the bracket inside the license plate mount and begin reassembly. I left a loop of coax for any water that enters to drip off.
*Before beginning reassembly, attach the inner plate and reconnect the light. I found it nearly impossible to clear the light connection with a small opening inside the plate mount and had to remove the license plate mount after taking the picture to make it all fit.

Remove the rubber grommet inside your JK, cut an X in the rubber avoiding the existing wires and feed your coax through. Then run your coax up to your radio and check your SWR before use. The four foot FireStik antenna provided is adjustable to achieve the best SWR for your setup. Good luck!


Some of the tools you’ll need. You’ll also need a sharp knife, some needle nose pliers, a screw driver and some zip ties.
After removing the license plate, inner plate, license plate mount, and tail light, you remove one of the clips for the new mount.
The clip is made of metal and is pretty stout; it required me to use some pliers to compress the keepers inside to remove it.
After disassembly it’s time to cut away some plastic inside the license plate mount to make room for the UltraMount bracket. I found it easier to use my band saw to make a clean cut of the mounting ear, but used a hand saw to remove another plastic tab inside.
The instructions include a template of where to drill the hole for the antenna stud. I first transferred the template to a 3x5 card, lined up the corner of the card with the inner corner of the license plate mount, and marked the hole. I was a little nervous of drilling a hole in the plastic mount, but the template and the instructions provided were reassuring. I used a step-bit to make the hole as it doesn’t grab the plastic when drilling.
Once the hole has been made, position the bracket inside the license plate mount and begin reassembly. I left a loop of coax for any water that enters to drip off.
*Before beginning reassembly, attach the inner plate and reconnect the light. I found it nearly impossible to clear the light connection with a small opening inside the plate mount and had to remove the license plate mount after taking the picture to make it all fit.
Remove the rubber grommet inside your JK, cut an X in the rubber avoiding the existing wires and feed your coax through. Then run your coax up to your radio and check your SWR before use. The four foot FireStik antenna provided is adjustable to achieve the best SWR for your setup. Good luck!
Last edited by Classified; Oct 26, 2010 at 09:21 PM.

JK Jedi
Joined: Oct 2009
Posts: 4,760
Likes: 0
From: Fresno, California, United States
Thanks for the contribution. I see your from Clovis. Look for Cen-Cal in the staging area. We are always interested in meeting local peeps. Nice write-up BTW.
But, you may want to edit your post in order to make the links work.
But, you may want to edit your post in order to make the links work.
Last edited by Absolute; Oct 25, 2010 at 08:23 PM.