
Currie Adjustable Trac Bars Installation Notes

Thread Starter
JK Super Freak
Joined: Oct 2007
Posts: 1,572
Likes: 0
From: Phoenix, AZ
Instead of using relocation brackets, I decided to use adjustable front and rear trac bars with my 2.5� TeraFlex Spring Lift.
After looking at the available bars, I decided to get the Currie bars. I like the Zerk fittings on both ends, and the Johnny Joint on one end.
Here�s what they look like out of the box (front on top, rear on bottom):

Here�s a picture of the stock (top) and Currie (bottom) Front Trac Bars:

Here�s a picture of the stock (top) and Currie (bottom) Rear Trac Bars:

When you take off your trac bar, it helps to loosen both bolts then as necessary jack up the axle side until the bolt is loose enough to remove it by hand. You should be able to easily rotate the nut by hand before you take it off:

When installing your new Currie Trac Bar you should make an initial estimate of how long to make it (see note), insert the frame end with the bolt and hand tighten the nut, then put the axle end in place and jack up/down the axle until the bolt easily fits in place:

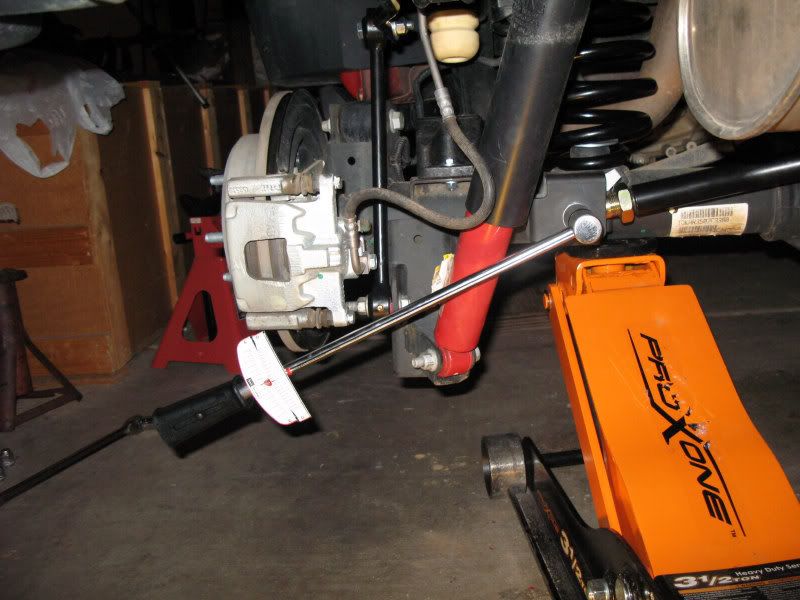
You need to torque all bolts (the Factory Service Manual recommends 125 ft. lbs.) with the weight on the axles (i.e. not sitting up on a lift). It�s a lot easier to use the torque wrench with the tires off (Once torqued, don�t forget to tighten the jam nut!):
Front finished:

Rear finished:

Take it out for a spin and bring it back and measure to see if you need to re-adjust. In the rear I measured the distance from the inside of the wheels to the edge of the frame, and the outside of the tires and the fenders. In the front I just measured the outside of the tires and the fenders because the frame/springs/differences made it difficult to get a good measurement with the wheels and frame. When adjusting the trac bar I found that I could just remove the axle end, adjust the trac bar in/out (see note), jack up/down the axle, and re-torque the bolt. I didn�t need to touch the frame bolt.
Notes on adjusting the trac bar and jam nut:
1. When you adjust your trac bar you want to keep at least 1� of the thread inside the tube - 3/4" may work OK and 1/2" is not safe.
2. Make sure you have access to the Zerk fitting when installed in the axle bracket.
3. Once the trac bars is torqued in place, tighten the jam nut as best you can.
4. When the jam nut is tight, you want to take notice of the nut position relative to the bracket. On the front bracket the nut may come very close or may actually hit the bracket. If this occurs with your install you should contact Currie and get their smaller jam nut.
So far my trac bars have held up well. I did have a problem with the spring clip on the front trac bar that Currie fixed with no hassle. I haven�t had any squeaking, and haven�t had any rubbing on my Riddlers.
After looking at the available bars, I decided to get the Currie bars. I like the Zerk fittings on both ends, and the Johnny Joint on one end.
Here�s what they look like out of the box (front on top, rear on bottom):
Here�s a picture of the stock (top) and Currie (bottom) Front Trac Bars:
Here�s a picture of the stock (top) and Currie (bottom) Rear Trac Bars:
When you take off your trac bar, it helps to loosen both bolts then as necessary jack up the axle side until the bolt is loose enough to remove it by hand. You should be able to easily rotate the nut by hand before you take it off:
When installing your new Currie Trac Bar you should make an initial estimate of how long to make it (see note), insert the frame end with the bolt and hand tighten the nut, then put the axle end in place and jack up/down the axle until the bolt easily fits in place:
You need to torque all bolts (the Factory Service Manual recommends 125 ft. lbs.) with the weight on the axles (i.e. not sitting up on a lift). It�s a lot easier to use the torque wrench with the tires off (Once torqued, don�t forget to tighten the jam nut!):
Front finished:
Rear finished:
Take it out for a spin and bring it back and measure to see if you need to re-adjust. In the rear I measured the distance from the inside of the wheels to the edge of the frame, and the outside of the tires and the fenders. In the front I just measured the outside of the tires and the fenders because the frame/springs/differences made it difficult to get a good measurement with the wheels and frame. When adjusting the trac bar I found that I could just remove the axle end, adjust the trac bar in/out (see note), jack up/down the axle, and re-torque the bolt. I didn�t need to touch the frame bolt.
Notes on adjusting the trac bar and jam nut:
1. When you adjust your trac bar you want to keep at least 1� of the thread inside the tube - 3/4" may work OK and 1/2" is not safe.
2. Make sure you have access to the Zerk fitting when installed in the axle bracket.
3. Once the trac bars is torqued in place, tighten the jam nut as best you can.
4. When the jam nut is tight, you want to take notice of the nut position relative to the bracket. On the front bracket the nut may come very close or may actually hit the bracket. If this occurs with your install you should contact Currie and get their smaller jam nut.
So far my trac bars have held up well. I did have a problem with the spring clip on the front trac bar that Currie fixed with no hassle. I haven�t had any squeaking, and haven�t had any rubbing on my Riddlers.


JK Super Freak
Joined: Oct 2007
Posts: 1,446
Likes: 0
From: Statesboro, GA
joe002, what made you decide to go with the adjustable bars. I have been thinking about it but can't really see why I need them. i only ask because we have the same lift and wondered if you were experiencing some kind of problems.
Thread Starter
JK Super Freak
Joined: Oct 2007
Posts: 1,572
Likes: 0
From: Phoenix, AZ
On the front, I just wanted my wheels to be centered.
In the end it may not really matter. I didn�t do any testing with the stock trac bars and the lift, but I figured I already spent a lot for the Jeep and a few hundred more permits me to accurately keep the wheels centered.
Even though the wheels would not be as centered as they are now, the stock track bars and rear bracket may have given me the exact same ride/feel/results.

JK Freak
Joined: Nov 2007
Posts: 627
Likes: 0
From: Enid, OK
At the very least it will recenter my axle and i can use it down the road if i ever put a bigger lift on.
JK Freak
Joined: Feb 2008
Posts: 605
Likes: 0
From: RSM.CA
With the adjustable trackbar, is there any need for a new rear bracket?
I thought one reason for a new bracket in the rear is too make it stronger
compared to the oe one.
And....is there a need for a new bracket on the front also for strength?
I have heard there is no need for new trackbars if adjustables bars are used.
Still somewhat confused. Thanks
I thought one reason for a new bracket in the rear is too make it stronger
compared to the oe one.
And....is there a need for a new bracket on the front also for strength?
I have heard there is no need for new trackbars if adjustables bars are used.
Still somewhat confused. Thanks
Trending Topics
Thread Starter
JK Super Freak
Joined: Oct 2007
Posts: 1,572
Likes: 0
From: Phoenix, AZ
With the adjustable trackbar, is there any need for a new rear bracket?
I thought one reason for a new bracket in the rear is too make it stronger
compared to the oe one.
And....is there a need for a new bracket on the front also for strength?
I have heard there is no need for new trackbars if adjustables bars are used.
Still somewhat confused. Thanks
I thought one reason for a new bracket in the rear is too make it stronger
compared to the oe one.
And....is there a need for a new bracket on the front also for strength?
I have heard there is no need for new trackbars if adjustables bars are used.
Still somewhat confused. Thanks
There are two types of brackets. Ones that help to adjust the geometry and when used hopefully alleviates the need for an adjustable trac bar. Some of the earlier versions of these brackets ended up breaking the OEM brackets because of the stress applied to the OEM brackets. Typically these brackets were mounted on the axle not the frame. The newer brackets seem to have alleviated this problem.
The other kind of bracket - that you are thinking about - adjusts the geometry, but also strengthens the OEM bracket so it won�t fail under stress.
Actually, the best solution would be to have a new strong bracket that was adjusted for your lift with an adjustable trac bar to center your wheels. When your Jeep is on a flat surface you would really like to see is your trac bar horizontal. What you�ll notice with a lift and no bracket is the trac bar is now at more of an angle away from horizontal. If you have a good strong bracket that is longer to make up for the lift you will notice your trac bar is more horizontal. If you also have an adjustable trac bar you will be able to center your wheels too.
With my smaller lift I decided it was more important to center my wheels then to have my trac bar as horizontal as possible. So far it has worked well for me - no sign of additional stress on my brackets, and I have a great ride and performance. Maybe one of these days I may look into reinforced front and rear brackets to make the trac bar more horizontal, but I�m not really sure I will see any difference.
JK Freak
Joined: Feb 2008
Posts: 605
Likes: 0
From: RSM.CA
Thanks for all the information/
But, how do I know if the braket is the newer stronger type?
I assume if the bracket has to be welded it is the strengh type.
And.....may go with the Currie Rock Jock but it lifts the front 5"
which means it will barely fit in the garage and I probably could
not run 35's.
Likely to go with the TF 3" spring lift with all the brackets and
trac bars, about the same price as Currie which does not include
new trac bars.
Seems like you are pleased with the TF.?
Thread Starter
JK Super Freak
Joined: Oct 2007
Posts: 1,572
Likes: 0
From: Phoenix, AZ
Edit: The brackets on the front appear to be more on the axle than on the frame. Again it's best to check with the vendor and forum members.
Last edited by joe002; Dec 3, 2008 at 06:21 PM.