
D44 SOLID Diff Cover Install w/pics

Thread Starter
JK Freak
Joined: Sep 2009
Posts: 894
Likes: 0
From: Kirkland, WA
Got my SOLID D44 covers installed finally. Here's the write up. (I have D44's front and rear, for anyone who has different axles, order the different covers -install is the same process-)
Tools Needed:
Adjustable 1/2" Torque Ratchet
Ratchet extension
1/2" socket
Steel Wool/Sand paper/abrasive pad/razor blade
Brake Cleaner
Compressed air (optional)
4.5" Metal Grinding Wheel (possibly optional)
(x2) 2.375 Quarts 75-w140 Gear Oil (full synthetic)
RTV Sealant and/or D44 Lube Lockers
Supplied Diff Cover Hardware (I threw all of mine out except fill plug, details below)
1) I started off by excitedly opening my cover packages from solid. I read the sheet that came with them stating I had to grind off ~.2-.4" of metal away from the inside of the fill plug IF I had factory E-Lockers. (which I do). Instead of calling SOLID or looking up threads here for people who opted out of this, I decided to play it safe and grind it. Took 5 minutes with a 4.5" metal wheel grinder.


The directions do not state an exact measurement for clearance, so I eyeballed it and hoped it was good enough. Clean all the dust/metal fragments out of the cover w/some brake cleaner and a paper towel.

Line up your Lubelocker (optional) in case by some insane shipping mishap you got the wrong cover or one of the holes wasn't punched.

2) FINALLY you can get started. Take out the drainplug with 1/2" ratchet and drain all oil into pan. If you want to keep your stock fill plug (I'll cover why later, remove it and set aside now)

3) Remove all (10) 1/2" screws from the differential housing.

On the rear axle there will be a bracket with corrugated wiring for the e-locker bolted with the top 2 screws, just tuck it up on the trac bar or wherever it is out of the way.

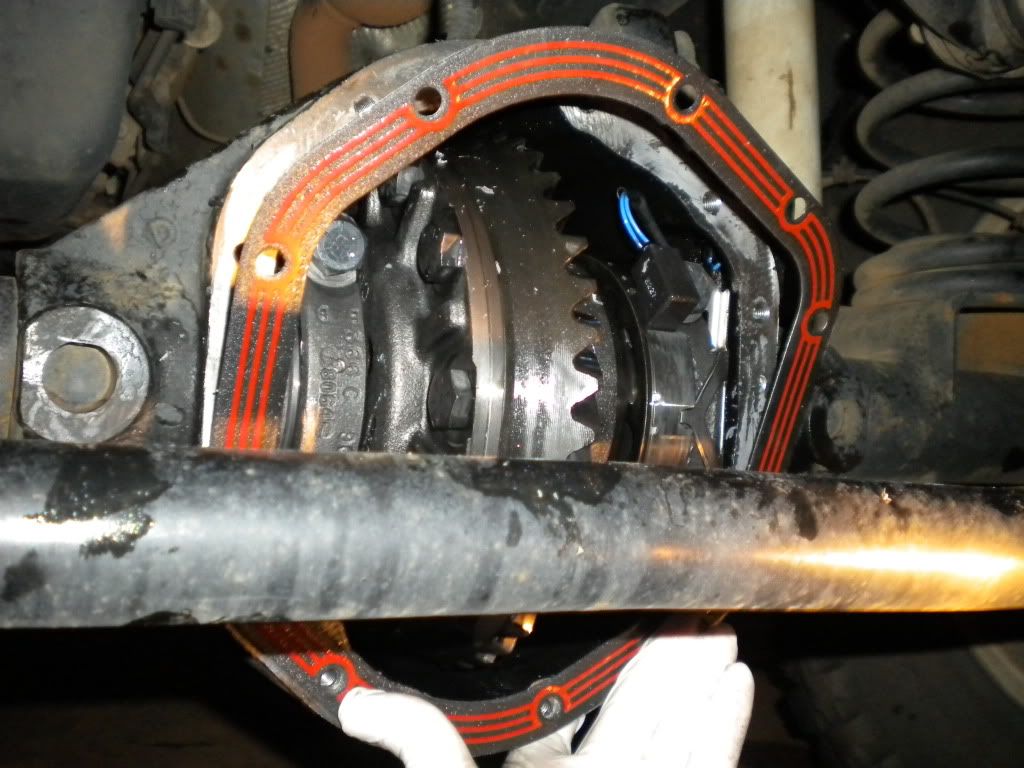
4) Tap the cover off LIGHTLY with a hammer. Once off spray the inside liberally with brake cleaner and let drain into the pan. Make sure all brake cleaner has evaporated/drained before continuing.

Here is the E-locker, the reason I had to grind the cover for clearance.

5) Take the razor blade/abrasive scrub and run them parallel to the axle housing scraping off ALL residual RTV sealant.

Get it as clean/shiny as possible, use some more brake cleaner or compressed air to blast out any RTV that snuck it's way into the housing.
6) For those of you that are taking the far easier route and keeping all of your stock (10) 1/2" screws continue to step 7.
For everyone else keep reading to accommodate for the allen wrench screws Solid provided. I do not have an allen wrench torque device, so I made one out of a modified allen wrench, drill bit adapter, and 1/4" ratchet. I WOULD NOT RECOMMEND DOING THIS!!!!! The supplied allen screws are complete S*** and would not seat right, all mounted crooked and pulled the cover off center. I threw them away and used all of the stock mounting hardware, except the fill plug.


7) Line up Lubelocker (or use RTV sealant) with the axle housing. Also apply a small amount of RTV sealant around the lip of your stock 1/2" screws, this is optional but w/Lubelocker installed the most likely point where water can enter are the screws.
Slide Diff Cover over the Lubelocker lining up all 10 holes. MAKE SURE IT IS LINED UP CORRECTLY with no overlapping Lubelocker.
8) Finger tighten all (10) 1/2" screws (or other hardware). On the rear make sure to reconnect the e-locker harness fastener. Begin torque ratcheting @ 15ft. lbs for the first cycle. 35ft. lbs. for the second. This is the rec. sequence from Lubelocker.
* DISCLAIMER *Some people have found that torquing to 35ft.lb. will snap their hardware, whether it is grade 8 aftermarket, or the stock screws. If you are worried about snapping the screws 25ft.lb. is the general standard that is still tight enough to prevent leaks.


The ratchet extension will come in handy when navigating around the front and rear trac-bars.
9) Re-install the axle drain plug (torque to ~35ft.lbs) and fill the Diff with 2.375 Quarts of 75-w140 gear oil. I used to fill it with the factory spec 75-w90, but it turned dead black within 8000 operating miles. With the amount of bumpers, wheels/tires, etc. added I figure I'm pulling tow-rated weight anyways.
10) Install the stock fill plug, or the one supplied with the covers. Again Solid manufactured hardware in allen wrench size (I DO NOT KNOW WHY ) I took the largest allen wrench I had (not sure on size, lost the kit years ago) and hand tightened until I couldn't turn it anymore.

11) Fire up the Jeep, put it in 4w-hi and drive it for a few minutes (going less than 30mph). Check for any leaks. Periodically check for leaks over the next few days just to make sure everything is sealed up and continue with 15k mi. service intervals.
Overall I'm extremely happy with SOLID's product, just not their hardware. Here's a comparison picture over stock.

Finished Axles
Rear

Front

And this is what happens when you put a 5/16" threaded bolt through your hand when it slips while tightening hardware.

Tools Needed:
Adjustable 1/2" Torque Ratchet
Ratchet extension
1/2" socket
Steel Wool/Sand paper/abrasive pad/razor blade
Brake Cleaner
Compressed air (optional)
4.5" Metal Grinding Wheel (possibly optional)
(x2) 2.375 Quarts 75-w140 Gear Oil (full synthetic)
RTV Sealant and/or D44 Lube Lockers
Supplied Diff Cover Hardware (I threw all of mine out except fill plug, details below)
1) I started off by excitedly
opening my cover packages from solid. I read the sheet that came with them stating I had to grind off ~.2-.4" of metal away from the inside of the fill plug IF I had factory E-Lockers. (which I do). Instead of calling SOLID or looking up threads here for people who opted out of this, I decided to play it safe and grind it. Took 5 minutes with a 4.5" metal wheel grinder.The directions do not state an exact measurement for clearance, so I eyeballed it and hoped it was good enough. Clean all the dust/metal fragments out of the cover w/some brake cleaner and a paper towel.
Line up your Lubelocker (optional) in case by some insane shipping mishap you got the wrong cover or one of the holes wasn't punched.
2) FINALLY you can get started. Take out the drainplug with 1/2" ratchet and drain all oil into pan. If you want to keep your stock fill plug (I'll cover why later, remove it and set aside now)
3) Remove all (10) 1/2" screws from the differential housing.
On the rear axle there will be a bracket with corrugated wiring for the e-locker bolted with the top 2 screws, just tuck it up on the trac bar or wherever it is out of the way.
4) Tap the cover off LIGHTLY with a hammer. Once off spray the inside liberally with brake cleaner and let drain into the pan. Make sure all brake cleaner has evaporated/drained before continuing.
Here is the E-locker, the reason I had to grind the cover for clearance.
5) Take the razor blade/abrasive scrub and run them parallel to the axle housing scraping off ALL residual RTV sealant.
Get it as clean/shiny as possible, use some more brake cleaner or compressed air to blast out any RTV that snuck it's way into the housing.
6) For those of you that are taking the far easier route and keeping all of your stock (10) 1/2" screws continue to step 7.
For everyone else keep reading to accommodate for the allen wrench screws Solid provided. I do not have an allen wrench torque device, so I made one out of a modified allen wrench, drill bit adapter, and 1/4" ratchet. I WOULD NOT RECOMMEND DOING THIS!!!!!
The supplied allen screws are complete S*** and would not seat right, all mounted crooked and pulled the cover off center. I threw them away and used all of the stock mounting hardware, except the fill plug.7) Line up Lubelocker (or use RTV sealant) with the axle housing. Also apply a small amount of RTV sealant around the lip of your stock 1/2" screws, this is optional but w/Lubelocker installed the most likely point where water can enter are the screws.
Slide Diff Cover over the Lubelocker lining up all 10 holes. MAKE SURE IT IS LINED UP CORRECTLY with no overlapping Lubelocker.
8) Finger tighten all (10) 1/2" screws (or other hardware). On the rear make sure to reconnect the e-locker harness fastener. Begin torque ratcheting @ 15ft. lbs for the first cycle. 35ft. lbs. for the second. This is the rec. sequence from Lubelocker.
* DISCLAIMER *Some people have found that torquing to 35ft.lb. will snap their hardware, whether it is grade 8 aftermarket, or the stock screws. If you are worried about snapping the screws 25ft.lb. is the general standard that is still tight enough to prevent leaks.
The ratchet extension will come in handy when navigating around the front and rear trac-bars.
9) Re-install the axle drain plug (torque to ~35ft.lbs) and fill the Diff with 2.375 Quarts of 75-w140 gear oil. I used to fill it with the factory spec 75-w90, but it turned dead black within 8000 operating miles. With the amount of bumpers, wheels/tires, etc. added I figure I'm pulling tow-rated weight anyways.
10) Install the stock fill plug, or the one supplied with the covers. Again Solid manufactured hardware in allen wrench size (I DO NOT KNOW WHY
) I took the largest allen wrench I had (not sure on size, lost the kit years ago) and hand tightened until I couldn't turn it anymore.11) Fire up the Jeep, put it in 4w-hi and drive it for a few minutes (going less than 30mph). Check for any leaks. Periodically check for leaks over the next few days just to make sure everything is sealed up and continue with 15k mi. service intervals.
Overall I'm extremely happy with SOLID's product, just not their hardware. Here's a comparison picture over stock.
Finished Axles
Rear
Front
And this is what happens when you put a 5/16" threaded bolt through your hand when it slips while tightening hardware.
Last edited by runit3; Mar 21, 2011 at 01:06 AM.

JK Super Freak
Joined: Sep 2007
Posts: 1,258
Likes: 1
From: Roanoke,TX
Just one quick note
35lb is a lot of torque for that size bolt (I know it is what lubelocker recomends)
most go with 25lbs on the retorque
do a search, many people broke the bolts off trying to go with 35lb
35lb is a lot of torque for that size bolt (I know it is what lubelocker recomends)
most go with 25lbs on the retorque
do a search, many people broke the bolts off trying to go with 35lb
Thread Starter
JK Freak
Joined: Sep 2009
Posts: 894
Likes: 0
From: Kirkland, WA
I kept my stock hardware because when I took it off it was actually torqued to 40+ft.lbs (I didn't torque it, dealer must have). I knew they could handle the load before I tightened them. Yes they could have still broken but finding 1/2" socket screws with locks in my neighborhood is a lot easier than finding obscure grade 8 allen size screws.
Thanks for the comment though, I'll add a disclaimer.
Trending Topics
Thread Starter
JK Freak
Joined: Sep 2009
Posts: 894
Likes: 0
From: Kirkland, WA
On the front diff I kept all the stock hardware besides the fill plug and it took me ~1 hour. The rear took me 2 hours because I was working alone and struggled with the aftermarket screws before going back to the stock ones.
If you prep all of your tools and grind the diffs before hand, the draining, cleaning, and re-torquing only takes about 45min.
All this being said I would block out at least 3 hours of your day just to make sure everything gets done right...This is not the install to cheat on because of time.
If you prep all of your tools and grind the diffs before hand, the draining, cleaning, and re-torquing only takes about 45min.
All this being said I would block out at least 3 hours of your day just to make sure everything gets done right...This is not the install to cheat on because of time.
