Slow Build - Shrockworks Bumper, Engo E9000S Winch CUBE Driving Lamps
 08-15-2013, 09:00 PM
#1
JK Enthusiast
Thread Starter
Join Date: Feb 2013
Location: Oakland, CA
Posts: 255
Likes: 0
Received 0 Likes
on
0 Posts
This is my chronicle of my Jeeps transformation from Stock.
I ordered three (make that four) main items to start this process:
The ShrockWorks bumper has a four month build/wait period. The wait on the bumper is extensive but I am lying to myself and telling myself that it is a awesome Christmas gift. The new Engo E9000s winch is back ordered at least 3 week from JeepHut.com. I am not sweating this because of the extensive bumper delay. Lastly is the Inspired Engineering Cube Driving Lights, these lights are the first of the three items to arrive.
Most recently Factor 55 ProLink Loaded, and Winch lock Already shipped by 4 Wheel Parts, excited to see this in person.
Since then I saw a Factor 55 post on JK Forum and had to have it. So I ordered it last night. One Factor 55 ProLink Loaded, and Winch lock. Found out this morning it already shipped by 4 Wheel Parts, excited to see this in person. 4 Wheel Parts had the best deal around surprisingly enough.
Let me talk about customer service.
ShrockWorks "Stubby" Front Bumper I exchanged several emails with Mark with ShockWorks. I asked many questions and were please with how responsive Mark was. I am very please so far with my dealings with them. Being that I am now just like a kid waiting for for Christmas. I was hoping to track the process of the bumper on their web site but I was told that is not how the site works. Mark did say I could check in any time I wanted for a progress report.
JeepHut.com I placed my order for the Engo Winch or rather I went trough the process of placing my order several times. Putting the items in the cart then closing the web page till I decided to pull the trigger. After ordering the Engo and getting a confirmation email. I received a marketing spam email to finish one of the previous orders that I bailed on. Not good. Cross reference the email with purchases and don't send out the spam. After I ordered I saw a forum post about deals from JeepHut.com and Engo Winches. So I called, they knew nothing about this and told me the winch is three weeks back ordered. I don't mind the back-order because I need the bumper first, but don't post there are deals and then calm ignorance. Bad form. I will let this slide now because I already ordered it before asking for the discount.
Inspired Engineering Cube Driving Lights I first found out about Inspired here on JK Forum. I was impressed by their knowledge of electrical principles and their product. I went to their website and found the new lights for my new bumper and placed my order. I thought that was the end of it. No Customer Service is their middle name. (Inspired-Customer Service- Engineering) Sami contacted me first to ask what type of install was I intending, then there was a better connector to the factory wiring did I want to wait. I am very pleased so far. I say you should check out their web site for the customer service alone.
4 Wheel Parts Customer service is just what you would expect from a large chain store. Professional auto-email replies, overly complicated phone system to navigate through and prompt shipping. I called to change the color from red to grey and it already shipped by 10 am this morning. Guess I'm keeping it red unless I make it a local store to exchange it.
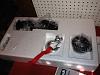
Whats In the Box?
ShrockWorks "Stubby" Front Bumper - Post #10
Engo E9000S Winch - Post #4 & 5
Inspired Engineering Cube Driving Lights - Cube Lights (2), Inspired Stickers (2) Warranty Information, Instructions, Invoce
Factor 55 ProLink Loaded - Post #2
Winch lock - Post #2

I was shocked by three things when I opened the box.
Th lights are roughly 2.5 inches big.
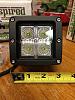
I guess I thought they would look smaller but in person they look much bigger then I expected. Each light has substantial weight to them. They do not feel cheep. Lastly If you order them and don't intend to install for a while like I do, open the box and get the serial numbers off them to register them on the webpage or after 30 day the warranty expires.
I can't wait to install these and test them though.
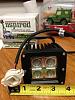
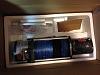
Here is a look at the new JK 2010+ connector
I will update this when I get the next part in.
I ordered three (make that four) main items to start this process:
- ShrockWorks "Stubby" Front Bumper
- Engo E9000S Winch
- Inspired Engineering Cube Driving Lights
- Factor 55 ProLink Loaded, and Winch lock (new Addition)
The ShrockWorks bumper has a four month build/wait period. The wait on the bumper is extensive but I am lying to myself and telling myself that it is a awesome Christmas gift. The new Engo E9000s winch is back ordered at least 3 week from JeepHut.com. I am not sweating this because of the extensive bumper delay. Lastly is the Inspired Engineering Cube Driving Lights, these lights are the first of the three items to arrive.
Most recently Factor 55 ProLink Loaded, and Winch lock Already shipped by 4 Wheel Parts, excited to see this in person.
Since then I saw a Factor 55 post on JK Forum and had to have it. So I ordered it last night. One Factor 55 ProLink Loaded, and Winch lock. Found out this morning it already shipped by 4 Wheel Parts, excited to see this in person. 4 Wheel Parts had the best deal around surprisingly enough.
Let me talk about customer service.
ShrockWorks "Stubby" Front Bumper I exchanged several emails with Mark with ShockWorks. I asked many questions and were please with how responsive Mark was. I am very please so far with my dealings with them. Being that I am now just like a kid waiting for for Christmas. I was hoping to track the process of the bumper on their web site but I was told that is not how the site works. Mark did say I could check in any time I wanted for a progress report.
JeepHut.com I placed my order for the Engo Winch or rather I went trough the process of placing my order several times. Putting the items in the cart then closing the web page till I decided to pull the trigger. After ordering the Engo and getting a confirmation email. I received a marketing spam email to finish one of the previous orders that I bailed on. Not good. Cross reference the email with purchases and don't send out the spam. After I ordered I saw a forum post about deals from JeepHut.com and Engo Winches. So I called, they knew nothing about this and told me the winch is three weeks back ordered. I don't mind the back-order because I need the bumper first, but don't post there are deals and then calm ignorance. Bad form. I will let this slide now because I already ordered it before asking for the discount.
Inspired Engineering Cube Driving Lights I first found out about Inspired here on JK Forum. I was impressed by their knowledge of electrical principles and their product. I went to their website and found the new lights for my new bumper and placed my order. I thought that was the end of it. No Customer Service is their middle name. (Inspired-Customer Service- Engineering) Sami contacted me first to ask what type of install was I intending, then there was a better connector to the factory wiring did I want to wait. I am very pleased so far. I say you should check out their web site for the customer service alone.
4 Wheel Parts Customer service is just what you would expect from a large chain store. Professional auto-email replies, overly complicated phone system to navigate through and prompt shipping. I called to change the color from red to grey and it already shipped by 10 am this morning. Guess I'm keeping it red unless I make it a local store to exchange it.
Whats In the Box?
ShrockWorks "Stubby" Front Bumper - Post #10
Engo E9000S Winch - Post #4 & 5
Inspired Engineering Cube Driving Lights - Cube Lights (2), Inspired Stickers (2) Warranty Information, Instructions, Invoce
Factor 55 ProLink Loaded - Post #2
Winch lock - Post #2
I was shocked by three things when I opened the box.
- The Cube Lights are big
- The Cube Lights are heavy
- The warranty has a 30 day time out period to register
Th lights are roughly 2.5 inches big.
I guess I thought they would look smaller but in person they look much bigger then I expected. Each light has substantial weight to them. They do not feel cheep. Lastly If you order them and don't intend to install for a while like I do, open the box and get the serial numbers off them to register them on the webpage or after 30 day the warranty expires.
I can't wait to install these and test them though.
Here is a look at the new JK 2010+ connector
I will update this when I get the next part in.
Last edited by rdavi; 01-20-2014 at 11:18 AM. Reason: Added Parts
 08-23-2013, 05:29 PM
#2
JK Enthusiast
Thread Starter
Join Date: Feb 2013
Location: Oakland, CA
Posts: 255
Likes: 0
Received 0 Likes
on
0 Posts
Received 4 Wheel Parts order, next day got email that the order shipped. WTF I am glade that after the order was received I got the tracking info.

Review of items:
The factor 55 ProLink is very large in person. I really like the red, I will keep it. Since the bumper should be here in December it will be like Rudolf's Nose on the Jeep. It feels substantial.


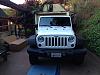
Just loaded a stock photo of the new bumper on order

and the Prolink on my bumper for comparison purpose.

In the stock picture imagine the square lights insted of round and Rudolf's Red nose on the jeep.
Enjoy the pics.
Review of items:
The factor 55 ProLink is very large in person. I really like the red, I will keep it. Since the bumper should be here in December it will be like Rudolf's Nose on the Jeep. It feels substantial.
Just loaded a stock photo of the new bumper on order
and the Prolink on my bumper for comparison purpose.
In the stock picture imagine the square lights insted of round and Rudolf's Red nose on the jeep.
Enjoy the pics.
Last edited by rdavi; 01-15-2014 at 10:44 PM. Reason: Photos
08-27-2013, 09:08 PM
#3
JK Enthusiast
Thread Starter
Join Date: Feb 2013
Location: Oakland, CA
Posts: 255
Likes: 0
Received 0 Likes
on
0 Posts
So I asked ShrockWorks about the lead time because I was curious just how much of the lead time was actually do to build time and how much was to waiting in the queue just to get started. I learned the following which I thought was interesting...
It's been about a month so far which means you still have a few months to go. The process will start 4-5 weeks before it's ready to ship. The first thing to be done is cut the parts from a flat piece of 3/16" plate. Next in line is the press brake where they're formed if need be. Then they will go to fabrication where the parts are fit, welded and finished. A finished bumper is sent off to the powder coat shop and it's ready to box up and ship upon returning.
I never thought or expected that it would take a month or more to build a bumper but that helps explain the long lead time. I appreciate the detail, I now know the type of quality placed into my new bumper. Made by hand in America can't hope for more for your Jeep. Worth the wait when all works out.
Last edited by rdavi; 09-09-2013 at 09:16 PM. Reason: Formatting
09-22-2013, 10:11 PM
#4
JK Enthusiast
Thread Starter
Join Date: Feb 2013
Location: Oakland, CA
Posts: 255
Likes: 0
Received 0 Likes
on
0 Posts
The ordering/Customer service
I ordered the Engo ES-9000S winch on July 31st from JeepHut, back ordered till September 20th. I understand product can be difficult to stock and there was a nation wide back order. JeepHut just seems disorganized, I called several times with less than satisfactory answers on timing, every time I called it seamed to be three week till it would be in.
Finally! But JeepHut does not seem very customer centric.
Whats in the Box:

Installing the wireless receiver
This operation is fairly easy, only basic tools needed.
To be continued:
I ordered the Engo ES-9000S winch on July 31st from JeepHut, back ordered till September 20th. I understand product can be difficult to stock and there was a nation wide back order. JeepHut just seems disorganized, I called several times with less than satisfactory answers on timing, every time I called it seamed to be three week till it would be in.
- I received an email stating they had "Order History - View your history of purchases that you have made with us" I checked their web site, but it was up dated recently so I could no longer check my order on line.
Finally! But JeepHut does not seem very customer centric.
Whats in the Box:
- Hook
- Wired Remote
- Negative Battery Lead
- Bolts
- Winch spool
- Sinthetic Rope
- Solenoid Box
- Positive Battery Lead
- Wireless Remote
- Wireless Remote Receiver
- Hawse Fairlead
Installing the wireless receiver
This operation is fairly easy, only basic tools needed.
- [*]
- [*]
- [*]
- [*]
To be continued:
Last edited by rdavi; 01-16-2014 at 12:05 PM. Reason: Broke up post into two
09-22-2013, 10:28 PM
#5
JK Enthusiast
Thread Starter
Join Date: Feb 2013
Location: Oakland, CA
Posts: 255
Likes: 0
Received 0 Likes
on
0 Posts
**Limitations to the type of account I have force me to break up my post into two to show photos**
Steps to take:
Steps to take:
- Remove the four screw hole plugs.
- Remove the four Philips head screws
- Remove the cover
- Place the wireless receiver in one of to locations in the housing
- Mine had play so I placed a wedge behind it
- I followed the provided wiring diagram
- Use the 5/16th socket to remove the nuts to all the post
- Attach the correct wires
- The red needs to attach to a larger nut use the open end box wrench on this one but first loss-in the two nuts holding the thick flat ground brace
- Attache the red wire
- Reattach the thick flat ground brace and tighten the nuts
- Replace the cover
- Replace the four Philips head screws
- Replace the four screw hole plugs.
Last edited by rdavi; 01-16-2014 at 12:06 PM.
12-21-2013, 05:31 PM
#6
JK Enthusiast
Thread Starter
Join Date: Feb 2013
Location: Oakland, CA
Posts: 255
Likes: 0
Received 0 Likes
on
0 Posts
Just got word that I should have the bumper just after Christmas, still can't wait.
In the mean time I got some lights from inspired engineering, the IE-ROCK lights. I don't plan to install them in the typical fashion.

The first one I installed in the trunk as a trunk light that turns on when I open the trunk door.

Just bidding my time till the bumper gets here...
In the mean time I got some lights from inspired engineering, the IE-ROCK lights. I don't plan to install them in the typical fashion.
The first one I installed in the trunk as a trunk light that turns on when I open the trunk door.
Just bidding my time till the bumper gets here...
Last edited by rdavi; 01-15-2014 at 10:50 PM. Reason: Photos
01-01-2014, 08:03 PM
#7
JK Enthusiast
Thread Starter
Join Date: Feb 2013
Location: Oakland, CA
Posts: 255
Likes: 0
Received 0 Likes
on
0 Posts
Today I continued adding my Inspired Engineering IE-Rock lights,

this time I added two of them under the hood.


I need to find a good hood light switch to finish the install but I wanted to get them installed.


Check out the pictures of how well they work. I needed to add some washers on one sit to make it fit.
this time I added two of them under the hood.
I need to find a good hood light switch to finish the install but I wanted to get them installed.
Check out the pictures of how well they work. I needed to add some washers on one sit to make it fit.
Last edited by rdavi; 01-15-2014 at 10:47 PM. Reason: Photos
Trending Topics
01-13-2014, 11:12 PM
#8
JK Enthusiast
Thread Starter
Join Date: Feb 2013
Location: Oakland, CA
Posts: 255
Likes: 0
Received 0 Likes
on
0 Posts
Finally received my bumper!
So I removed my bumper and started the process of moving my pump. I just finished this part at midnight so I will not give a full wright up to night.
So I removed my bumper and started the process of moving my pump. I just finished this part at midnight so I will not give a full wright up to night.
01-14-2014, 12:42 AM
#9
JK Enthusiast
Join Date: Aug 2013
Location: Superior WI
Posts: 143
Likes: 0
Received 0 Likes
on
0 Posts
Awesome, im looking forward to seeing more pics with you bumper and winch. i liked all the places that you put your rock lights, i might have to copy your trunk space light. 

01-15-2014, 07:55 PM
#10
JK Enthusiast
Thread Starter
Join Date: Feb 2013
Location: Oakland, CA
Posts: 255
Likes: 0
Received 0 Likes
on
0 Posts
OK so I track the package and arrange to work from home in the afternoon to make sure all goes well with my bumper delivery.
I get home and the bumper is in my driveway. Cool I'm still on the clock but did not have lunch so I spend my lunch removing my bumper. I still have to get the kids from school by 6 PM so I am limited in what I can do.
As I drive to get the kids without a bumper on. I am planning on how to attack my bumper swap. Plan is to move the Vacuum Pump and stop there for the night. Reality is I can't start more bumper work till the kids are in bed.
I start the rest of the install about 9 PM If I am lacking photos it is because working in the dark with very limited time...
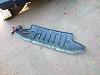
ShrockWorks "Stubby" Front Bumper (Day 1 Part 1)
What’s In the Box?
![Click image for larger version
Name: IMG_4123[1].jpg
Views: 284
Size: 67.9 KB
ID: 524023](https://www.jk-forum.com/forums/attachment.php?attachmentid=524023&thumb=1&d=1513721026)
![Click image for larger version
Name: IMG_4125[1].jpg
Views: 248
Size: 50.7 KB
ID: 524024](https://www.jk-forum.com/forums/attachment.php?attachmentid=524024&thumb=1&d=1513721026)
Bumper
Skid Plate
Winch Mount
OR FAB Vacuum Relocation Kit
Paper Instructions (Shrockworks & OR Fab)
Assorted Nuts and Bolts
Shrockworks Bumper Sticker
Installing the Bumper
Removing the bumper
Remove the Air Dam, these screws are finicky I just pried the plastic screws out
Remove the Bumper cover, same as previous but I pried from under the cover with a screw driver
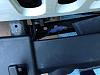
Disconnect the fog lights and cut zip ties holding cable to bumper
Unbolt all (8) nuts holding on the bumper
Remove bumper
To be Continued...
I get home and the bumper is in my driveway. Cool I'm still on the clock but did not have lunch so I spend my lunch removing my bumper. I still have to get the kids from school by 6 PM so I am limited in what I can do.
As I drive to get the kids without a bumper on. I am planning on how to attack my bumper swap. Plan is to move the Vacuum Pump and stop there for the night. Reality is I can't start more bumper work till the kids are in bed.
I start the rest of the install about 9 PM If I am lacking photos it is because working in the dark with very limited time...
ShrockWorks "Stubby" Front Bumper (Day 1 Part 1)
What’s In the Box?
Bumper
Skid Plate
Winch Mount
OR FAB Vacuum Relocation Kit
Paper Instructions (Shrockworks & OR Fab)
Assorted Nuts and Bolts
Shrockworks Bumper Sticker
Installing the Bumper
Removing the bumper
Remove the Air Dam, these screws are finicky I just pried the plastic screws out
Remove the Bumper cover, same as previous but I pried from under the cover with a screw driver
Disconnect the fog lights and cut zip ties holding cable to bumper
Unbolt all (8) nuts holding on the bumper
Remove bumper
To be Continued...
Last edited by rdavi; 01-16-2014 at 11:42 AM.

