Homelink garage door opener installation
 01-12-2009, 01:56 PM
#1
JK Enthusiast
Thread Starter
Okay, I have seen several different ideas on here about how to handle the installation of a hard-wired garage door operner. Although, several have turned out nicely, I wanted to do it my own way, using a homelink module.
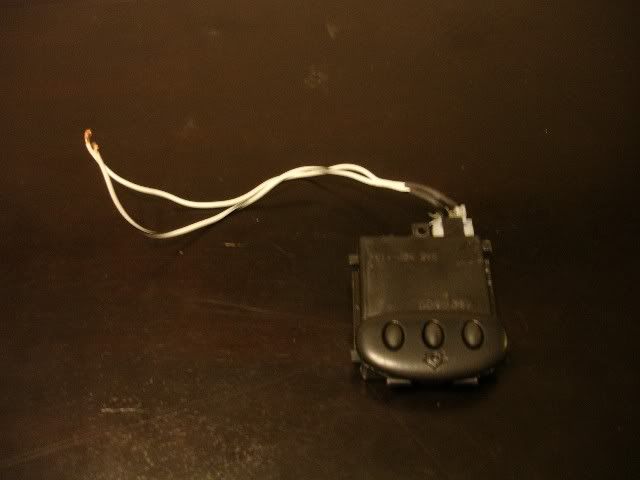
First, I bought a nice-looking homelink module from eBay. If you buy one of these, you shouldn't pay more than $40 total, or you're getting ripped off. Make sure if you do pay that much, that it's rolling-code capable also. The regular units are only worth half as much.
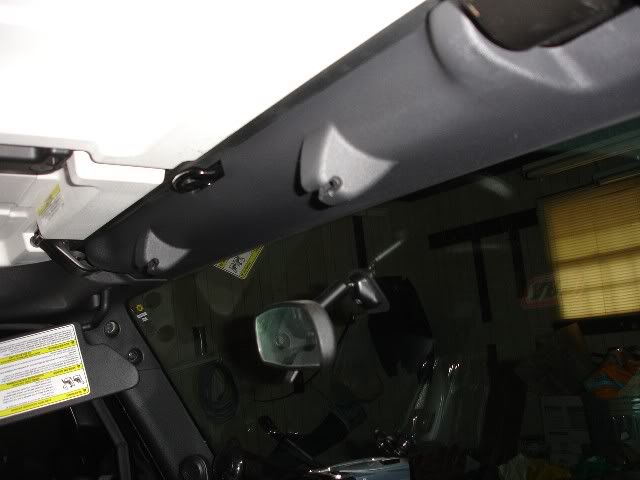
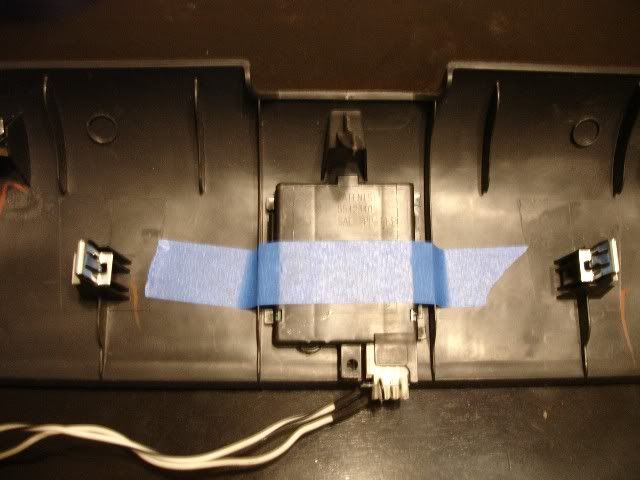
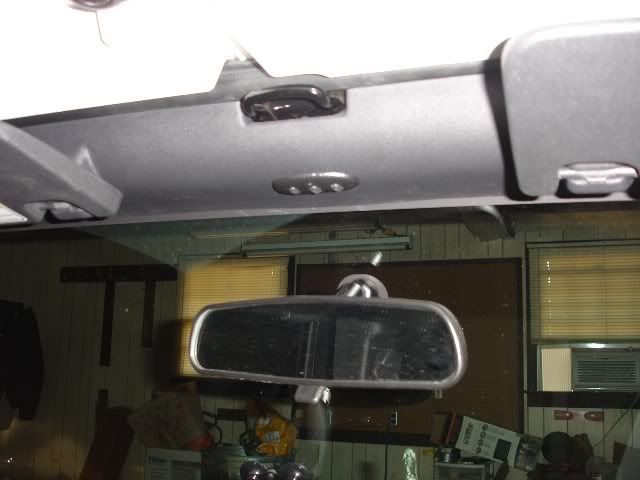
Next, I had to decide where I wanted to mount the unit. For me, this was a no-brainer. I wanted it centered up in the header.
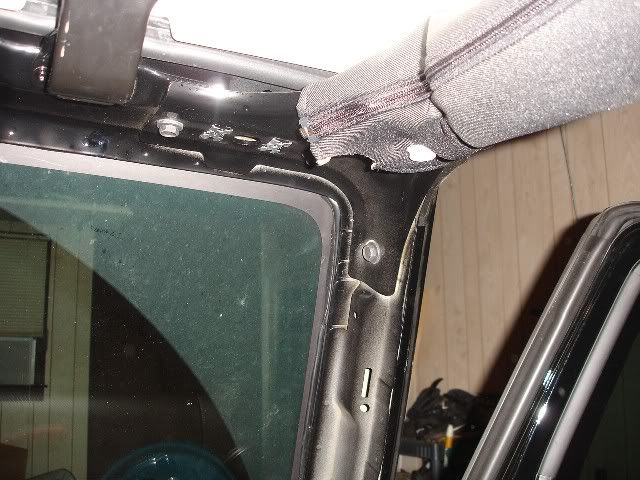
Next, I needed to remove the header and prep it for installation.

In order to ensure your homelink module will fit, you should size it up first. Tape it in the location where you intend to install it, and then re-insert the header to make sure you have enough room for the unit inside. There isn't a lot of room for the unit between the header and the window channel, so this is important.
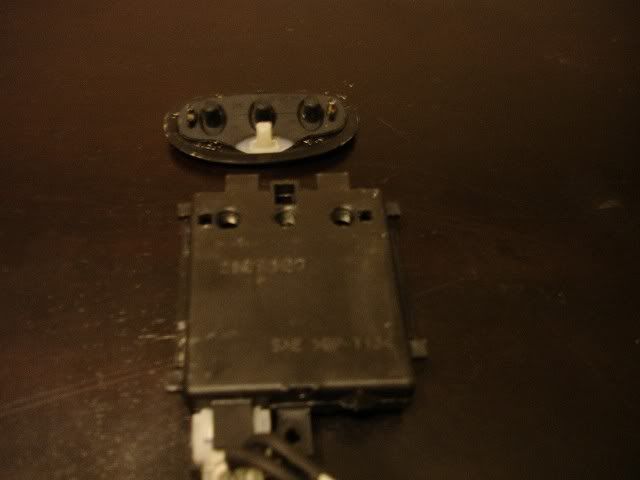
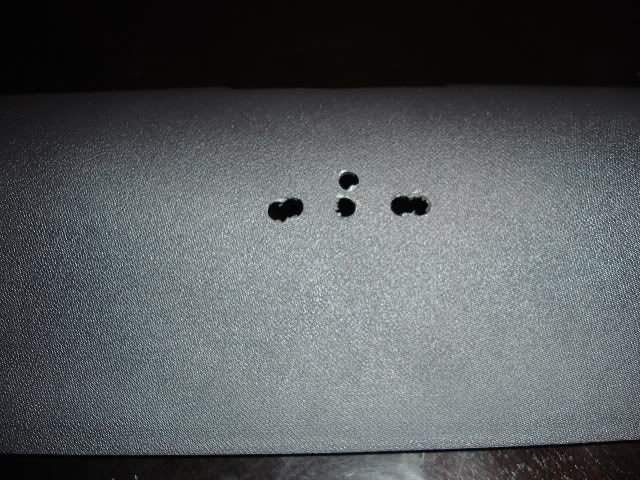
If the header fits, then you are ready to start cutting some holes. Before you do that, I would suggest making a template. To do so is very easy. First, remove the button assembly from the homelink module.
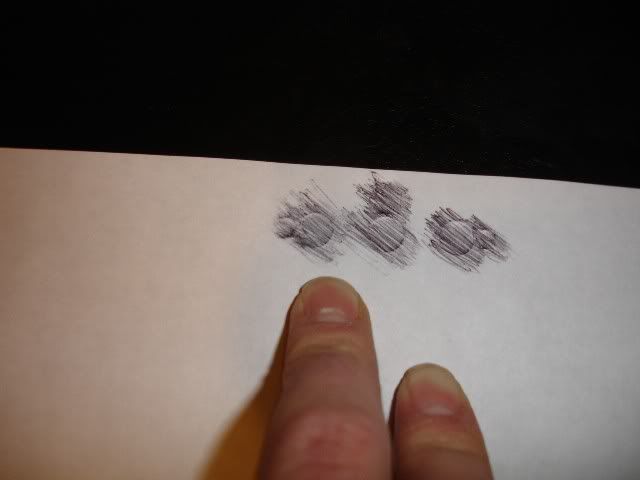
Then place a sheet of paper over the openings where the buttons and LED go. Using an ink pen or a pencil, rub the paper to create your template.
Then lay the module on the paper and trace it out.
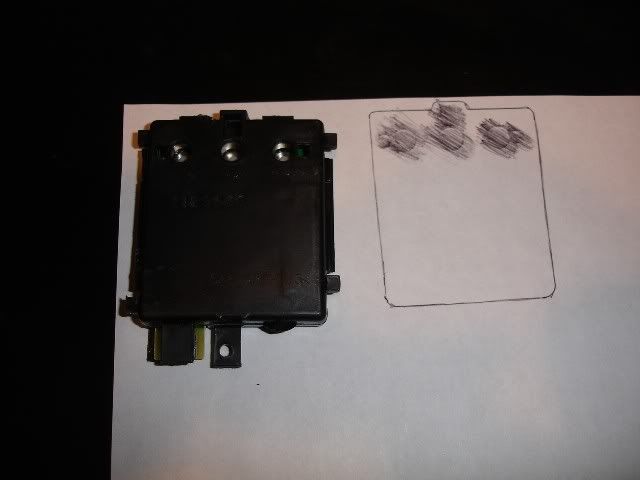
Now, cut the template out of the paper, lay it inside the header, and drill your holes.
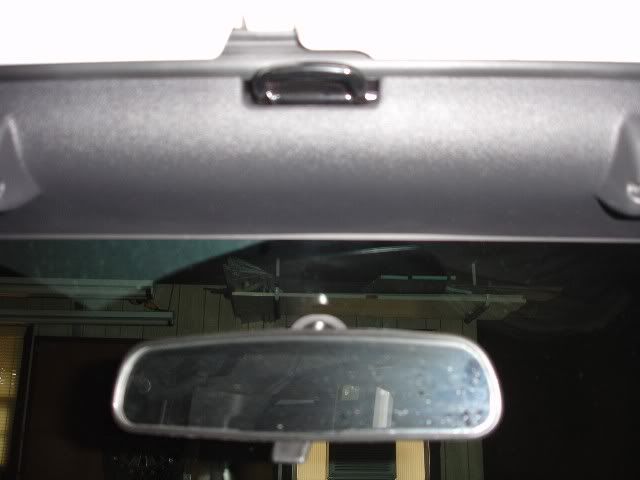
Now you are ready to test-fit the cover into the holes.
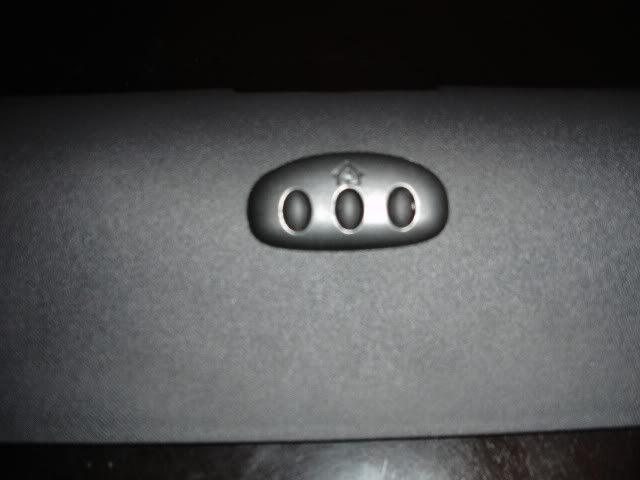
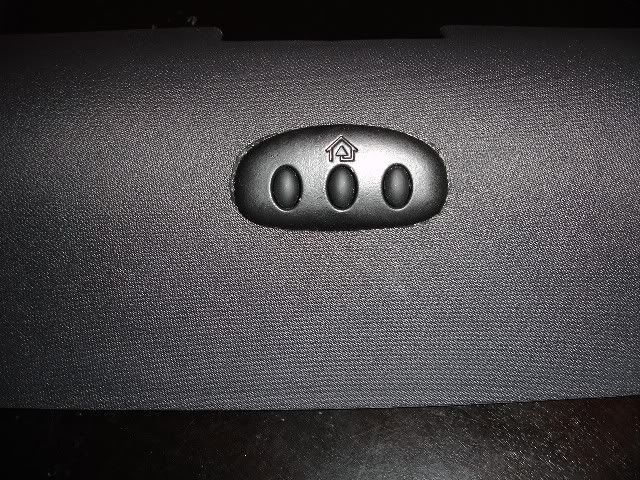
If everything fits properly, then you are in good shape to re-attach the homelink module. It will go on the inside of the header. The button assembly has two fingers that pop into the homelink module, and hold it in place. If your's is like mine, the thickness of the header will keep this from happening. First, I decided I would use some epoxy and just glue everything together.
Unfortunately, this didn't work for me. The epoxy wouldn't stick to the buttons, to the header, or to the homelink module. Therefore, I decided to go a different route. I used miter pins to hold the buttons in place. Drill small holes through the fingers and insert the miter pins from inside the header. This will do a good job if you make the fit snug.
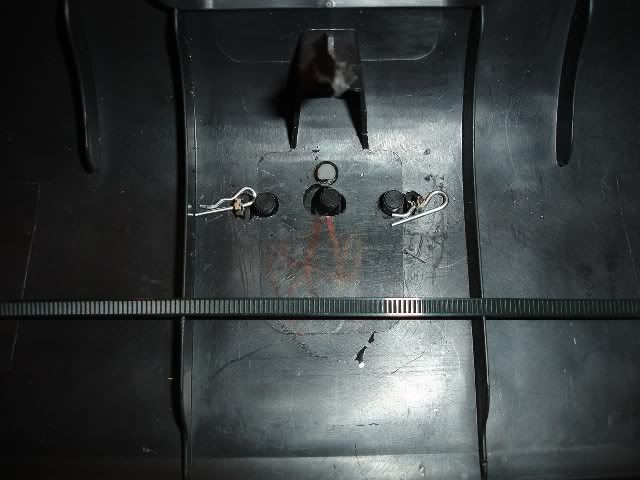
I also drilled two small holes through the clips on either side of the homelink, and used a couple of zip ties to help hold the module in place. I pulled a single zip-tie through both holes. The female end was large enough to hang on the hole. I then attached a second zip tie to the male end and snugged it up against the other hole, then trimmed.
A word of warning: because of the thickness of the header, and because of the addition of the miter pins, the rubber buttons would not reach the circuit board inside of the module any longer. I took the eraser out of a mechanical pencil, cut it into three pieces, and placed them in the holes on the module. They act as button-extenders and work perfectly for the job. (Sorry, forgot to take a pic.)
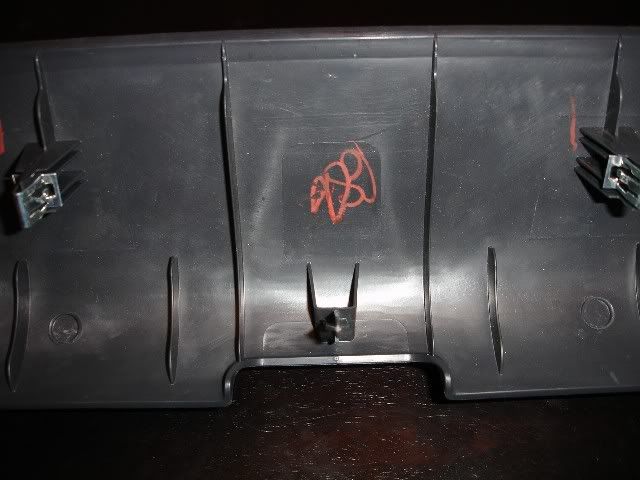
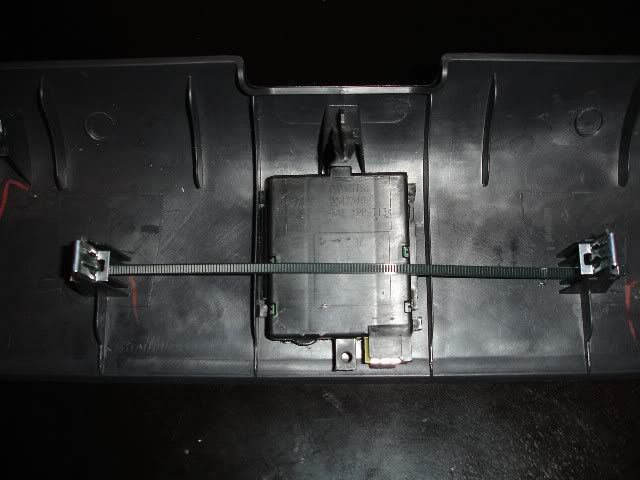
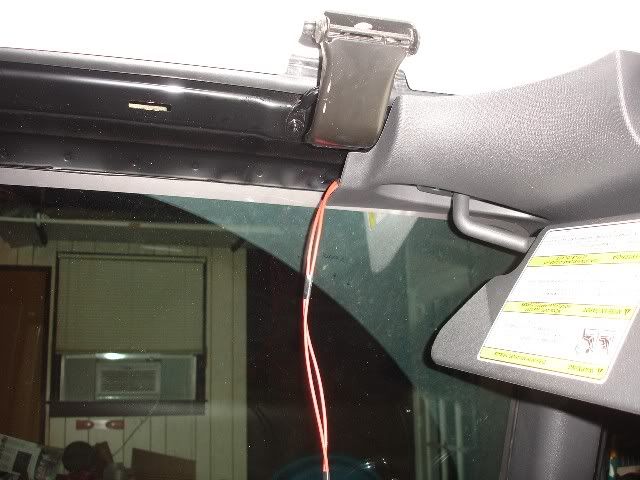
Once you have completed assembly of the unit, it is time to install it in the jeep. First, you will probably need to trim some of the excess plastic off of the module to make enough clearance for the installation between the header and the window channel. Unplug the wiring harness and throw it away. Then remove everything below the red line. You may even need to trim back the circuit board. Failure to do this may cause a bulge in your header after the installation is complete. There is nothing wrong with this if you don't mind the asthetics of it.
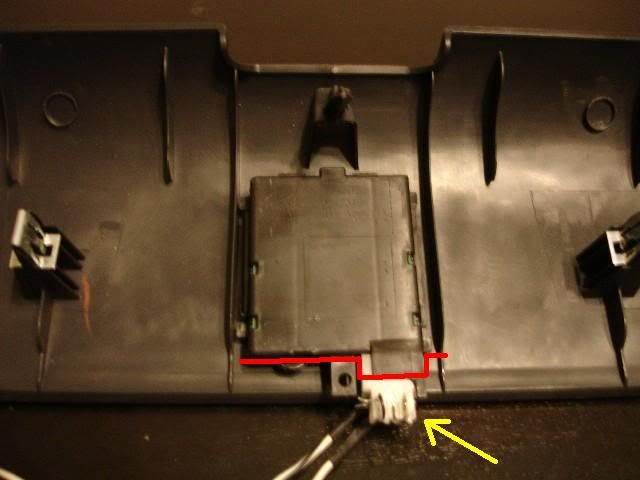
Once you are finished trimming the plastic and the circuit board, soder your wires to the circuit board. Polarity is important. The opener will not work if you wire it up backwards. Also, remember to soder to the module before connecting to the vehicle wiring.
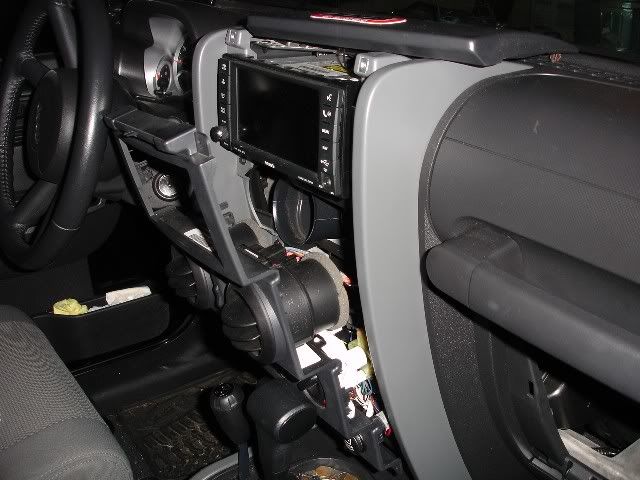
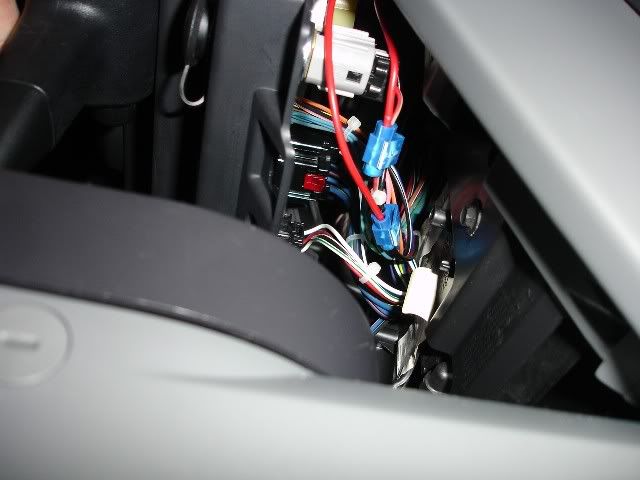
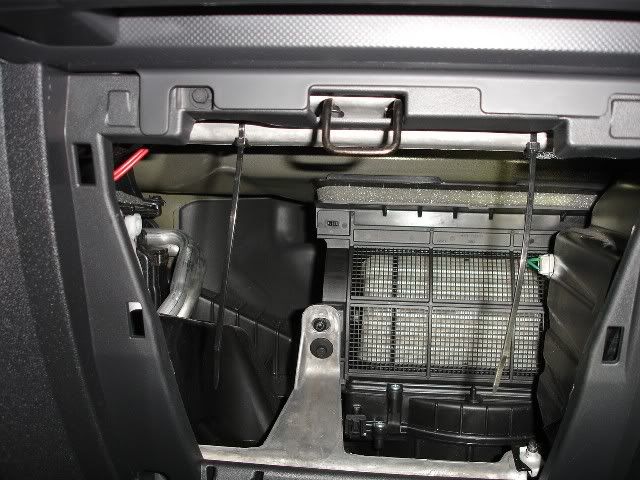
Now, you will need to remove all of the panels in-between the header and the power outlet (not the cigarette lighter). This includes the corner panel, the A-pillar panel, the passenger side panel, the glove box, the upper and lower dash panel, and the AC control assembly. I know this sounds like a lot, but except for 4 screws in the AC control assembly, everything else is held on by clips.
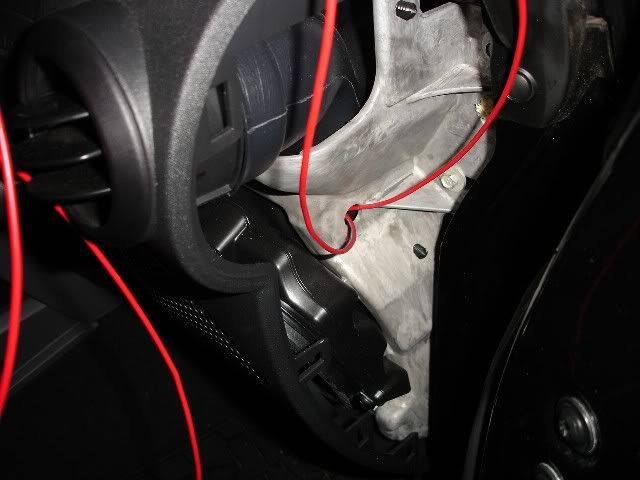
Next, route the wire through the vehicle. Make sure to leave enough slack to reach the power outlet. Once at the power outlet, the wire should be spliced. I used some rather cheap cable splices from the local auto-store. I paid $3 for about 10. You will only need two, one for the hot and one for the ground. Again, remember your polarity. It is important to wire it up in the correct orientation.
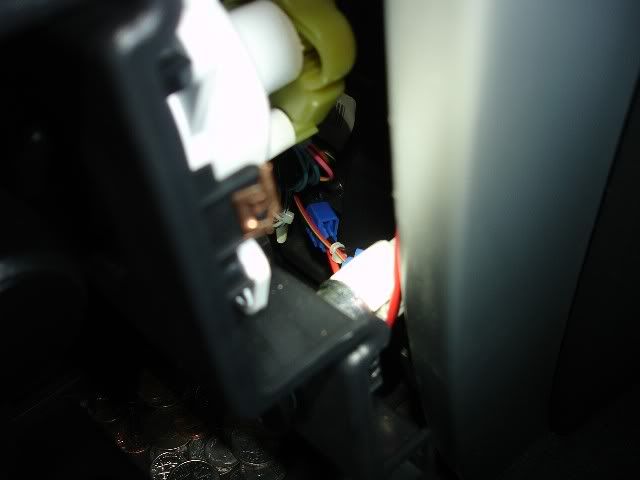
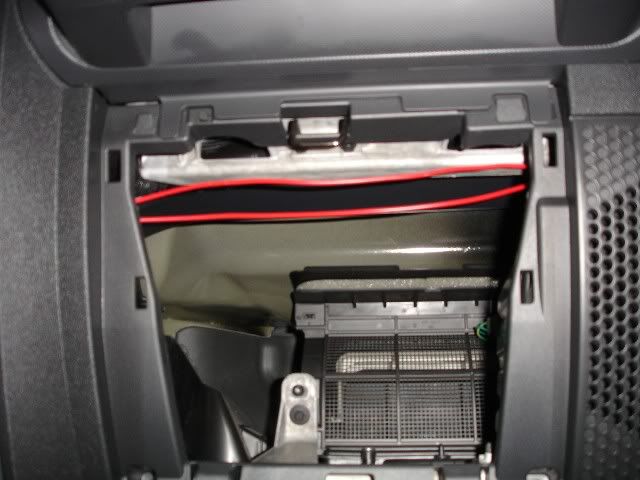
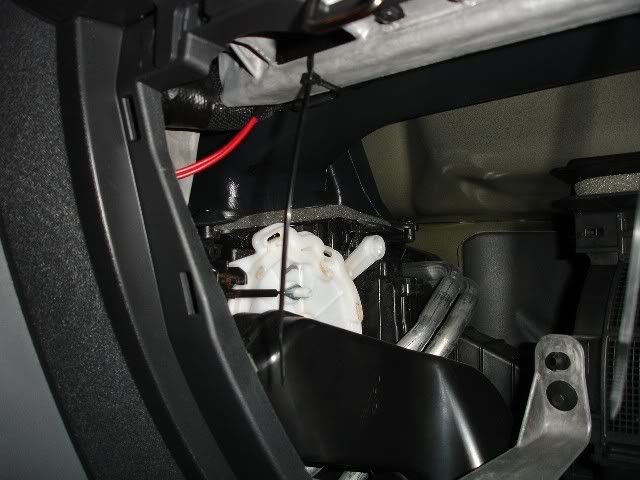
Once you have spliced into the power outlet, you should test the unit and make sure its working. If so, you are ready to re-assemble your Jeep. Make sure to route the wire in locations so that it will not get pinched or severed.
One last thing you will probably need to do is install some kind of back stop to keep the unit from moving inside of the header. When you press the buttons, the unit has a tendancy to float. I bought a rubber stop at ACE. It cost about $2.50. I had to trim it three times to get the correct thickness, but once installed, it held the module firmly against the header.

Once all of the panels have been re-installed, you are finished. Enjoy your new homelink.
First, I bought a nice-looking homelink module from eBay. If you buy one of these, you shouldn't pay more than $40 total, or you're getting ripped off. Make sure if you do pay that much, that it's rolling-code capable also. The regular units are only worth half as much.
Next, I had to decide where I wanted to mount the unit. For me, this was a no-brainer. I wanted it centered up in the header.
Next, I needed to remove the header and prep it for installation.
In order to ensure your homelink module will fit, you should size it up first. Tape it in the location where you intend to install it, and then re-insert the header to make sure you have enough room for the unit inside. There isn't a lot of room for the unit between the header and the window channel, so this is important.
If the header fits, then you are ready to start cutting some holes. Before you do that, I would suggest making a template. To do so is very easy. First, remove the button assembly from the homelink module.
Then place a sheet of paper over the openings where the buttons and LED go. Using an ink pen or a pencil, rub the paper to create your template.
Then lay the module on the paper and trace it out.
Now, cut the template out of the paper, lay it inside the header, and drill your holes.
Now you are ready to test-fit the cover into the holes.
If everything fits properly, then you are in good shape to re-attach the homelink module. It will go on the inside of the header. The button assembly has two fingers that pop into the homelink module, and hold it in place. If your's is like mine, the thickness of the header will keep this from happening. First, I decided I would use some epoxy and just glue everything together.
Unfortunately, this didn't work for me. The epoxy wouldn't stick to the buttons, to the header, or to the homelink module. Therefore, I decided to go a different route. I used miter pins to hold the buttons in place. Drill small holes through the fingers and insert the miter pins from inside the header. This will do a good job if you make the fit snug.
I also drilled two small holes through the clips on either side of the homelink, and used a couple of zip ties to help hold the module in place. I pulled a single zip-tie through both holes. The female end was large enough to hang on the hole. I then attached a second zip tie to the male end and snugged it up against the other hole, then trimmed.
A word of warning: because of the thickness of the header, and because of the addition of the miter pins, the rubber buttons would not reach the circuit board inside of the module any longer. I took the eraser out of a mechanical pencil, cut it into three pieces, and placed them in the holes on the module. They act as button-extenders and work perfectly for the job. (Sorry, forgot to take a pic.)
Once you have completed assembly of the unit, it is time to install it in the jeep. First, you will probably need to trim some of the excess plastic off of the module to make enough clearance for the installation between the header and the window channel. Unplug the wiring harness and throw it away. Then remove everything below the red line. You may even need to trim back the circuit board. Failure to do this may cause a bulge in your header after the installation is complete. There is nothing wrong with this if you don't mind the asthetics of it.
Once you are finished trimming the plastic and the circuit board, soder your wires to the circuit board. Polarity is important. The opener will not work if you wire it up backwards. Also, remember to soder to the module before connecting to the vehicle wiring.
Now, you will need to remove all of the panels in-between the header and the power outlet (not the cigarette lighter). This includes the corner panel, the A-pillar panel, the passenger side panel, the glove box, the upper and lower dash panel, and the AC control assembly. I know this sounds like a lot, but except for 4 screws in the AC control assembly, everything else is held on by clips.
Next, route the wire through the vehicle. Make sure to leave enough slack to reach the power outlet. Once at the power outlet, the wire should be spliced. I used some rather cheap cable splices from the local auto-store. I paid $3 for about 10. You will only need two, one for the hot and one for the ground. Again, remember your polarity. It is important to wire it up in the correct orientation.
Once you have spliced into the power outlet, you should test the unit and make sure its working. If so, you are ready to re-assemble your Jeep. Make sure to route the wire in locations so that it will not get pinched or severed.
One last thing you will probably need to do is install some kind of back stop to keep the unit from moving inside of the header. When you press the buttons, the unit has a tendancy to float. I bought a rubber stop at ACE. It cost about $2.50. I had to trim it three times to get the correct thickness, but once installed, it held the module firmly against the header.
Once all of the panels have been re-installed, you are finished. Enjoy your new homelink.
Last edited by davidmech21; 09-29-2012 at 06:31 AM.

The following users liked this post:
PoppaAlan (11-29-2022)
Trending Topics
01-16-2009, 10:24 AM
#8
JK Super Freak
Join Date: Dec 2007
Location: WV relocated 2 Dyess AFB, TX
Posts: 1,750
Likes: 0
Received 1 Like
on
1 Post
I have that same homelink module in my wifes minivan!
I have been contemplating doing the same thing but I think I am going with the home link auto dimming mirror instead.
Great JOB!
I have been contemplating doing the same thing but I think I am going with the home link auto dimming mirror instead.
Great JOB!
01-16-2009, 10:33 AM
#9
JK Freak
Join Date: Oct 2007
Location: Manassas, VA
Posts: 950
Likes: 0
Received 0 Likes
on
0 Posts
that is awesome.... good idea going with the homelink...
I will be copying you on this.
the one I did wasn't nearly this nice... I just did the buttons in the header, then wired it to a regular garage door opener. makes it a pain to change the battery, I like your idea tremendously. Well done!

I will be copying you on this.
the one I did wasn't nearly this nice... I just did the buttons in the header, then wired it to a regular garage door opener. makes it a pain to change the battery, I like your idea tremendously. Well done!
01-16-2009, 01:41 PM
#10
JK Newbie
Join Date: Oct 2007
Location: El Cajon, CA
Posts: 83
Likes: 0
Received 0 Likes
on
0 Posts
I really like your detailed write up. It's great for people who want to have a homelink remote in their JK.
I have a liftmaster remote for 3 garage doors and simply tuck it into a little space up underneath the roll bar cover and interior cushion directly above your left shoulder. I found that this was adequate and hides the remote well for anyone interested.
I have a liftmaster remote for 3 garage doors and simply tuck it into a little space up underneath the roll bar cover and interior cushion directly above your left shoulder. I found that this was adequate and hides the remote well for anyone interested.