JCR Full Skid Install!
 12-19-2014, 12:51 PM
#1
JK Enthusiast
Thread Starter
Join Date: Mar 2012
Location: Escondido, California
Posts: 466
Likes: 0
Received 0 Likes
on
0 Posts
So there you are minding your business down a nice trail (or parking lot) when you drive over a huge boulder (or prius) and all of that lovely JK weight lands right on the oil pan, transfer case or both. So what could possibly be used to prevent this from happeneing??? Full skids of course!
I know that there are some great options on the market for simple and complete bolt on skid systems that cover all the naughty bits. But almost all want an arm, leg, oil pan, or your next month’s check to get them. I was fortunate enough to find what the guys over at JCR offroad had in this department. My first impression I was blown away by the material they use with these. These are beefier than a couple of bison burgers and some beers! Very thick and they cover everything. But enough with the boring talk lets get to the install!!
The skids come from JCR bare steel which allow you to color match to your rig or just paint black sense its easier to repaint after scratching them (like they are meant to be). I went with basic black rattle can. Easy, cheap, and cheap! I opted for the engine, T-case, and evap canister skid. They are working on a gas tank skid and it should be out shortly.
Install difficulty:

These are easy to bolt on and everything lines up perfectly. But since they are crazy beefy you will need an extra set of arms/hands to get them into place and bolted up. They have the instructions on there site for download and are very straight forward. There were a few snags I ran into that weren’t very clear but I will get to that.
Kit contents:
(1) Engine skid
(2) Engine skid brackets
(1) T-Case skid
(1) Evap canister skid
(1) Bag of hardware for the engine skid and brackets. Stock hardware is used everywhere else.
Tools needed:
9/16” wrench
9/16” socket
18mm socket or wrench
21mm socket (exhaust loop skid)
7/32” allen
1/2” drill bit (t-case skid)
I also used:
(2) beers
And some safety glasses because my underside had some gifts for me.
Installation Instructions
Step 1:
Throw the instructions away because we are men and they are useless. And lay out the skids to see the way they go together. I was under mine for about 10 mins lifting them up before I realized they were backwards.
Step 2:
Park your Jeep on a flat level surface and make sure it isn't going to roll away. Chock the rear tires, engage the park brake.
Step 3:
Remove the stock transfer case skid and keep the hardware handy as it will be reused.


Step 4:
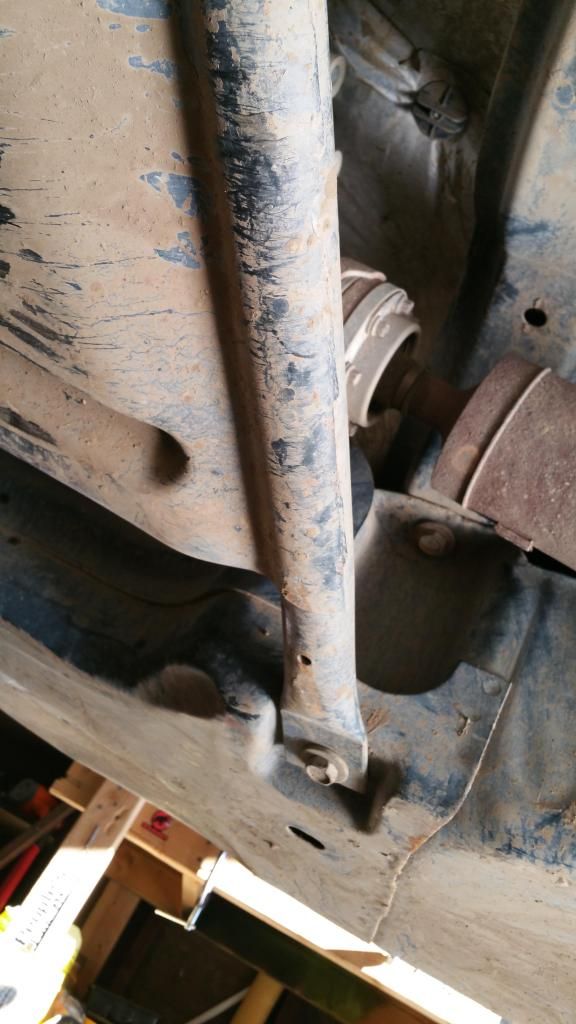
Take a battle buddy and crawl underneath to place the T-case skid and loosely install one of the bolts on the front side on the cross member and also loosely install the 1 on the frame rail, and the other on the gas tank. You will see 2 holes on the frame rail side. Tighten down the skid and mark the second hole on the frame rail for drilling using the � drill bit. Once drilled use the supplied frame nut guide and tighten down the skid. (note): You will see in the pictures below where I did not drill the frame. I am running a different crossmember that allows the lower control arms to be bolted to it. This cause the skid to be pushed down a bit and not sit flush on the frame. Everything is still tight and no rattles until I can figure out a fix.
Step 5:
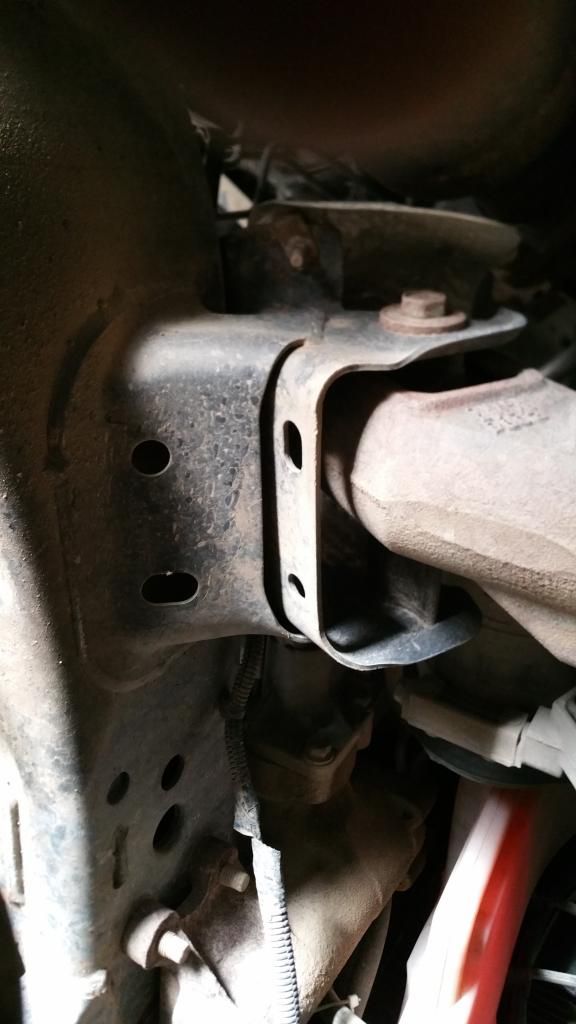
Grab the 2 engine skid brackets and 4 bolts, 4 washers, and 4 lock washers. There are 2 holes on the bottom side of each motor mount that bolts go through. Take a bolt and washer and from the top drop the bolt through the hole. The bolts have to be pointing down with the treads exposed because of the motor mount movement. The passenger side needed a lil love but it does fit! The most frustrating part of the install was making sure I had the right side bracket for the skid. They only go on one way and the more L shaped bracket goes on the driver side.
Driver side mounting bracket:
Passenger side mouting location:
Engine side:
Passenger side:
Engine Skid Brackets:
Step 6:
With the engine brackets loosely installed grab the engine skid and he man it to the brackets. Take the allen head bolts, washers, lock washers, and nuts from the bottom of the skid through the bracket. The Bracket sits in the skid as seen in the pic. Leave everything loose until all the bolts are in.
Step 7:
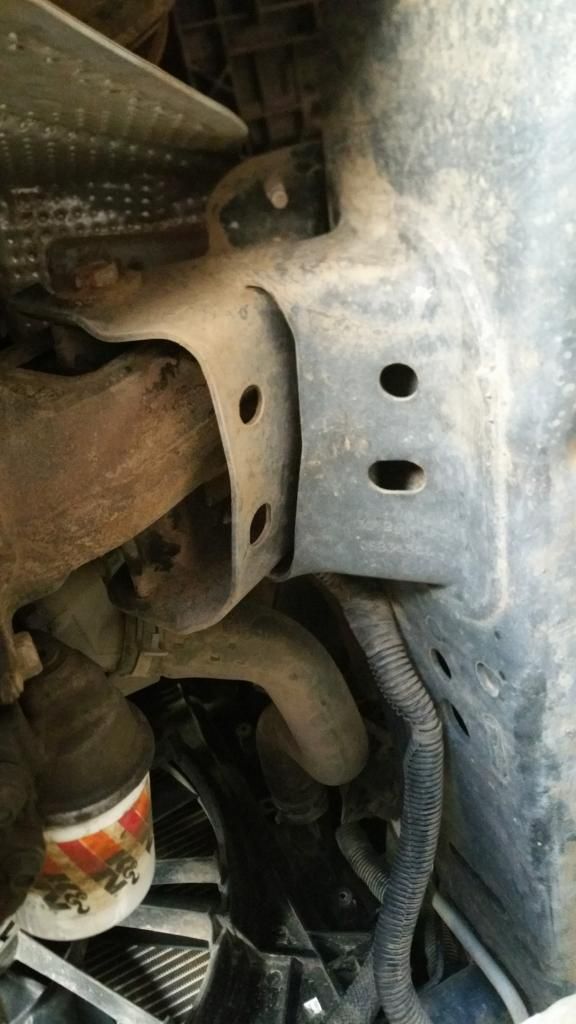
Remove the bolts holding the T-case to the crossmember out and place the engine skide over the T-Case. This way rocks and things can slide from front to back and not catch the lip from the T-Case.
Step 8:
Install the crossmember bolts back in. You will see there in a extra hole. The bolt is not supplied but the measurement is 12mm x 1.5 if you wanted to put one in.
EVAP SKID
Step 9:
Remove the soft rubber line and hard connector from the back of your evap container. The hard connector has a coupe little clips that need to be pressed in.
Step 10:
Remove the front two bolts on the factory evap mount,and loosen the rear bolt about half way.
Step 11:
At this point your evap canister and mount should be hanging off the rear bolt. Slide the JCR evap skid rear mount between the head of the rear bolt and the factory mounting bracket.
Step 12:
Push the front of the evap skid upward, and install the factory bolts. Use a provided washer under each bolt head. You will be sandwiching the JCR evap skid between the bolt heads, and the factory evap canister mounts.
Step 13:
Now completely remove the rear mounting bolt and add a washer under its head as well. Reinstall and lightly tighten it.
Step 14:
While everything is still loose, align the canister and mount up with the holes in the JCR skid.
Step 15:
Attach the hard line.
Step 16:
Tighten all three bolts.
Step 17:
Go WHEEL and get them scratched and beat up!!
My impressions
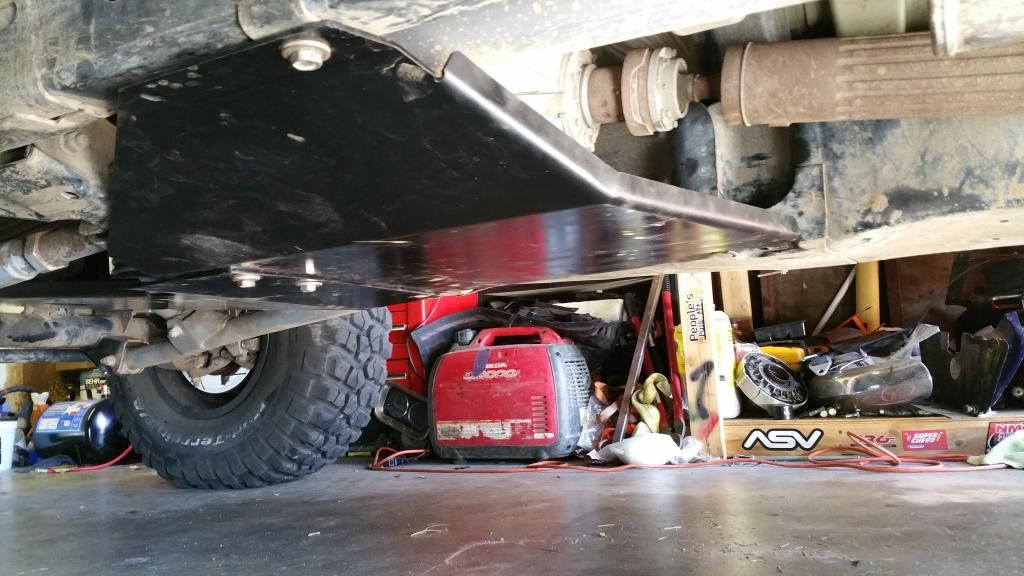
Very nice kit! Everything is there and aligns nicely. They are a very thick material and I have absolutely no worries about the underside any more. These skids are unbeatable for the price! So if you are looking for a fantastic set of skids that will protect your underside don’t look any further!
I know that there are some great options on the market for simple and complete bolt on skid systems that cover all the naughty bits. But almost all want an arm, leg, oil pan, or your next month’s check to get them. I was fortunate enough to find what the guys over at JCR offroad had in this department. My first impression I was blown away by the material they use with these. These are beefier than a couple of bison burgers and some beers! Very thick and they cover everything. But enough with the boring talk lets get to the install!!
The skids come from JCR bare steel which allow you to color match to your rig or just paint black sense its easier to repaint after scratching them (like they are meant to be). I went with basic black rattle can. Easy, cheap, and cheap! I opted for the engine, T-case, and evap canister skid. They are working on a gas tank skid and it should be out shortly.
Install difficulty:

These are easy to bolt on and everything lines up perfectly. But since they are crazy beefy you will need an extra set of arms/hands to get them into place and bolted up. They have the instructions on there site for download and are very straight forward. There were a few snags I ran into that weren’t very clear but I will get to that.
Kit contents:
(1) Engine skid
(2) Engine skid brackets
(1) T-Case skid
(1) Evap canister skid
(1) Bag of hardware for the engine skid and brackets. Stock hardware is used everywhere else.
Tools needed:
9/16” wrench
9/16” socket
18mm socket or wrench
21mm socket (exhaust loop skid)
7/32” allen
1/2” drill bit (t-case skid)
I also used:
(2) beers
And some safety glasses because my underside had some gifts for me.
Installation Instructions
Step 1:
Throw the instructions away because we are men and they are useless. And lay out the skids to see the way they go together. I was under mine for about 10 mins lifting them up before I realized they were backwards.
Step 2:
Park your Jeep on a flat level surface and make sure it isn't going to roll away. Chock the rear tires, engage the park brake.
Step 3:
Remove the stock transfer case skid and keep the hardware handy as it will be reused.


Step 4:
Take a battle buddy and crawl underneath to place the T-case skid and loosely install one of the bolts on the front side on the cross member and also loosely install the 1 on the frame rail, and the other on the gas tank. You will see 2 holes on the frame rail side. Tighten down the skid and mark the second hole on the frame rail for drilling using the � drill bit. Once drilled use the supplied frame nut guide and tighten down the skid. (note): You will see in the pictures below where I did not drill the frame. I am running a different crossmember that allows the lower control arms to be bolted to it. This cause the skid to be pushed down a bit and not sit flush on the frame. Everything is still tight and no rattles until I can figure out a fix.

Step 5:
Grab the 2 engine skid brackets and 4 bolts, 4 washers, and 4 lock washers. There are 2 holes on the bottom side of each motor mount that bolts go through. Take a bolt and washer and from the top drop the bolt through the hole. The bolts have to be pointing down with the treads exposed because of the motor mount movement. The passenger side needed a lil love but it does fit! The most frustrating part of the install was making sure I had the right side bracket for the skid. They only go on one way and the more L shaped bracket goes on the driver side.
Driver side mounting bracket:

Passenger side mouting location:

Engine side:

Passenger side:

Engine Skid Brackets:

Step 6:
With the engine brackets loosely installed grab the engine skid and he man it to the brackets. Take the allen head bolts, washers, lock washers, and nuts from the bottom of the skid through the bracket. The Bracket sits in the skid as seen in the pic. Leave everything loose until all the bolts are in.

Step 7:
Remove the bolts holding the T-case to the crossmember out and place the engine skide over the T-Case. This way rocks and things can slide from front to back and not catch the lip from the T-Case.
Step 8:
Install the crossmember bolts back in. You will see there in a extra hole. The bolt is not supplied but the measurement is 12mm x 1.5 if you wanted to put one in.
EVAP SKID
Step 9:
Remove the soft rubber line and hard connector from the back of your evap container. The hard connector has a coupe little clips that need to be pressed in.
Step 10:
Remove the front two bolts on the factory evap mount,and loosen the rear bolt about half way.
Step 11:
At this point your evap canister and mount should be hanging off the rear bolt. Slide the JCR evap skid rear mount between the head of the rear bolt and the factory mounting bracket.
Step 12:
Push the front of the evap skid upward, and install the factory bolts. Use a provided washer under each bolt head. You will be sandwiching the JCR evap skid between the bolt heads, and the factory evap canister mounts.
Step 13:
Now completely remove the rear mounting bolt and add a washer under its head as well. Reinstall and lightly tighten it.
Step 14:
While everything is still loose, align the canister and mount up with the holes in the JCR skid.
Step 15:
Attach the hard line.
Step 16:
Tighten all three bolts.
Step 17:
Go WHEEL and get them scratched and beat up!!
My impressions
Very nice kit! Everything is there and aligns nicely. They are a very thick material and I have absolutely no worries about the underside any more. These skids are unbeatable for the price! So if you are looking for a fantastic set of skids that will protect your underside don’t look any further!
Last edited by FlexyJK; 12-20-2014 at 10:53 AM.


 Hope if you're reading this you are recovering okay from the motorcycle accident!
12-20-2014, 10:24 AM
Hope if you're reading this you are recovering okay from the motorcycle accident!
12-20-2014, 10:24 AM
#5
JK Enthusiast
Join Date: Mar 2012
Location: El Cajon
Posts: 310
Likes: 0
Received 0 Likes
on
0 Posts
Great job Nick! I will call JCR on Monday and see if they can get me the T-case and Gas tank skid b4 Christmas. With any luck, I can get my son to help with install at the desert. We installed my PS eval skid while jeep was on trailer last New Years at the desert. Hope your feeling better! With age comes a cage!
03-17-2016, 01:00 PM
#7
JK Enthusiast
Thread Starter
Join Date: Mar 2012
Location: Escondido, California
Posts: 466
Likes: 0
Received 0 Likes
on
0 Posts
I cant say I have. I know most of the other engine skids also mount to the same spots. Can you hear something rattling or just feels different?
Trending Topics
03-17-2016, 01:26 PM
#8
JK Newbie

Join Date: Jan 2016
Posts: 3
Likes: 0
Received 0 Likes
on
0 Posts
You can feel it when shifting through the lower gears and I think the exhaust is hitting some bolts while going around corners. I'm going to unbolt everything tonight and see if I can't get it to fit better.
03-17-2016, 03:39 PM
#9
JK Newbie
Join Date: Jan 2016
Posts: 3
Likes: 0
Received 0 Likes
on
0 Posts
Ended up finding a bolt that was to long and was contacting the crossover pipe. Once I took that out the vibrations went away.