M.O.R.E. Hide-A-Step Install/ Review!
 02-12-2015, 05:16 PM
#1
JK Newbie
Thread Starter

Join Date: Dec 2014
Location: Southgate, MI
Posts: 25
Likes: 0
Received 0 Likes
on
0 Posts
Time for another quick install and review of a quick bolt-on mod! Mrs. Doc is preggers with number 2, and number 1 is still in a rear facing car seat. Combining that with the small lift and the high door sills of the JK, and it makes for a cranky wife when it comes time to travel in style (ie. NOT in her car).
So in order to keep the peace and keep my Rubi-Rails, I found the Mountain Off-Road Enterprises Hide-a-step. I ordered a pair of the black steps from Quadratec and put them on after work tonight! Here's the write-up.
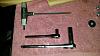
Here's the tools you'll need; a 5mm allen wrench, a 10mm socket wrench, 13mm socket wrench, and appropriately sized ratcheting wrenches. I used a 1/4" and 1/2" because I'm too lazy to change sockets. BEWARE that if you're installing these without Rubi-rails, you'll need to use the included extra hardware. I didn't touch that junk, so I didn't verify the sizes.
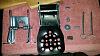
Here's the "what's in the box" shot. I haven't included directions, because who reads those anyways?!? (Read them, it'll save you some time.)
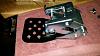
The step assembled with the quick connect pins
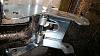
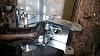
Starting the work, these are the bolts you'll need to loosen or remove. On my 2 door, there's 2 "sets" on each side. Loosen the front set, remove the bolt and 2 nuts on the set beneath the door. Rumor has it that the 4 door has 3 "sets". I can't verify this, but you'll need to loosen up the bolts and nuts that aren't getting a step.
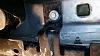
The easiest way to get the bracket in place is to pull the rail away from the body and pivot the bracket up from the back side. The bracket itself needs to sandwich in between the rail mount and the body.
(To be continued)
So in order to keep the peace and keep my Rubi-Rails, I found the Mountain Off-Road Enterprises Hide-a-step. I ordered a pair of the black steps from Quadratec and put them on after work tonight! Here's the write-up.
Here's the tools you'll need; a 5mm allen wrench, a 10mm socket wrench, 13mm socket wrench, and appropriately sized ratcheting wrenches. I used a 1/4" and 1/2" because I'm too lazy to change sockets. BEWARE that if you're installing these without Rubi-rails, you'll need to use the included extra hardware. I didn't touch that junk, so I didn't verify the sizes.
Here's the "what's in the box" shot. I haven't included directions, because who reads those anyways?!? (Read them, it'll save you some time.)
The step assembled with the quick connect pins
Starting the work, these are the bolts you'll need to loosen or remove. On my 2 door, there's 2 "sets" on each side. Loosen the front set, remove the bolt and 2 nuts on the set beneath the door. Rumor has it that the 4 door has 3 "sets". I can't verify this, but you'll need to loosen up the bolts and nuts that aren't getting a step.
The easiest way to get the bracket in place is to pull the rail away from the body and pivot the bracket up from the back side. The bracket itself needs to sandwich in between the rail mount and the body.
(To be continued)
 02-12-2015, 05:27 PM
#2
JK Newbie
Thread Starter
Join Date: Dec 2014
Location: Southgate, MI
Posts: 25
Likes: 0
Received 0 Likes
on
0 Posts
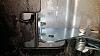
Take a look at the tab here. The hole for the studs is slotted, so it's entirely possible to put it too far forward or rearward, making it tough/ impossible to get one of the nuts on. Don't ask me how I know. Please.
Another "learn as you go" lesson: Install one of the quick disconnect pins before you do the final tighten. Otherwise, you can get the whole thing put together and the pin won't go in because it hits the rail bracket. Again, don't ask.
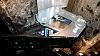
Speaking of close looks, take a gander at the way everything "stacks up". The spring-loaded bracket goes on the very bottom, then the rail bracket, then the attachment bracket for the hide-a-step.
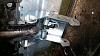
The only "spare part" you'll end up with is the vertical bolt that formerly held the Rubi-rail in place. It gets replaced with a button head (5mm allen) bolt and fender washer. You'll need to slide the fender washer in between the spring-loaded bracket and the rail bracket. It sounds harder than it is.
Basically done! The step is attached to the mount bracket with the two quick disconnect pins. You'll need to wiggle things around a bit to get the pins in, but they're pretty secure once they slide in.
(Continued next post)
Another "learn as you go" lesson: Install one of the quick disconnect pins before you do the final tighten. Otherwise, you can get the whole thing put together and the pin won't go in because it hits the rail bracket. Again, don't ask.
Speaking of close looks, take a gander at the way everything "stacks up". The spring-loaded bracket goes on the very bottom, then the rail bracket, then the attachment bracket for the hide-a-step.
The only "spare part" you'll end up with is the vertical bolt that formerly held the Rubi-rail in place. It gets replaced with a button head (5mm allen) bolt and fender washer. You'll need to slide the fender washer in between the spring-loaded bracket and the rail bracket. It sounds harder than it is.
Basically done! The step is attached to the mount bracket with the two quick disconnect pins. You'll need to wiggle things around a bit to get the pins in, but they're pretty secure once they slide in.
(Continued next post)
02-12-2015, 05:42 PM
#3
JK Newbie
Thread Starter
Join Date: Dec 2014
Location: Southgate, MI
Posts: 25
Likes: 0
Received 0 Likes
on
0 Posts
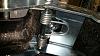
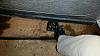
This is the step installed and "at rest". It's very unobtrusive, only sticking out about 3/4". It's just enough to get your foot in place.

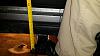
Putting very light pressure with your foot drops the step to the extended height. It also extends outward, allowing a bigger foothold. I wear size 11.5 wide boots, and I can get about 2/3 of my foot onto the step.
The step drops your entry "step-up height" by 11.5", as measured from the top of the step to the top of the door sill. My JK isn't quite huge, so I can get in relatively unassisted. However, the step still allows me to get into the backseat easier and unhook the baby seat.
Quick and Dirty Review:
I like these steps. They are a simple solution to a small problem. I love the look of the Rubicon Rails, and didn't want to ditch the rails for a traditional side step bar ("nerf bar"). I looked into the other options for folding steps like the Amp Research setup, and found them to be cost prohibitive. Quadratec lists the black Hide-A-Steps at $129, but you can find the plain steel finish at $117. A pair of these is almost the same cost as the N-Fab rock rails with steps, or other similar offerings, but as mentioned, I didn't want to go that route.
After install, I tried out the step to see how comfortable I'd be with the operation. Let me say this first: I'm a big guy. I'm 340lbs and 6ft tall. I punish step rails and similar products. I had called MORE prior to making this purchase to see if they had a weight rating or tests done, and was told of a 350lb technician they had who would jump on the step. When I tried putting my weight on one foot on the Hide-A-Step, I could feel it bending. The step still functions fine, so it couldn't have been too bad. Would I trust it for accessing a roof rack, or prolonged standing? No. Is it good enough for the occasional boost? Yeah, probably.
Bottom line: Would I recommend them to someone else? As long as you're either a smaller person (weight-wise) or understand the limitations of the product, yes.
Thanks for watching!
02-13-2015, 05:07 AM
#5
These were the first mod I did when I bought my JKUR. First thing I did was "mod the mod". M.O.RE. Didn't sell it in black at the time so I had all the components powder coated to match the Rubi rails. Been on for 3.5 years and still work great. My wife and daughter use them all the time.

Trending Topics
 02-22-2015, 01:17 PM
#10