Mopar Heated Seat Install
 05-08-2008, 12:21 PM
#1
JK Freak
Thread Starter
Join Date: Jun 2007
Location: Vancouver, B.C., Canada
Posts: 676
Likes: 0
Received 2 Likes
on
2 Posts
I dediced to purchase the JK front heated seat kit and install myself, I have recorded most of the steps with photos.
This entire project was completed in a buddies garage over an afternoon with a case of beer and basic hand tools.
Afterwords you will enjoy toasty buns which helps to extend the soft top season up here in the great white north.
I should note that this kit was installed on my old 2008 Sahara. In 2009, the panel below the HVAC has been replaced by a net but the switch can still be installed above the net.
Also the 2011 Wrangler has heated leather as a factory option.
Enjoy and goodluck, PM if you have any questions.

To start, you will have to purchase the kit from your trusty local Mopar part retailer. Part # 82211621. You will also require a complete socket set (metric sizes), cutting pliers, narrow-nose pliers, 1/2" torque wrench, utility knife (or dremel tool) and a few more misc tools for dash dis-assembly.
It is best if you have a clean and clutter free table to place the removed seats on while installing the heating pads; I was able to cover the dirty shop table with some cardboard to provide this. A better idea is to even bring the seats into the house for the work. (assuming you have permission)...ha
STEP 1. Remove the front seat from the vehicle by first removing the 4 bolts from the floor and disconnecting electrical lead on the underside of the seat. (**These bolts were quite hard to remove and required a leverage bar to break loose**)

STEP 2. Inclip the channel-type retainers from the front and sides of the seat to allow the cloth covering to be peeled back, no specific tools required here.


STEP 3. Cut the hog clips from around the front and 3 from each side to allow enough room to pull back the base of the seat. Cutting pliers are usefull here.


STEP 4. Place the heating pad (do not remove the backing yet) on the approximate position of function being sure to keep it square with equal spacing from the sides and front channel. (I chose to punch a hole with a screwdriver through the back of the foam to run the wires through and make a clean-looking install. The directions have no detail at all.) Once the wires are through the back, peel off the backing and stick down the heating pad to the foam.


STEP 5. For the time being, the seat bottom fabric can be left unattached while the seat back is installed. Remove the channel clips from the bottom of the back and peel up the fabric to access the foam.

STEP 6. Same as the base, position the pad, run the wires then remove the backing and securely stick on the pad.


STEP 7. Use the supplied zip-ties to secure the wires to the frameing of the seat. Roll the seat-back fabric back down. Feel free to secure the wiring in a similar way to the photos.


STEP 8. Now you are finished the install. Replace all the fabric on the seat, clip the channel retainers and use the supplied hog-ties to the seat in the same locations that were removed. I found that simple pliers were able to crimp the ties if I partially bent them prior to installing them around the 2 "rods".
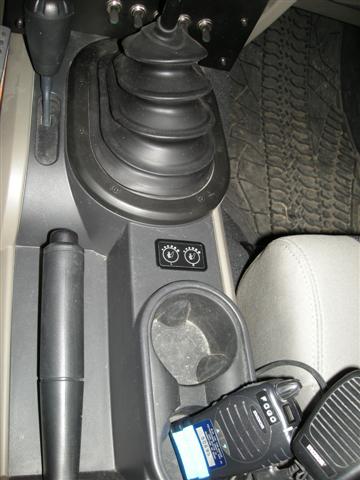
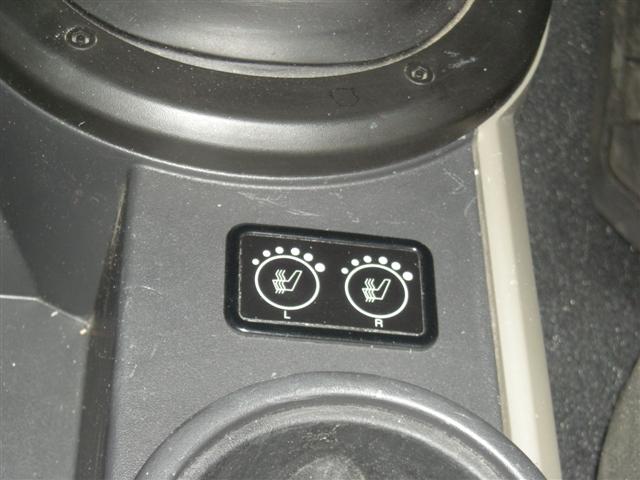
STEP 9. It is best to route all the connections and switch prior to reinstalling the seat. I could not figure out how to properly remove the entire console, so I ran the wired along the underside, out of site and pulled up the connection just below the power output sockets. I installed the switch on the panel in the lower dash as suggested by the instructions. Simply measure out the center, place on the template and cut out a small notch to run the wire-strip through. Be sure the panel is cleaned and warmed up to ensure a quality bond. You will have to remove the center panel of the dash to install all the wireing properly. When I find instructions on how to remove the console without breaking something I plan to route the wire properly.

Now simply do the same to the other seat and you will be soothing your lower back in no time.

Good luck all.
PM if you have any questions.
This entire project was completed in a buddies garage over an afternoon with a case of beer and basic hand tools.
Afterwords you will enjoy toasty buns which helps to extend the soft top season up here in the great white north.
I should note that this kit was installed on my old 2008 Sahara. In 2009, the panel below the HVAC has been replaced by a net but the switch can still be installed above the net.
Also the 2011 Wrangler has heated leather as a factory option.
Enjoy and goodluck, PM if you have any questions.
To start, you will have to purchase the kit from your trusty local Mopar part retailer. Part # 82211621. You will also require a complete socket set (metric sizes), cutting pliers, narrow-nose pliers, 1/2" torque wrench, utility knife (or dremel tool) and a few more misc tools for dash dis-assembly.
It is best if you have a clean and clutter free table to place the removed seats on while installing the heating pads; I was able to cover the dirty shop table with some cardboard to provide this. A better idea is to even bring the seats into the house for the work. (assuming you have permission)...ha
STEP 1. Remove the front seat from the vehicle by first removing the 4 bolts from the floor and disconnecting electrical lead on the underside of the seat. (**These bolts were quite hard to remove and required a leverage bar to break loose**)
STEP 2. Inclip the channel-type retainers from the front and sides of the seat to allow the cloth covering to be peeled back, no specific tools required here.
STEP 3. Cut the hog clips from around the front and 3 from each side to allow enough room to pull back the base of the seat. Cutting pliers are usefull here.
STEP 4. Place the heating pad (do not remove the backing yet) on the approximate position of function being sure to keep it square with equal spacing from the sides and front channel. (I chose to punch a hole with a screwdriver through the back of the foam to run the wires through and make a clean-looking install. The directions have no detail at all.) Once the wires are through the back, peel off the backing and stick down the heating pad to the foam.
STEP 5. For the time being, the seat bottom fabric can be left unattached while the seat back is installed. Remove the channel clips from the bottom of the back and peel up the fabric to access the foam.
STEP 6. Same as the base, position the pad, run the wires then remove the backing and securely stick on the pad.
STEP 7. Use the supplied zip-ties to secure the wires to the frameing of the seat. Roll the seat-back fabric back down. Feel free to secure the wiring in a similar way to the photos.
STEP 8. Now you are finished the install. Replace all the fabric on the seat, clip the channel retainers and use the supplied hog-ties to the seat in the same locations that were removed. I found that simple pliers were able to crimp the ties if I partially bent them prior to installing them around the 2 "rods".
STEP 9. It is best to route all the connections and switch prior to reinstalling the seat. I could not figure out how to properly remove the entire console, so I ran the wired along the underside, out of site and pulled up the connection just below the power output sockets. I installed the switch on the panel in the lower dash as suggested by the instructions. Simply measure out the center, place on the template and cut out a small notch to run the wire-strip through. Be sure the panel is cleaned and warmed up to ensure a quality bond. You will have to remove the center panel of the dash to install all the wireing properly. When I find instructions on how to remove the console without breaking something I plan to route the wire properly.
Now simply do the same to the other seat and you will be soothing your lower back in no time.
Good luck all.
PM if you have any questions.
Last edited by Matt08jk; 08-28-2010 at 08:59 AM. Reason: New Information


 05-10-2008, 09:36 AM
#6
JK Freak
Join Date: Mar 2008
Location: Nanaimo, British Columbia, Canada
Posts: 919
Likes: 0
Received 0 Likes
on
0 Posts
Great writeup, nice clean install too!
I just wish that there was another button on the switches between power points (I have a Rubi, so there's only one available). My friend has a Caliber and that's where the switches are at. Would look stock, and you'd have a bunch of dealers scratching their heads, LOL!
Cheers.
I just wish that there was another button on the switches between power points (I have a Rubi, so there's only one available). My friend has a Caliber and that's where the switches are at. Would look stock, and you'd have a bunch of dealers scratching their heads, LOL!
Cheers.
05-13-2008, 10:26 AM
#7
JK Enthusiast

Join Date: Feb 2007
Location: Kansas
Posts: 183
Likes: 0
Received 0 Likes
on
0 Posts
I did this back in January. Thought I would post my location for the controlers.
I have CoolTech's Switch panel so i couldn't really put it where the directions said to and make it look good.
So i decided to put it by the cup holders.
also somone posted the instructions a few months back as well:
http://www.project-jk.com/images/pdf...eatedSeats.pdf
Ks
I have CoolTech's Switch panel so i couldn't really put it where the directions said to and make it look good.
So i decided to put it by the cup holders.
also somone posted the instructions a few months back as well:
http://www.project-jk.com/images/pdf...eatedSeats.pdf
Ks
Trending Topics
06-10-2008, 07:14 AM
#8
JK Freak

Join Date: Jun 2007
Location: Detroit
Posts: 838
Likes: 0
Received 0 Likes
on
0 Posts
Kick ass write up! 
I am starting to get pissed lookin at these great write-ups for stuff I already did last year! I could have saved hours of frustration and might even still have my left index finger...
I am starting to get pissed lookin at these great write-ups for stuff I already did last year! I could have saved hours of frustration and might even still have my left index finger...
06-12-2008, 08:03 AM
#9
JK Enthusiast
Join Date: Dec 2007
Location: Libertyville, IL
Posts: 191
Likes: 0
Received 0 Likes
on
0 Posts
For those that have done this install. How do you fold/position the seat fabric back on to the sides. The passenger side - right side, keeps coming off the seat. There is a plastic liner that goes along the edge and suppose to go where. For the life of me the drivers side holds, but the passenger sides comes undone. Any help? I also noticed a weld was popped in my seat and if my seat is lowered all the way down to the floor it creaks. When I pump the handle a couple times, it stops. Help.
09-07-2008, 04:49 PM
#10
JK Newbie
Join Date: Apr 2008
Location: Nelson, BC, Canada
Posts: 22
Likes: 0
Received 0 Likes
on
0 Posts
I would like to add (being about 1/3 of the way through this myself) that should you choose to purchase hog ring pliers for the job, buy ones something like these: 
You can find them on the 'bay, or at a place like The Eastwood Company. (I'm not aware of any of the forum sponsor companies selling hog ring pliers - please feel free to correct me if I am wrong!) I bought a different set, and found them completely useless for this application (although they may do fine on my other vehicle).
You can find them on the 'bay, or at a place like The Eastwood Company. (I'm not aware of any of the forum sponsor companies selling hog ring pliers - please feel free to correct me if I am wrong!) I bought a different set, and found them completely useless for this application (although they may do fine on my other vehicle).