Rugged Ridge Dash Multi-Mount Phone Kit Write-Up
 05-31-2016, 10:27 AM
#21
JK Newbie

Join Date: May 2016
Location: Memphis, TN
Posts: 1
Likes: 0
Received 0 Likes
on
0 Posts
Hi guys! I need some assistance please. While installing my base, I dropped the screw  into a never to be found crevice of my Jeep. Anyone willing to remove theirs and give me the exact dimensions, length, width? Or even better a part number or place to order a new one?
Step 3
Install your new accessory mount base and tray.
� The hook on the arms of accessory mount will attach to the dash board vents behind the storage area closest to windshield. (You will attach the back side by vents FIRST, for everything to fit correct.)
� Reinstall the 7mm black screw from prior step using your � ratchet and 7mm socket. (DO NOT OVER TIGHTEN)
� Once black screw is tightened down, and place new Rugged Ridge rubber tray in storage area.
into a never to be found crevice of my Jeep. Anyone willing to remove theirs and give me the exact dimensions, length, width? Or even better a part number or place to order a new one?Step 3
Install your new accessory mount base and tray.
� The hook on the arms of accessory mount will attach to the dash board vents behind the storage area closest to windshield. (You will attach the back side by vents FIRST, for everything to fit correct.)
� Reinstall the 7mm black screw from prior step using your � ratchet and 7mm socket. (DO NOT OVER TIGHTEN)
� Once black screw is tightened down, and place new Rugged Ridge rubber tray in storage area.
 06-06-2016, 09:41 PM
#22
JK Junkie
Thread Starter
Hi guys! I need some assistance please. While installing my base, I dropped the screw into a never to be found crevice of my Jeep. Anyone willing to remove theirs and give me the exact dimensions, length, width? Or even better a part number or place to order a new one?
Step 3
Install your new accessory mount base and tray.
� The hook on the arms of accessory mount will attach to the dash board vents behind the storage area closest to windshield. (You will attach the back side by vents FIRST, for everything to fit correct.)
� Reinstall the 7mm black screw from prior step using your � ratchet and 7mm socket. (DO NOT OVER TIGHTEN)
� Once black screw is tightened down, and place new Rugged Ridge rubber tray in storage area.
into a never to be found crevice of my Jeep. Anyone willing to remove theirs and give me the exact dimensions, length, width? Or even better a part number or place to order a new one?Step 3
Install your new accessory mount base and tray.
� The hook on the arms of accessory mount will attach to the dash board vents behind the storage area closest to windshield. (You will attach the back side by vents FIRST, for everything to fit correct.)
� Reinstall the 7mm black screw from prior step using your � ratchet and 7mm socket. (DO NOT OVER TIGHTEN)
� Once black screw is tightened down, and place new Rugged Ridge rubber tray in storage area.
02-23-2017, 06:57 PM
#24
JK Newbie

Join Date: Jun 2016
Location: Seattle, WA
Posts: 2
Likes: 0
Received 0 Likes
on
0 Posts
I got to say, this mount was awesome the first month, then it started spitting out my phone (Note 4) across the cabin over the slightest bump.
I am so disappointed on this mount. I cannot trust it to hold my phone securely. Not sure why Rugged Ridge chose to use flexible tips to hold the phone...
Anyway, noticed post #19...gives me hope there may still be a chance to mod this mount to make it reliable.
Also, if you have a GoPro Hero 3 or newer, it will not mount... This mount was design for the older Hero cameras.
02-23-2017, 07:00 PM
#25
JK Newbie
Join Date: Jun 2016
Location: Seattle, WA
Posts: 2
Likes: 0
Received 0 Likes
on
0 Posts
Yes, if you buy the Ram ball that's threaded for 1/4-20: Ram Mount 1/4-Inch-20 Female Threaded Hex Hole with 1-Inch Ball https://www.amazon.com/dp/B009GLW1PG..._RH3rxbED137W4 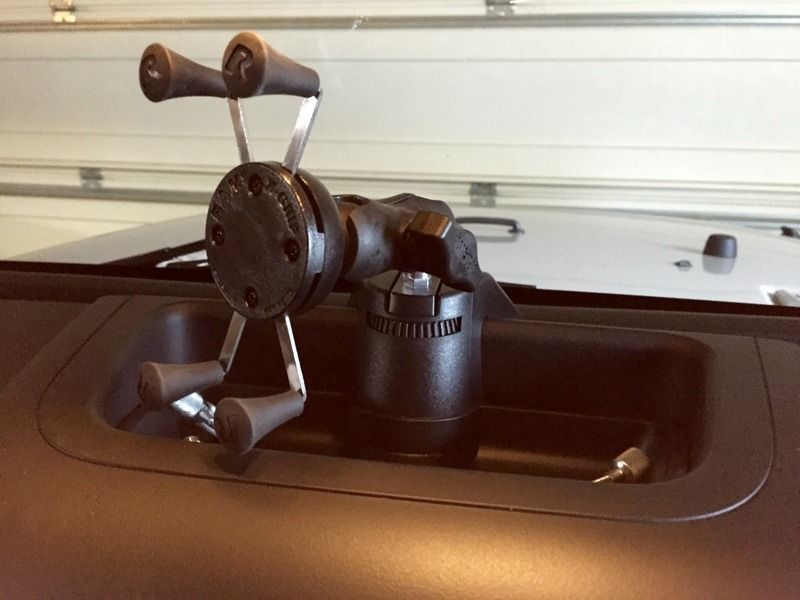
Would you please share the parts used to make this mount? I am highly interested!!
Thanks!!
03-01-2017, 05:38 PM
#26
JK Newbie

Join Date: Dec 2016
Location: Socal
Posts: 3
Likes: 0
Received 0 Likes
on
0 Posts
07-26-2017, 08:19 AM
#27
JK Super Freak
Not trying to dig up old thread but I also have an aftermarket double DINN radio. I'm curious if anyone tried just using a nut and bolt as opposed to cutting the factory radio mount.