
JK Pentastar Swap
 08-12-2015, 07:38 AM
#11
Super Moderator

I think chaos fab is up north there with you, they may be able to help you get the project rolling and even source parts. I'd like to be a part of it if I were a touch closer. I'm in the Norfolk area.
 08-12-2015, 07:38 AM
#12
JK Newbie
Thread Starter

I will be posting details and pic as I get time over the next few days/week, but for a spoiler it does work, and total cost (including tools) was less than the cost of a cheap LS or hemi swap kit. Am I saying others should follow in my footsteps, not necessarily. For the effort, and skill involved, a nice V8 would probably add a ton of resale value, while a pentastar wont improve the value much. That being said, this cost including purchase of my jeep was less than a new one, plus I dont like the uconnect hackware that the major manufacturers think is neato. Back in 2008 when I got my first JKU the dealers came down 6k below invoice, now they would budge off their inflated prices (I went to EVERY jeep dealer within an hour that had the ride I was looking for).
So back to the topic. I was doing research into the engine swap idea when I discovered a rear main seal leak. Time was now working against me and I had to fast forward my plans.
My pentastar idea matured to the forefront of my thoughts when I found a low mileage (15,000miles) pentastar with NSG370 included for a pretty good price. It was out of a rear-end wrecked 2dr 2013 sport and so had many of the front end part available as well. This was tempting enough to begin researching this more. I began my research by investigating whether I would need to change engine mounts which would be a no-go for me. I discovered that the JKU body has been unchanged since 2007 with the exception of a middle exhaust mount post and some other tiny details. This was the first good sign, and meant I didnt need to do major cutting and welding. The next thing I had to figure out were the electronics. Modern wranglers have many computers, connectors, and other things that could go seriously haywire if everything didnt work perfectly together. With the only helpful advice I received in this process (RPM Extreme guys were great), I was advised to keep the TIPM from my jeep, and try and get it to talk with the PCM from the new engine. The TIPM contains all of the options that came with the body of the jeep, so changing that out could be a rat's nest of problems.
I decided to also check connectors, and my poor-man's way of doing this was to drive to a dealer with my jeep and one by one compare the connectors: the salespeople never asked me why I was disconnecting so many wiring harnesses on the showroom model
After this initial research came out positive, I pulled the trigger on the engine and bought it. Then came the hard part of actually making this idea a reality...
08-12-2015, 08:15 AM
#13
JK Enthusiast
Join Date: May 2015
Location: Canton,MI
Posts: 194
Likes: 0
Received 0 Likes
on
0 Posts
the anticipation is killing me! not that i would do it, v8 would be my choice. that being said i love seeing stuff that has never been done before. details details!!
08-13-2015, 11:28 AM
#14
JK Newbie
Thread Starter
One of the first issues I ran into in this project was the inability to find tech manuals on how to do anything. I have done a lot of work on cars, but mostly Japanese sports cars. The American off road machine was a new beast to me. Not having a good repair manual took me some time to overcome, but ended up using eautorepair.net. Not perfect, but it gave me the 2013 factory level manuals for a month for something like $35. I printed off the wiring diagrams first since that was gonna take the most research. I had already found the system wiring diagrams for the 2008 somewhere on the interweb, so I could now compare. After quite a bit of researching the system wiring diagrams to find out shared commonality between 2008 and 2013, I began to panic, big time panic. This was way more complicated than I thought. But then I began to breath. Engineers designed these things didn�t they? Engineers don�t like to reinvent things� right? So I took a different approach, and simply compared the wires going to the PCM in the two model years. Turns out they have mostly the same functions, and operate on standard power requirements. In fact most cars do. So the wires were going to be solvable.
My actual work began around 4th of July.
Day1:
Step 1) remove grill, and bumper. Step 1.5) Try not to get too mad.
The first day took about an hour and was just to get work under way. Sometimes turning wrenches can be a pain in the neck. Bumper is easy enough in theory to remove with 8 bolts holding it to the frame from behind, but the bolts were sticky and my knuckles sore. Also there is the bottom plastic shield and top plastic shield that can be tricky to remove if the plastic tabs are stuck. Grill is held on by push clips on the bottom and plastic retainers along the top. The plastic retainers were mostly broken, but the metal push tabs on the bottom were rusty and hard to get out.
08-14-2015, 09:06 AM
#15
JK Newbie
Thread Starter
Day 2 notes, 1.75hrs
Step 1) Finish removing front bumper and plastic parts such as a grill.
Step 2) Disconnect the fuel pump electrical plug at the fuel tank and start engine. Let it run till dry. The electrical connector for the fuel pump is at the top of the fuel pump which is back near the rear differential. Look for the wire going toward the top of the fuel tank and fish your hand along it until you feel the connector. There is a "safety tab" in the connector that must be moved before the connector can be removed. Look at the two wire connectors in the engine bay to see what I am talking about. Carefully move the plastic safety tab and then press the little button to disconnect.
Step 3) After you run the car dry (about 10 seconds in case you disconnected the wrong wire) reconnect fuel circuit so you don�t forget at the end of the project.
Write down Note mileage and vin for programming new PCM: Mine was ~187,000
Very important step. If you forget this, you will be hosed later.
Step 4) Drain oil
Step 5) Drain coolant
Step 6) Disconnect air intake at throttle body (also disconnect temp sensor electrical connection and hose clamp)
Step 7) Unbolt the two bolts holding the radiator to the front frame, undo 12 plastic damn connectors for radiator
Step 8) Disconnect top coolant line from radiator
Step 9) Disconnect bottom coolant line from radiator
Step 9.5) Get sprayed in face with antifreeze
Step 10) Raise the coolant overflow tank (separates easily by pulling straight up) drain coolant from tank
Step 11) Unbolt 4 top front frame bolts
Step 12) Unbolt ac lines at radiator (have an ac shop drain first or get sprayed with toxic chemicals in your face)
Step 13) Disconnect temp sensor at radiator, pull radiator up and out, careful to not break anything, dont lose the four rubber radiator isolators


This is what it looks like when some more has been removed. Be sure to label wiring connectors as you move along for many reasons.
Step 1) Finish removing front bumper and plastic parts such as a grill.
Step 2) Disconnect the fuel pump electrical plug at the fuel tank and start engine. Let it run till dry. The electrical connector for the fuel pump is at the top of the fuel pump which is back near the rear differential. Look for the wire going toward the top of the fuel tank and fish your hand along it until you feel the connector. There is a "safety tab" in the connector that must be moved before the connector can be removed. Look at the two wire connectors in the engine bay to see what I am talking about. Carefully move the plastic safety tab and then press the little button to disconnect.
Step 3) After you run the car dry (about 10 seconds in case you disconnected the wrong wire) reconnect fuel circuit so you don�t forget at the end of the project.
Write down Note mileage and vin for programming new PCM: Mine was ~187,000
Very important step. If you forget this, you will be hosed later.
Step 4) Drain oil
Step 5) Drain coolant
Step 6) Disconnect air intake at throttle body (also disconnect temp sensor electrical connection and hose clamp)
Step 7) Unbolt the two bolts holding the radiator to the front frame, undo 12 plastic damn connectors for radiator
Step 8) Disconnect top coolant line from radiator
Step 9) Disconnect bottom coolant line from radiator
Step 9.5) Get sprayed in face with antifreeze
Step 10) Raise the coolant overflow tank (separates easily by pulling straight up) drain coolant from tank
Step 11) Unbolt 4 top front frame bolts
Step 12) Unbolt ac lines at radiator (have an ac shop drain first or get sprayed with toxic chemicals in your face)
Step 13) Disconnect temp sensor at radiator, pull radiator up and out, careful to not break anything, dont lose the four rubber radiator isolators
This is what it looks like when some more has been removed. Be sure to label wiring connectors as you move along for many reasons.
08-17-2015, 10:37 AM
#17
JK Newbie
Thread Starter
Day 3: 1.5hrs Mostly removing wiring connectors, so label the locations in case you need to reverse this project later, or want to reference on the new wiring harness later. Time is a great eraser of memory
1) Unbolt front frame
2) Remove battery
3) Remove headlight wiring harness
4) Remove front wiring harness (2connectors) from TIPM
5) Remove TIPM
6) Remove battery and TIPM plastic tray
7) Drain power steering reservoir and disconnect to make removal of plastic tray easier
8) Remove front frame
9) Remove more AC lines
10) Undo generator wire (I did this, but you actually don’t need to)
11) Undo AC wire
12) Undo AC condenser wire
13) Remove engine to heater core x2 hoses
14) Unbolt armor under transfer case, break off bolt and get frustrated (extracting this bolt took � of the total time of this entire project.. I spent over $100 on extraction methods, and eventually the weld that held the bolt on broke)
15) Disconnect fuel lines near the rear of the tranny, get sprayed with gas, promptly reconnect
16) Disconnect wiring harnesses

This shows the battery tray removed
Front frame removed so you can pull the engine. Be very careful not to damage the aluminum power steering line that runs across the frame rails near the front.
A nice view of the TIPM. Mine had a slight color imprint left from the connectors as I detached them. If yours doesnt have this feature, label it since several of the connectors share an common interface. Would suck to plug them in wrong when you are done. Save the TIPM for later, this is your wrangler's brain and we will totally reuse it.
You can see in my crappy photos the AC lines with plastic bags rubber banded over them to keep dirt out. I thought I could reuse AC lines, but I couldnt.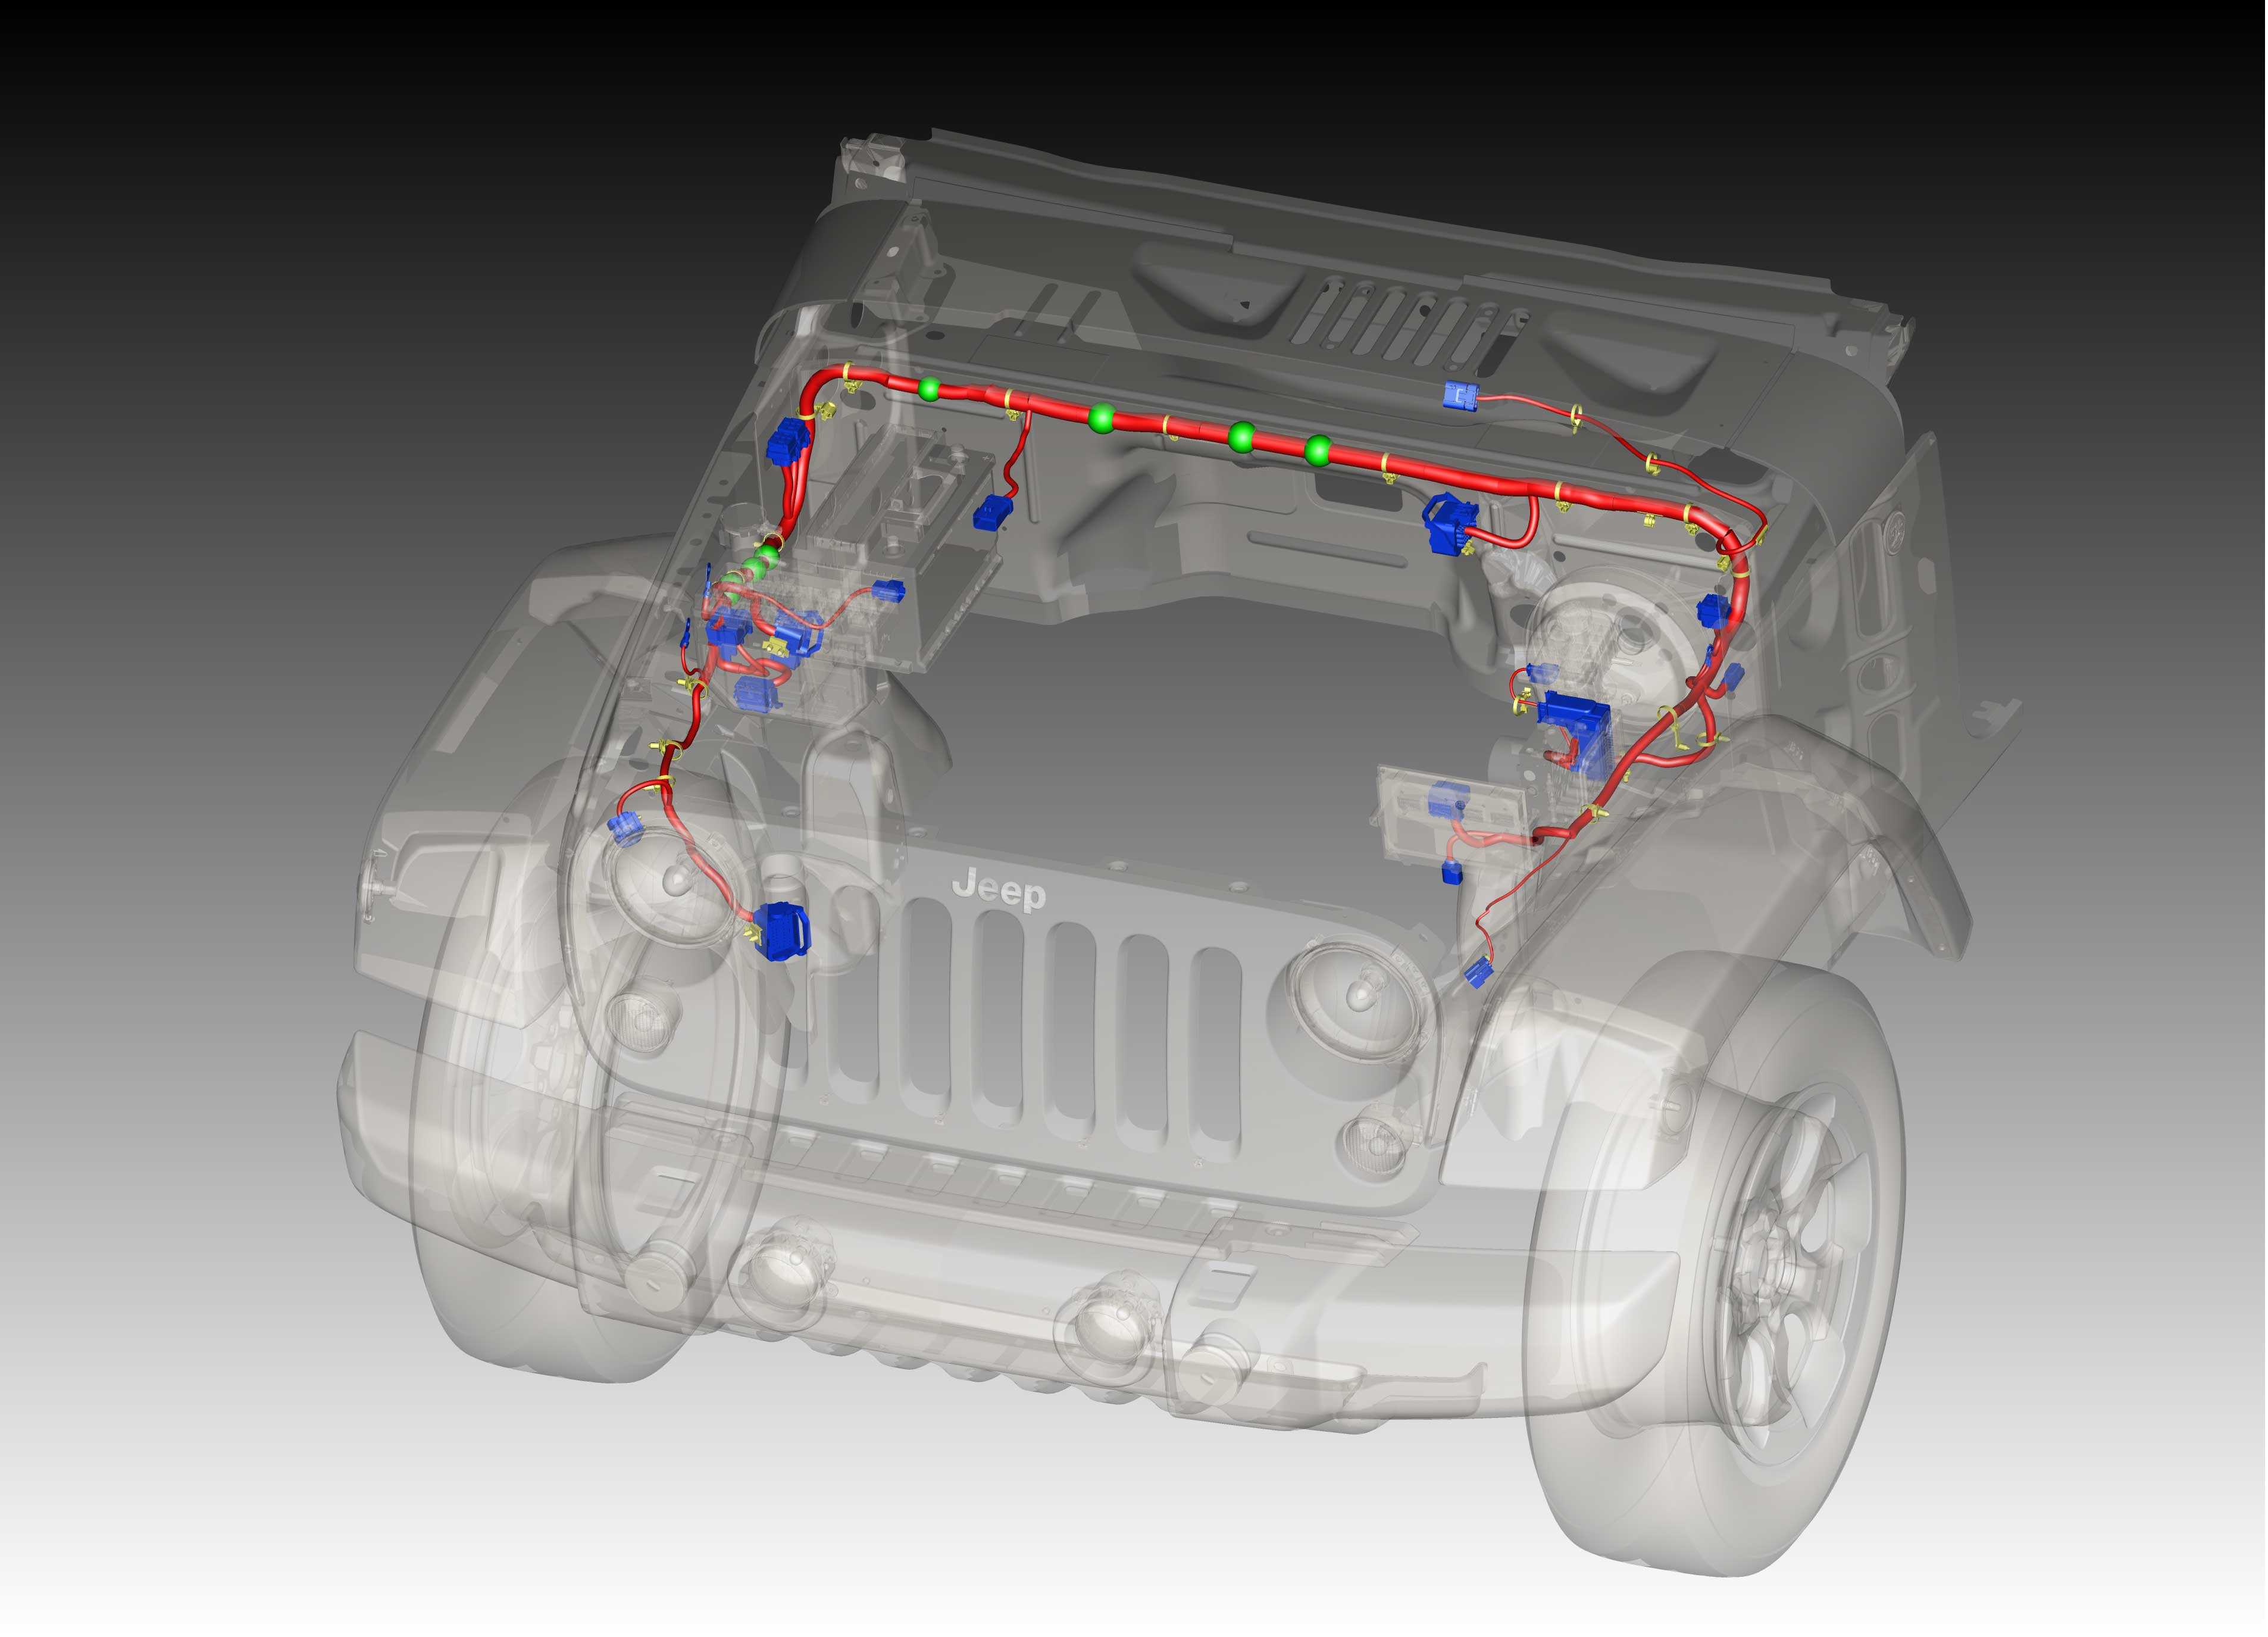
This last picture shows the wiring harness to remove. Label each of these connections so you can assemble the new wiring harness later. I will label these connectors soon so you can see what functions we are going to splice.
1) Unbolt front frame
2) Remove battery
3) Remove headlight wiring harness
4) Remove front wiring harness (2connectors) from TIPM
5) Remove TIPM
6) Remove battery and TIPM plastic tray
7) Drain power steering reservoir and disconnect to make removal of plastic tray easier
8) Remove front frame
9) Remove more AC lines
10) Undo generator wire (I did this, but you actually don’t need to)
11) Undo AC wire
12) Undo AC condenser wire
13) Remove engine to heater core x2 hoses
14) Unbolt armor under transfer case, break off bolt and get frustrated (extracting this bolt took � of the total time of this entire project.. I spent over $100 on extraction methods, and eventually the weld that held the bolt on broke)
15) Disconnect fuel lines near the rear of the tranny, get sprayed with gas, promptly reconnect
16) Disconnect wiring harnesses
This shows the battery tray removed
Front frame removed so you can pull the engine. Be very careful not to damage the aluminum power steering line that runs across the frame rails near the front.
A nice view of the TIPM. Mine had a slight color imprint left from the connectors as I detached them. If yours doesnt have this feature, label it since several of the connectors share an common interface. Would suck to plug them in wrong when you are done. Save the TIPM for later, this is your wrangler's brain and we will totally reuse it.
You can see in my crappy photos the AC lines with plastic bags rubber banded over them to keep dirt out. I thought I could reuse AC lines, but I couldnt.
This last picture shows the wiring harness to remove. Label each of these connections so you can assemble the new wiring harness later. I will label these connectors soon so you can see what functions we are going to splice.
Last edited by Saharacon; 08-17-2015 at 10:42 AM.
08-17-2015, 12:03 PM
#18
JK Freak
I remember that stage of my swap and dealing with getting sprayed with gas. I tywraped shop towls to the connections so that when they came apart the towls held them together and the gas just dribbled out after blasting fuel all inside the towl.
U have a good plan. I am enjoying reading ur comments. Subscribed.
U have a good plan. I am enjoying reading ur comments. Subscribed.
08-18-2015, 04:37 AM
#20
JK Newbie
Thread Starter

