
New Warn Elite Series Front Bumper
 06-21-2012, 11:54 AM
#21
JK Freak
I did the install of the Warn Elite by myself; something that I would not recommend to others. The tolerances on the 8 mounting bolts to the frame are very tight, so there was a lot of installing, tightening, then loosening of bolts before they would all go in. And you have to enlarge a slot on the side of the frame to take a larger mounting bolt, and who the hell has a 15/16ths socket?
The relocation of the vacuum reservoir on the '12 JK is a pain unless you have a small grinder that can get into that tight space to remove the mounting flange. I wound up using a keyhole saw with a metal-cutting blade and 20 minutes later I had removed the flange. Depending on the winch, it's a pretty tight fit for the hoses that come off the reservoir, but it does work.
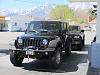
The purpose of the large fairlead hole is, as others have mentioned, to accommodate winches where the drum is off-set, like my Warn 9.5 cti (picture attached.
If you leave the fenders stock, I, for one, really like the look. The bumper flows with the lines of the fenders, making it look pretty sharp.
This is a very solid, well-built bumper. The added bonus is the ability to utilize the factory fog lights. Hell, they even supply extra wire and connectors required for the wider width of the mounting location. And since the mounting plate is included, it's solid and no additional purchase is needed.
The relocation of the vacuum reservoir on the '12 JK is a pain unless you have a small grinder that can get into that tight space to remove the mounting flange. I wound up using a keyhole saw with a metal-cutting blade and 20 minutes later I had removed the flange. Depending on the winch, it's a pretty tight fit for the hoses that come off the reservoir, but it does work.
The purpose of the large fairlead hole is, as others have mentioned, to accommodate winches where the drum is off-set, like my Warn 9.5 cti (picture attached.
If you leave the fenders stock, I, for one, really like the look. The bumper flows with the lines of the fenders, making it look pretty sharp.
This is a very solid, well-built bumper. The added bonus is the ability to utilize the factory fog lights. Hell, they even supply extra wire and connectors required for the wider width of the mounting location. And since the mounting plate is included, it's solid and no additional purchase is needed.
 06-21-2012, 01:38 PM
#22
JK Newbie
Join Date: Jun 2012
Location: Atlanta, GA
Posts: 6
Likes: 0
Received 0 Likes
on
0 Posts
I looked at the Warn Elite but decided against it as I was under the impression that a skid plate wasn't an option. Previous post has a pic with a skid plate - come with bumper?
08-01-2012, 02:34 AM
#23
JK Newbie
Join Date: Feb 2012
Location: Fair Lawn, NJ
Posts: 4
Likes: 0
Received 0 Likes
on
0 Posts
Yesterday a friend and I spent the better part of 5 hours installing the warn Elite series on my 09 Sahara. The major problem we had was that, out of the 8 bolts that mount the bumper to the frame, we could only line up 4 at a time -- each side lines up with the factory holes, but not both sides at the same time. The holes were off by a half inch. So once we had lost daylight after hours of installing, loosening and shifting, we left it bolted in on only one side and from the top mounting bracketts. Any advise guys?
08-01-2012, 05:31 AM
#24
Super Moderator
Join Date: Jun 2011
Location: Hendersonville, Tennessee
Posts: 11,035
Likes: 0
Received 80 Likes
on
72 Posts
Originally Posted by Mikeownsyourface
Yesterday a friend and I spent the better part of 5 hours installing the warn Elite series on my 09 Sahara. The major problem we had was that, out of the 8 bolts that mount the bumper to the frame, we could only line up 4 at a time -- each side lines up with the factory holes, but not both sides at the same time. The holes were off by a half inch. So once we had lost daylight after hours of installing, loosening and shifting, we left it bolted in on only one side and from the top mounting bracketts. Any advise guys?
08-01-2012, 10:51 AM
#25
JK Newbie
Join Date: Feb 2012
Location: Fair Lawn, NJ
Posts: 4
Likes: 0
Received 0 Likes
on
0 Posts
Lucky! I read an earlier post where somebody had the same issue with this bumper but was still able to get all the bolts in. I think i'll go back at it today with a little more knowledge and daylight. And probably a drill.
08-01-2012, 03:45 PM
#26
JK Newbie
Join Date: May 2012
Location: Fairfield, CT
Posts: 26
Likes: 0
Received 0 Likes
on
0 Posts
Originally Posted by Ryan0260
You may have to elongate the holes on the bumper with a drill. I installed my Expo one bumper in 30 minutes by myself, and everything lined up perfectly
08-01-2012, 04:19 PM
#27
JK Freak
See Grand Umpah's post above. Our experience on 08 was the same. Tight fit but it aligned without drilling after loosely attaching one side first. Benefitted from a couple of pairs of hands and a pair of jack stands to balance the bumper on while taking deep calming breaths. Zen and the art of motor mechanics. Don't know what tolerances jeep chassis have to be to built to to pass QC, but a small fraction of an inch would be enough to make this tight fit a problem.
One way to look at it is because the tolerances are so tight, once it is on, it will be a very solid bumper.
Keep working at it and you'll get it on, I'm sure.
08-03-2012, 07:11 PM
#28
JK Newbie

Join Date: Jul 2012
Location: Saskatchewan
Posts: 1
Likes: 0
Received 0 Likes
on
0 Posts


 08-05-2012, 12:47 AM
#29
JK Newbie
Join Date: Feb 2012
Location: Fair Lawn, NJ
Posts: 4
Likes: 0
Received 0 Likes
on
0 Posts
Originally Posted by Grand Umpah
X2. I wouldn't drill out any holes just yet. Based on my install, it's just a question of tightening, loosening, adjusting, swearing, and the bolts should eventually go in.
One way to look at it is because the tolerances are so tight, once it is on, it will be a very solid bumper.
Keep working at it and you'll get it on, I'm sure.
Last edited by Mikeownsyourface; 08-05-2012 at 12:50 AM.
08-05-2012, 11:56 AM
#30
JK Newbie
Join Date: May 2012
Location: Fairfield, CT
Posts: 26
Likes: 0
Received 0 Likes
on
0 Posts