
Rewiring Rubicon Lockers
 08-16-2010, 02:07 PM
#1
JK Enthusiast
Thread Starter
Join Date: Jun 2010
Location: Hedgesville, WV
Posts: 165
Likes: 0
Received 0 Likes
on
0 Posts
So I decided to rewire my factory lockers to get rid of all of the factory constraints on them. I've seen how to splice into the factory relay and wire them from scratch but I wanted to make this clean and easy so I came up with my own method.
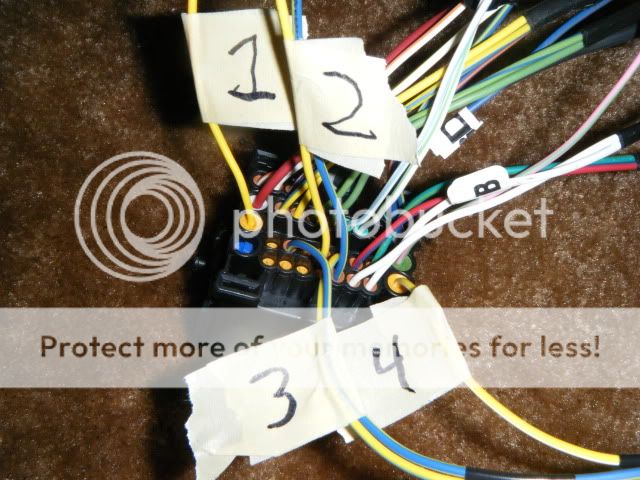
First thing is I bought a factory harness to take apart and figure out how everything is run.

This harness plugs in right behind the fuse box and there is plenty of room there to modify it. Here's what you are after in that harness.
#1 (yellow wire with orange stripe) Apply 12 volts to lock front locker.
#2 (blue w/ green stripe, yellow w/ light purple stripe) dry contact status for front locker.
#3 (blue w/ green stripe, yellow w/ blue stripe) dry contact status for rear locker.
#4 (yellow w/ white stripe) Apply 12 volts to lock rear locker.
What i'm going to do is separate these 6 wires from the harness and get a 6 pin water tight connector from deutschconnector dot com and put it inline with these wires so that I can plug and unplug them from the truck. Then use one connector as a blank with no pins to plug into the truck side of the harness to keep that sealed up. If I ever sell the truck I can simply unplug my harness and plug the truck back in to take control again. I got the DayStar lower panel and all the required switches to activate them and have status lights. I also got an 80 amp 7 circuit switched fuse block from painless to supply power to this and the PIAAs that I got for the front as well as anything else I add down the road. I'll post more pics and a full wiring diagram after I rewire everything this weekend.
First thing is I bought a factory harness to take apart and figure out how everything is run.
This harness plugs in right behind the fuse box and there is plenty of room there to modify it. Here's what you are after in that harness.
#1 (yellow wire with orange stripe) Apply 12 volts to lock front locker.
#2 (blue w/ green stripe, yellow w/ light purple stripe) dry contact status for front locker.
#3 (blue w/ green stripe, yellow w/ blue stripe) dry contact status for rear locker.
#4 (yellow w/ white stripe) Apply 12 volts to lock rear locker.
What i'm going to do is separate these 6 wires from the harness and get a 6 pin water tight connector from deutschconnector dot com and put it inline with these wires so that I can plug and unplug them from the truck. Then use one connector as a blank with no pins to plug into the truck side of the harness to keep that sealed up. If I ever sell the truck I can simply unplug my harness and plug the truck back in to take control again. I got the DayStar lower panel and all the required switches to activate them and have status lights. I also got an 80 amp 7 circuit switched fuse block from painless to supply power to this and the PIAAs that I got for the front as well as anything else I add down the road. I'll post more pics and a full wiring diagram after I rewire everything this weekend.
Last edited by TheScientist; 08-19-2010 at 06:02 AM.
 08-16-2010, 02:55 PM
#3
JK Enthusiast
Thread Starter
Join Date: Jun 2010
Location: Hedgesville, WV
Posts: 165
Likes: 0
Received 0 Likes
on
0 Posts
Correct. I will have full control over them. Lock just front or just back or both when ever I want. You can even lock the rear in 2 hi to have some fun in the snow.  Here's the switch panel that I'm wiring in to control it all. The top lights will come on and dim with the dash lights and the bottom lights will be the status lights for the lockers.

Here's the switch panel that I'm wiring in to control it all. The top lights will come on and dim with the dash lights and the bottom lights will be the status lights for the lockers.
Last edited by TheScientist; 08-16-2010 at 02:57 PM.
08-16-2010, 06:35 PM
#4
JK Newbie
Join Date: Aug 2009
Location: Homestead, Florida
Posts: 80
Likes: 0
Received 0 Likes
on
0 Posts
This is over complicating the entire process. I accomplished the exact same freedom by running two wires to the locker switches near the battery. Two wires, two splices and added two new switches and it worked. Minus the switches it cost about $10 for the wire, total...
Good job with this thread, I'm just not smart enough to figure that out. The wires I ran break the ground, it's that simple.
Search "locker bypass switch" to find my pic.
Good job with this thread, I'm just not smart enough to figure that out. The wires I ran break the ground, it's that simple.
Search "locker bypass switch" to find my pic.
Last edited by jmducha; 08-16-2010 at 06:38 PM.
08-16-2010, 06:39 PM
#5
JK Jedi Master
This is over complicating the entire process. I accomplished the exact same freedom by running two wires to the locker switches near the battery. Two wires, two splices and added two new switches and it worked. Minus the switches it cost about $10 for the wire, total...
Good job with this thread, I'm just not smart enough to figure that out. The wires I ran break the ground, it's that simple.
Search "locker bypass switch" to find my pic.
Good job with this thread, I'm just not smart enough to figure that out. The wires I ran break the ground, it's that simple.
Search "locker bypass switch" to find my pic.
08-17-2010, 02:20 AM
#7
JK Enthusiast
Thread Starter
Join Date: Jun 2010
Location: Hedgesville, WV
Posts: 165
Likes: 0
Received 0 Likes
on
0 Posts
This is over complicating the entire process. I accomplished the exact same freedom by running two wires to the locker switches near the battery. Two wires, two splices and added two new switches and it worked. Minus the switches it cost about $10 for the wire, total...
Good job with this thread, I'm just not smart enough to figure that out. The wires I ran break the ground, it's that simple.
Search "locker bypass switch" to find my pic.
Good job with this thread, I'm just not smart enough to figure that out. The wires I ran break the ground, it's that simple.
Search "locker bypass switch" to find my pic.
Trending Topics
08-17-2010, 05:31 AM
#8
JK Jedi Master
That's what I said at the top of the thread. I saw your way of messing with the relays. I wanted to bypass everything in the jeep completely (including those relays), have status lights that work, not have any flashing lights on the dash and not have to run a new harness though the entire jeep. This is a no compromise solution to getting total control over your lockers. Is it the easiest way? Definitely not. But I feel that if I'm going to modify a $30k toy that I'm going to do it right the first time. It's not that hard to do once you know what wires you are after in that harness. The connectors that I got are all water tight and really slick. They are the same connectors that Bombardier uses in their ATVs, snowmobiles and jet skis. No 3M splice connectors here. I'll put picks up once they come in and I start prefabbing the harness.

Along with pictures, a wiring diagram of the final harness would be helpful.
It's going to be hard to beat two simple ground wires and two switches, though.
08-17-2010, 06:00 AM
#9
JK Super Freak
Join Date: Aug 2009
Location: spencer, indiana
Posts: 1,093
Likes: 0
Received 0 Likes
on
0 Posts
to have functional lights that work and do it this way is overkill but why not. i did suscribe though and i want to see the end result and final writeup as well. i am looking to do this and i feel the same way. it is always nice to do it right the first time even if it is more complicated. thanks for putting this up.
08-17-2010, 12:01 PM
#10
JK Newbie
Join Date: Aug 2009
Location: Homestead, Florida
Posts: 80
Likes: 0
Received 0 Likes
on
0 Posts
Don't mean to sound pissy. But splicing a ground isn't really "messing" with relays. Then running two wires from the battery to the dash isn't exactly a new "harness". Good luck on the install though. I can definitely say this is the second best mod I have done. Works awesome in sand in two wheel drive and four high, since I live on an island it comes in handy. I did subscribe to see the final product.
How much was the other harness?
How much was the other harness?