
Wiring a 3rd Brake Light w/ Swingout

Thread Starter
JK Enthusiast
Joined: Jan 2009
Posts: 272
Likes: 0
From: Mesa, AZ
This is a simple extension of wires. I have rerouted and protected them from the environs.
Anyone who has a swing out tire carrier knows the frustrations of the 3rd brake light wiring. I installed the LoD Shorty with all the goodies including the 3rd brake light bracket, but the wiring is one thing that was not mentioned in the install. Here�s my fix and maybe it will help someone else.
Difficulty:
1 out of 5 wrenches
1 hour
Tools:
Drill
3/16� bit
Phillips Screw Driver
Electrical Wire
Parts:
12�-�� Wire Loom
30�- 16ga Wire
4- 16ga Butt connecters
4- Heat shrink tubes
4-wiring Clamps
10- Zip ties
Electrical Tape
Black Silicone
*Disconnect the battery when working with anything electrical on your JK.*
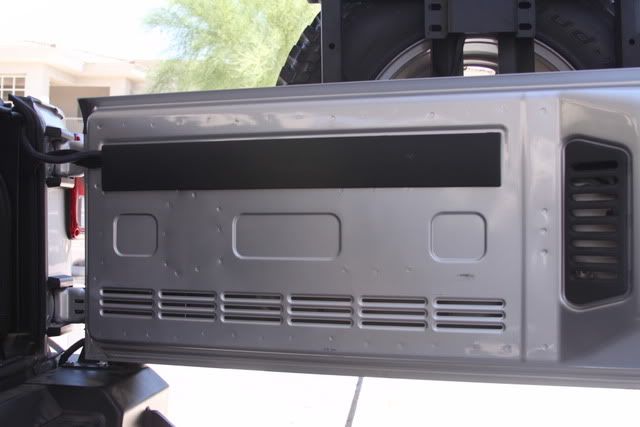
-Remove the 2 plastic trim pieces on the tailgate.
The long horizontal one has snap tabs on the bottom, and hooks reaching up, so pull the bottom straight out.
The vertical one has snap tabs on the inner side and hooks on the outside, so pull from the center line of the jeep first and swing it out towards the driver�s taillight.

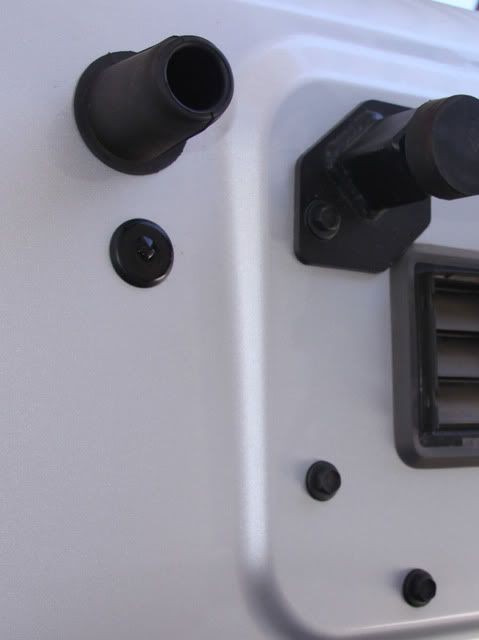
-Remove the grommet holding the wiring to the 3rd brake light.
You can cut the wiring off on both sides of this grommet.
Apply a small dab of black silicone to both sides of the grommet and set aside for drying.
-Remove the factory mesh wrapped around the wiring to the 3rd brake light.
Set aside this will be reused.
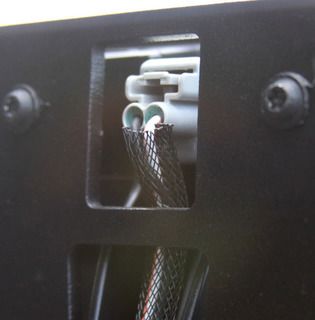
-From inside the tailgate�s large hole
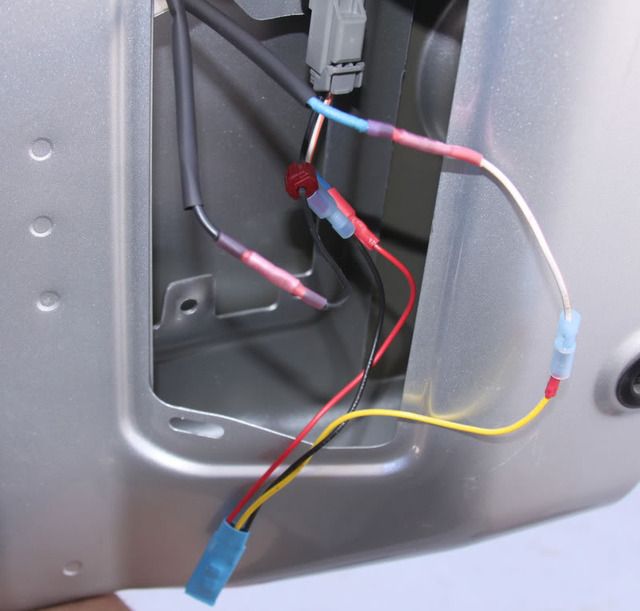
Note the color coding of your wiring (#1-black, #2-white w/orange strip).
The 2010 JK�s have a diode that give the 3rd brake light a triple flash when applied. I like this function and kept the diode in place. In the photo below you want to connect to the far upper left wiring, which was trimmed at the tailgate grommet
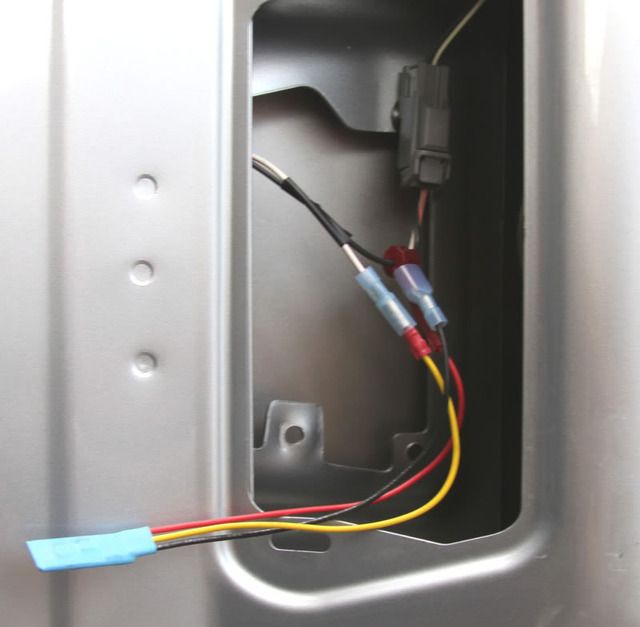
-Connect 15� of wire to each of the connections inside the tailgate.
I used heat shrink butt connectors and covered them in heat shrink.
Note which wire is which if running the same color wiring, simply placing black tape on both ends of the same piece of wire will help. Running different color wiring will help even more, but is not necessary if you mark the wires.
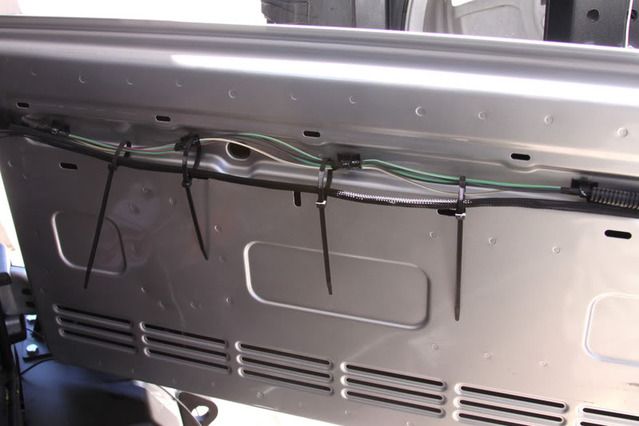
-Run the wiring following the factory wiring across the tailgate to the passenger side.
I reused the factory mesh fromt the 3rd brake light as protection along the rear tailgate. Loosely zip tie the wiring to the factory zipties.
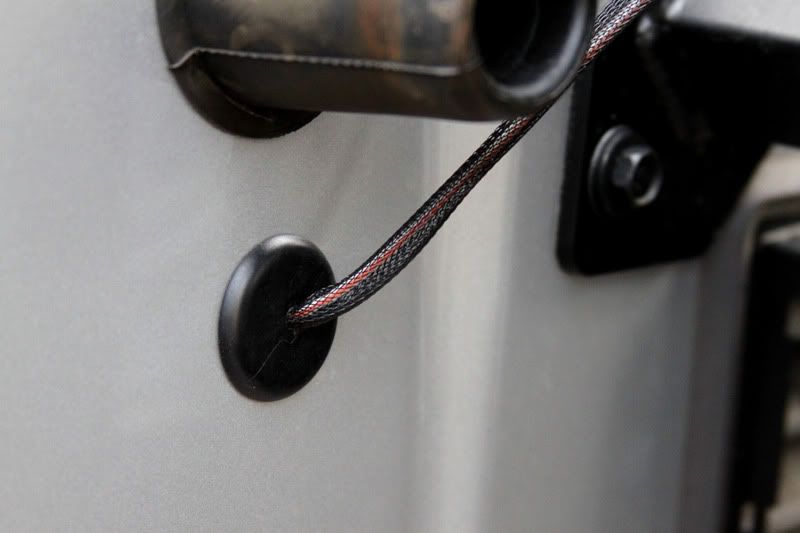
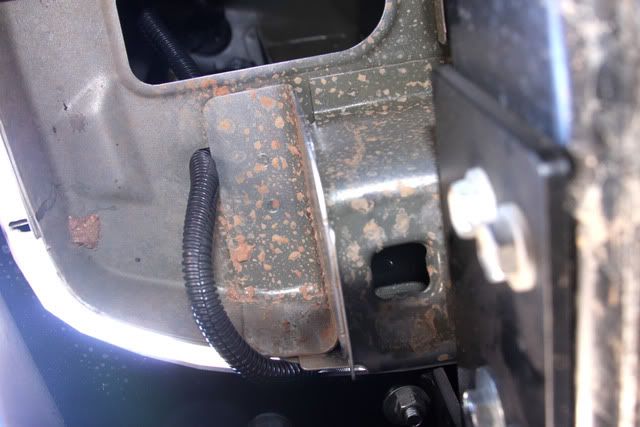
-Pull up the carpet on the passenger side upper fender. Here you will expose a grommet. Punch 2 holes through the grommet, remove grommet, and run a wire though each hole.
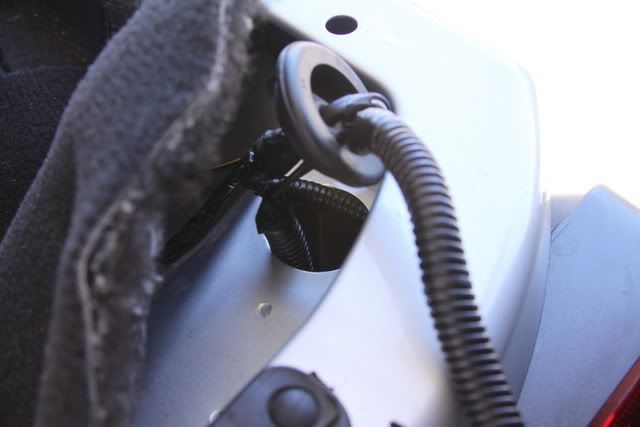
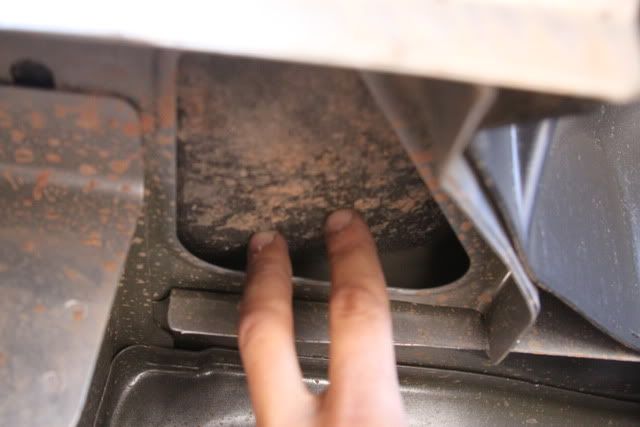
-Under the passenger side fender is a hunk of foam. Push up, twist, and pull out. Note the orientation for reinstall. This area will expose the inner fender well and the wiring will run down though that to a small hole in the bottom of the fender. Pull the wiring through the small hole.
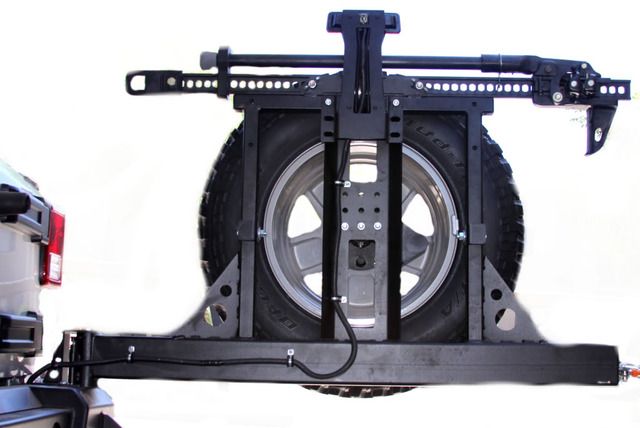
-Run the wiring under the fender directly to the hinge point of your tire carrier.
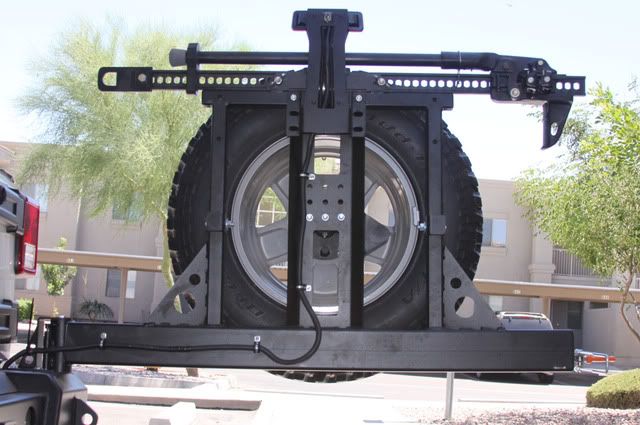
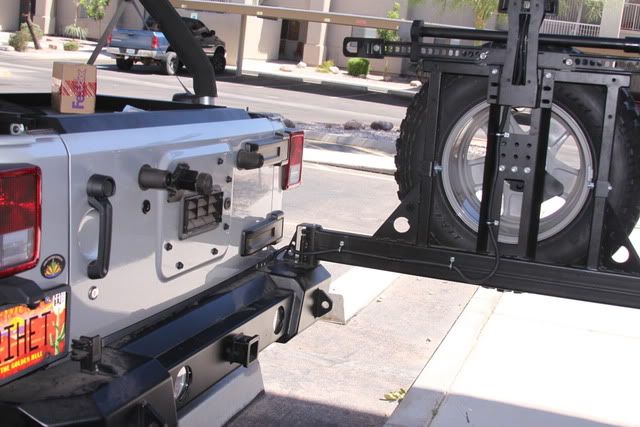
-Next look at how your wiring will run across your tire carrier.
With the LoD it made sense to follow the bottom and then head straight up the 3rd brake light extension bracket. This is where you will decide how and where to clamp the wiring to fit your application. I ensured that as my tires are upgraded and the 3rd brakelight extended that I had enough wire to fit those 37's!
-Trim the wiring you just ran to fit the desired routing along your swing out.
I staggered the wiring/butt connectors to ensure the wire loom would fit nicely.
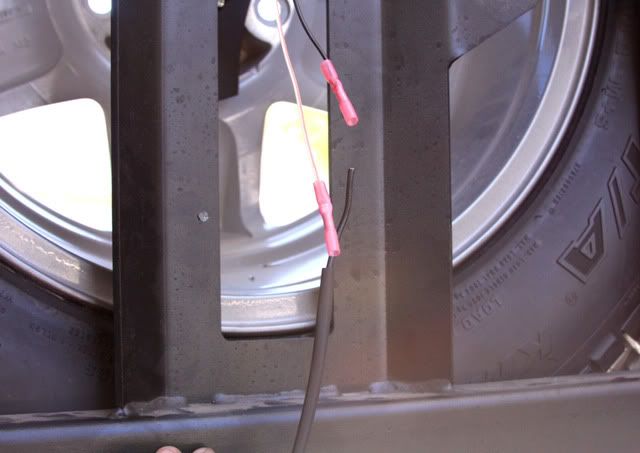
-Connect the new wiring to the factory wiring coming from the 3rd brake light.
Use heat shrink butt connectors and heat shrink tubes.
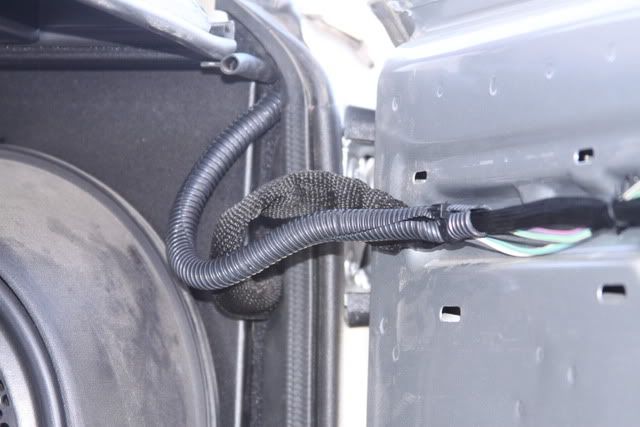
-Install wire loom along 3 different portions of unprotected wire.
Wrap ends of loom with electrical tape.
-1st is in the tailgate (larger vertical hole) to the factory reused mesh.
-2nd extended from tailgate hinge point through carpet and to the grommet in the fender.
-3rd is from deep inside the fender to the 3rd brake light. You will need to feed the loom through the small hole up to the grommet then to the brake light.
-Now that the wire is ran and protected from rubbing and the elements, it is time to secure it.
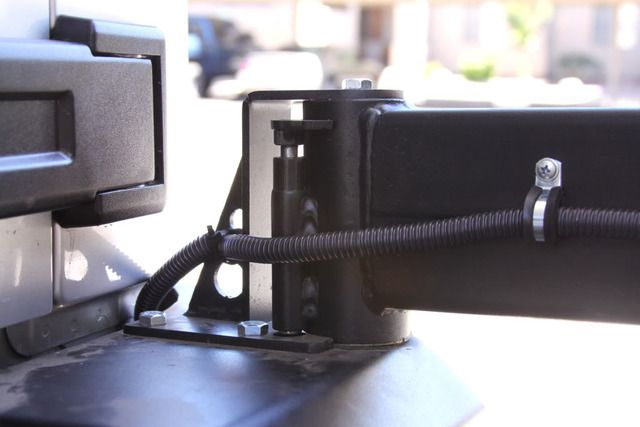
-Install 4 wire clamps along the swing out.
I used self tapping screws on the bottom portion of the LoD and small bolts with nuts along the vertical riser. I used a zip tie at the hinge to ensure the movement of the wireloom is going to work.
Check wire lengths.
Ensure that the 2 pivot points (inside tailgate and swingout hinge) are not too excessive. If you have excess the place to 'store' it is in the fender.
Replace the factory plastic covers on tailgate.
This is opposite of how they were removed.
Reinstall large grommet in tailgate
Reconnect battery
Check to see if the 3rd brakelight is operational.
Enjoy your swingout tire carrier as it should!
Anyone who has a swing out tire carrier knows the frustrations of the 3rd brake light wiring. I installed the LoD Shorty with all the goodies including the 3rd brake light bracket, but the wiring is one thing that was not mentioned in the install. Here�s my fix and maybe it will help someone else.
Difficulty:
1 out of 5 wrenches
1 hour
Tools:
Drill
3/16� bit
Phillips Screw Driver
Electrical Wire
Parts:
12�-�� Wire Loom
30�- 16ga Wire
4- 16ga Butt connecters
4- Heat shrink tubes
4-wiring Clamps
10- Zip ties
Electrical Tape
Black Silicone
*Disconnect the battery when working with anything electrical on your JK.*
-Remove the 2 plastic trim pieces on the tailgate.
The long horizontal one has snap tabs on the bottom, and hooks reaching up, so pull the bottom straight out.
The vertical one has snap tabs on the inner side and hooks on the outside, so pull from the center line of the jeep first and swing it out towards the driver�s taillight.
-Remove the grommet holding the wiring to the 3rd brake light.
You can cut the wiring off on both sides of this grommet.
Apply a small dab of black silicone to both sides of the grommet and set aside for drying.
-Remove the factory mesh wrapped around the wiring to the 3rd brake light.
Set aside this will be reused.
-From inside the tailgate�s large hole
Note the color coding of your wiring (#1-black, #2-white w/orange strip).
The 2010 JK�s have a diode that give the 3rd brake light a triple flash when applied. I like this function and kept the diode in place. In the photo below you want to connect to the far upper left wiring, which was trimmed at the tailgate grommet
-Connect 15� of wire to each of the connections inside the tailgate.
I used heat shrink butt connectors and covered them in heat shrink.
Note which wire is which if running the same color wiring, simply placing black tape on both ends of the same piece of wire will help. Running different color wiring will help even more, but is not necessary if you mark the wires.
-Run the wiring following the factory wiring across the tailgate to the passenger side.
I reused the factory mesh fromt the 3rd brake light as protection along the rear tailgate. Loosely zip tie the wiring to the factory zipties.
-Pull up the carpet on the passenger side upper fender. Here you will expose a grommet. Punch 2 holes through the grommet, remove grommet, and run a wire though each hole.
-Under the passenger side fender is a hunk of foam. Push up, twist, and pull out. Note the orientation for reinstall. This area will expose the inner fender well and the wiring will run down though that to a small hole in the bottom of the fender. Pull the wiring through the small hole.
-Run the wiring under the fender directly to the hinge point of your tire carrier.
-Next look at how your wiring will run across your tire carrier.
With the LoD it made sense to follow the bottom and then head straight up the 3rd brake light extension bracket. This is where you will decide how and where to clamp the wiring to fit your application. I ensured that as my tires are upgraded and the 3rd brakelight extended that I had enough wire to fit those 37's!
-Trim the wiring you just ran to fit the desired routing along your swing out.
I staggered the wiring/butt connectors to ensure the wire loom would fit nicely.
-Connect the new wiring to the factory wiring coming from the 3rd brake light.
Use heat shrink butt connectors and heat shrink tubes.
-Install wire loom along 3 different portions of unprotected wire.
Wrap ends of loom with electrical tape.
-1st is in the tailgate (larger vertical hole) to the factory reused mesh.
-2nd extended from tailgate hinge point through carpet and to the grommet in the fender.
-3rd is from deep inside the fender to the 3rd brake light. You will need to feed the loom through the small hole up to the grommet then to the brake light.
-Now that the wire is ran and protected from rubbing and the elements, it is time to secure it.
-Install 4 wire clamps along the swing out.
I used self tapping screws on the bottom portion of the LoD and small bolts with nuts along the vertical riser. I used a zip tie at the hinge to ensure the movement of the wireloom is going to work.
Check wire lengths.
Ensure that the 2 pivot points (inside tailgate and swingout hinge) are not too excessive. If you have excess the place to 'store' it is in the fender.
Replace the factory plastic covers on tailgate.
This is opposite of how they were removed.
Reinstall large grommet in tailgate
Reconnect battery
Check to see if the 3rd brakelight is operational.
Enjoy your swingout tire carrier as it should!


Thread Starter
JK Enthusiast
Joined: Jan 2009
Posts: 272
Likes: 0
From: Mesa, AZ
Thanks! Write's up done well help even with the littlest tasks.
I feel I need to give back. So anytime I do installs I document.
If anybody has improvements to this please post up!
The one thing I will watch is the pivot points with the wire loom. I might get some hollow nylon webbing and replace it at those points. (similar to how the inner tailgate wiring is at the hinge point).
Cheers.
JK Freak
Joined: May 2008
Posts: 549
Likes: 0
From: toronto, ontario canada
DOOOOOOOOOOOOOOOOOOOOOOOOOOOOOD!!!!!!!!!
perfect timing! i was planning on re routing that wire (or just ditching the 3rd brake light). thanks for taking the time and sharing your install. this is exactly what i needed.

perfect timing! i was planning on re routing that wire (or just ditching the 3rd brake light). thanks for taking the time and sharing your install. this is exactly what i needed.
JK Freak
Joined: Oct 2009
Posts: 592
Likes: 6
From: Auburn, Alabama
JK Freak
Joined: Jul 2010
Posts: 584
Likes: 7
From: Colorado Springs, CO
Trending Topics

JK Newbie
Joined: Sep 2010
Posts: 44
Likes: 0
From: Leesburg, VA
JK Newbie
Joined: Oct 2010
Posts: 22
Likes: 0
From: Goodyear, Arizona
Great write up! Thank you.
I just installed my "Rock Hard" rear bumper & tire carrier, and had to set up a third brake light and a LED "Truck-Lite" back up light hooked in to my reverse lights.
Your post made the wireing very easy, and it looks proffesional as well.
best of all, I did it myself,, and it actually works!
I just installed my "Rock Hard" rear bumper & tire carrier, and had to set up a third brake light and a LED "Truck-Lite" back up light hooked in to my reverse lights.
Your post made the wireing very easy, and it looks proffesional as well.
best of all, I did it myself,, and it actually works!