
bumper build (progressive)

Thread Starter
JK Freak
Joined: Feb 2008
Posts: 513
Likes: 0
From: delaware (north)
finished!!! powdercoat images coming soon


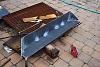
ok now that i have chosen the shape of my bumper its time i enter production phase.
ive made my model

and now ive started cutting out the pieces

the middle piece has gone thru a rust removal process but it used to look like the bottom piece
thread will be updated as updates come out
ok now that i have chosen the shape of my bumper its time i enter production phase.
ive made my model
and now ive started cutting out the pieces
the middle piece has gone thru a rust removal process but it used to look like the bottom piece
thread will be updated as updates come out
Last edited by warlord; Oct 18, 2010 at 06:50 PM.
Thread Starter
JK Freak
Joined: Feb 2008
Posts: 513
Likes: 0
From: delaware (north)
allright i now have most the pieces cut and derusted, i had to do a bunch of cutting in the rain today since the whole month is looking like a wet one, looking at the weather radar it looks like the rain is doing circles between me, ontario, ohio, then back to me. so getting a really sunny week is gonna be long awaited,
gotta get done with whatever time i have.
so anyway
most all pieces are de rusted and i have the last one processing tonight.
im still divided on whether to do a stinger or not
and i still have to figure out if i want to line-X, powder-coat, or just rattle can truck bed liner it.

gotta get done with whatever time i have.
so anyway
most all pieces are de rusted and i have the last one processing tonight.
im still divided on whether to do a stinger or not
and i still have to figure out if i want to line-X, powder-coat, or just rattle can truck bed liner it.
Thread Starter
JK Freak
Joined: Feb 2008
Posts: 513
Likes: 0
From: delaware (north)
alright
had a well productive day
managed to assemble the main body and do the outside welds and some cosmetic grinding
this is first assembly
after some spotwelding i moved on to the corners, ass seen here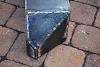
after fully welding the corners in i then ground most the edges into rounded corners
and this is the result of that
Thread Starter
JK Freak
Joined: Feb 2008
Posts: 513
Likes: 0
From: delaware (north)
allright i managed to get a good bit of work done today!
and now on to the few pics i managed to take (i got too involved and forgot to take some of the better moments)
i started the day off by removing my factory bumper and winch mount(with attached winch*(sold separately))
after about 3 hours of cursing and searching for a 1" wrench i managed to get everything removed. no pic
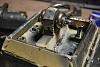
next i threw my new bumper on to trace some bolt patterns and such.
this is what it looks like when you pull a bumper off and throw another on for the sake of a picture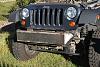
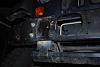
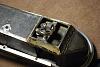
after some measurements i cut some slots out of the new bumper to address a conflict with the cross-member,
and i cut 2.5" off of my frame
used the cut off frame pieces to make some new brackets and welded them onto the now exposed frame ends.
by now its dark as balls and about 8 at night so gotta pack up so i had to throw the stock bumper internal metal piece on so i can drive to work without having the cops on my ass for the next 2 days.
anyway here is some pictures showing how much closer the bumper will be to the body


and here is the debris leftover from the end of the days work
you can see the slots cut from the bumper and the winch plate (with attached winch*(sold separately)), and the windbreaker filled with all the bolts removed from the process, oh and the shackle i ordered to be used when complete (stainless)

and now on to the few pics i managed to take (i got too involved and forgot to take some of the better moments)
i started the day off by removing my factory bumper and winch mount(with attached winch*(sold separately))
after about 3 hours of cursing and searching for a 1" wrench i managed to get everything removed. no pic
next i threw my new bumper on to trace some bolt patterns and such.
this is what it looks like when you pull a bumper off and throw another on for the sake of a picture
after some measurements i cut some slots out of the new bumper to address a conflict with the cross-member,
and i cut 2.5" off of my frame
used the cut off frame pieces to make some new brackets and welded them onto the now exposed frame ends.
by now its dark as balls and about 8 at night so gotta pack up so i had to throw the stock bumper internal metal piece on so i can drive to work without having the cops on my ass for the next 2 days.
anyway here is some pictures showing how much closer the bumper will be to the body
and here is the debris leftover from the end of the days work
you can see the slots cut from the bumper and the winch plate (with attached winch*(sold separately)), and the windbreaker filled with all the bolts removed from the process, oh and the shackle i ordered to be used when complete (stainless)
Trending Topics
Thread Starter
JK Freak
Joined: Feb 2008
Posts: 513
Likes: 0
From: delaware (north)
not really much to show in the way of results.
most of my time was spent drilling holes and such.
however i did manage to cutout my shackle mounts and drill at least one of them.
it took about 1 min to cut the plate but about 15 min to drill a hole in it, go figure.
the plate i used to make the mounts is 1" thick, kinda overkill but thats what i was going for anyway.
anyway i managed to make the pad on one side, just gotta finish it and close it up.
then just gotta make the other side pad, if i choose a bullnose then make that, then all i have to do is get it powder-coated and mounted.
does anyone know how long it takes to powder-coat something?
JK Newbie
Joined: Jul 2010
Posts: 35
Likes: 0
From: Lehighton, Pennsylvania, United States
Those shackle mounts are looking cool are you planning on making some kind of trim cover to go over the bolts cause that would look pretty nice or would it impede the use of the shackle Keep up the great work
Keep up the great work
Thread Starter
JK Freak
Joined: Feb 2008
Posts: 513
Likes: 0
From: delaware (north)
yes there will be a cover for the bolts, i just haven't cut it yet.
i think thats the last thing i have to cut and weld before this thing is done anyway so the results are soon coming, just gotta work around the rain and work itself.
im hoping to have this done this coming Tuesday but maybe possibly sooner, most likely it will hold me back till tuesday
i think thats the last thing i have to cut and weld before this thing is done anyway so the results are soon coming, just gotta work around the rain and work itself.
im hoping to have this done this coming Tuesday but maybe possibly sooner, most likely it will hold me back till tuesday