
Smittybilt XRC Rear Bumper & Tire Carrier Issues

Thread Starter
JK Freak
Joined: Jan 2011
Posts: 658
Likes: 0
From: Alexandria, VA
My first issue is with the tire carrier bracket. When installed the upper 3/8" x 1-3/4" bolt on the carrier spindle hits the bracket and prevents the carrier from opening:
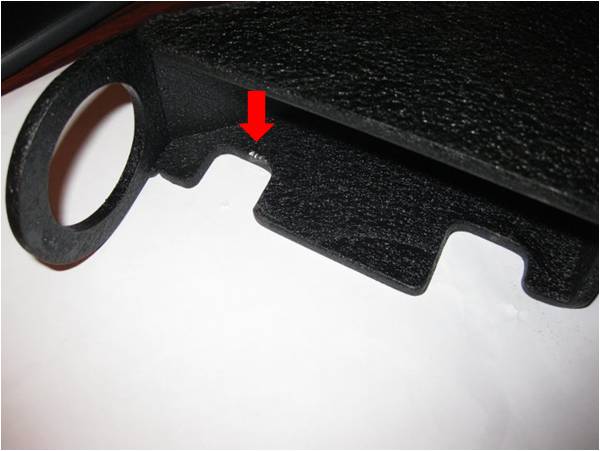
As seen in the picture, the lower notch is more recessed and does not hit. The only fix I can think of is to grind down the upper notch. Has anyone else had this problem? Maybe I'm doing something wrong?
The second issue is with the spare tire. The stock Rubicon wheel, which has 6 1/4" backspacing, does not seat against the mounting bracket. There is about a 1/2" gap when the tire is pressed against the carrier. I plan on buying spacers (i.e. washers) to fix this issue.
Another issue that others have with this bumper is with the right (passenger) side hitting the body when driving over bumps. It was suggested in other threads to install a body lift to fix this issue. I decided to try something a little less expensive:
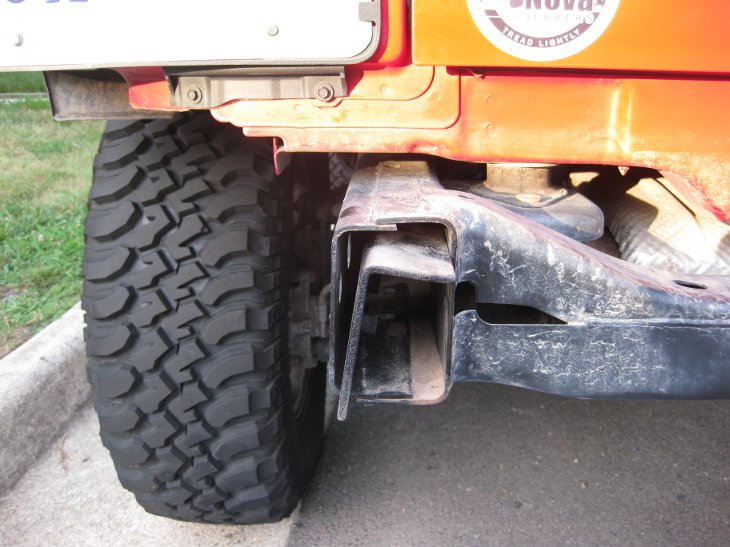
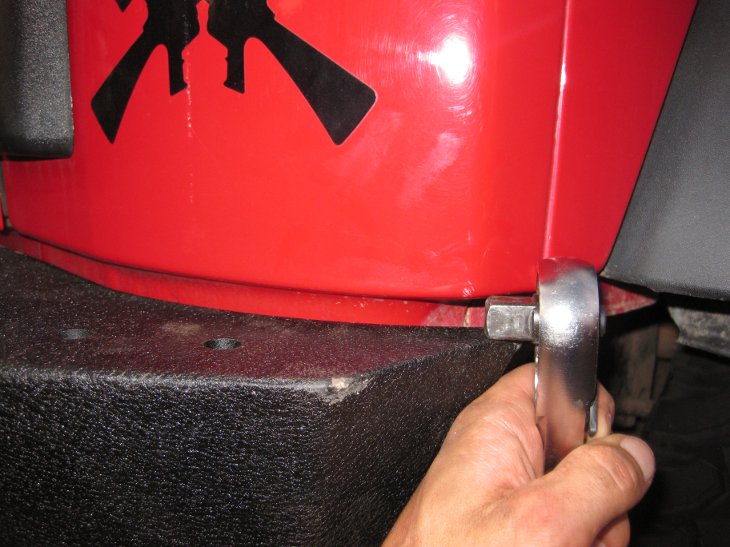
The first picture shows the mounting brackets inverted, which allows for mounting the bumper a little lower. The second picture shows about a 1/2" gap between the bumper and body (that is a 1/2" drive wrench). Previous to inverting the brackets, this gap was at most 1/4". If anyone decides to try this, you will have to completely remove the bumper in order to remove the brackets.
As seen in the picture, the lower notch is more recessed and does not hit. The only fix I can think of is to grind down the upper notch. Has anyone else had this problem? Maybe I'm doing something wrong?
The second issue is with the spare tire. The stock Rubicon wheel, which has 6 1/4" backspacing, does not seat against the mounting bracket. There is about a 1/2" gap when the tire is pressed against the carrier. I plan on buying spacers (i.e. washers) to fix this issue.
Another issue that others have with this bumper is with the right (passenger) side hitting the body when driving over bumps. It was suggested in other threads to install a body lift to fix this issue. I decided to try something a little less expensive:
The first picture shows the mounting brackets inverted, which allows for mounting the bumper a little lower. The second picture shows about a 1/2" gap between the bumper and body (that is a 1/2" drive wrench). Previous to inverting the brackets, this gap was at most 1/4". If anyone decides to try this, you will have to completely remove the bumper in order to remove the brackets.
Last edited by RedJK2; Jul 27, 2011 at 06:35 PM.

JK Enthusiast
Joined: Jun 2011
Posts: 241
Likes: 0
From: Manchester, NH
Thanks for the tip, I'm actually installing mine this weekend.
I did a test fit though, and wasn't able to figure out how to insert the 4 bolts in the middle above the hitch due to the location of the muffler on my 2011 JK.
Do you really need to remove the muffler, or am I missing an obvious way to insert those 4 center bolts?
As usual Smittybilt's directions are useless.

JK Junkie
Joined: May 2009
Posts: 3,093
Likes: 0
From: The Jersey Shore House
Mine used to hit I loosened it all up and used one Hell of a big pry bar to massage it down on the right side while my brother bolted it up then we did the same on the driver's side using a level to make sure it was even. This worked and it will only hit when I go over a huge hole or drop.
Thread Starter
JK Freak
Joined: Jan 2011
Posts: 658
Likes: 0
From: Alexandria, VA
Thanks for the tip, I'm actually installing mine this weekend.
I did a test fit though, and wasn't able to figure out how to insert the 4 bolts in the middle above the hitch due to the location of the muffler on my 2011 JK.
Do you really need to remove the muffler, or am I missing an obvious way to insert those 4 center bolts?
As usual Smittybilt's directions are useless.
I did a test fit though, and wasn't able to figure out how to insert the 4 bolts in the middle above the hitch due to the location of the muffler on my 2011 JK.
Do you really need to remove the muffler, or am I missing an obvious way to insert those 4 center bolts?
As usual Smittybilt's directions are useless.
JK Freak
Joined: Mar 2011
Posts: 522
Likes: 0
From: Linden, VA
I installed my rear XRC Rear Bumper and Tire Carrier about a year ago. Have had zero issues with install or use. Got a stool, picked up the bumper, rested it on my knees, used my "Ape Like Arms" to reach under and installed the 4 long bolts in the center. No muffler removal. Then bolted it to the frame rails.
Closer fit to body than I'd like, but no contact so far.
When mounting the tire and rim on the 3 studs on the tire carrier, you will need spacers or washers if using factory alloys with 6.25" back spacing. If using a 4.75" or less Back Spaced rim it mounts as it should.
Closer fit to body than I'd like, but no contact so far.
When mounting the tire and rim on the 3 studs on the tire carrier, you will need spacers or washers if using factory alloys with 6.25" back spacing. If using a 4.75" or less Back Spaced rim it mounts as it should.
Last edited by Zombie Hunter; Jul 27, 2011 at 07:12 PM.
Trending Topics
JK Enthusiast
Joined: Aug 2010
Posts: 415
Likes: 0
From: Kelowna, BC
I had the same contact issue with the right rear corner but since I installed the new bracket that smittybilt had in my kit it has not contacted. That being said it's still too close for comfort so I'm putting a BL on to permanently fix.
As far as the gap went I didn't even think of using spacers or washers. I had some 5/8" rubber used for the bottom of a box liner that I siliconed to the rack in between the tire and rack and it works beautifully. I think that may have been contributing to the flex and contact issue?
PS. I never had any issues with my muffler being in the way either on my 2010. They must have changed something on the 2011s.
