
Power inverter install with pics

Thread Starter
JK Enthusiast
Joined: Oct 2011
Posts: 349
Likes: 1
From: Tallahassee, Florida
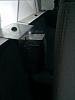
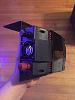
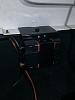
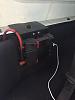
I wanted to install a small 400watt power inverter I picked up at Harbor Freight on sale. I could not find a good write up on hardwiring one and the cables that came with it were really to short to do anything with. I wanted to install it in a place with easy access, but one that was out of the way. I know a lot have installed them under the passenger seat, but was hesitant due to ventilation and possible water intrusion. So after some thought this was my solution. I decide to build a bracket and place it on the passenger side rail. Using the first hardtop bolt to mount it with. There is a nice flat spot that is the perfect size for this little inverter.
I went to Home Depot and bought a 1' x 1' piece of thin steel and some small bolts with nuts. I then stopped by a local stereo shop and purchased a amp install kit.
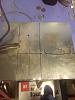
First I made my measurements for my backplate and bracket. Then used my dremel tool to cut and smooth any rough edges. Once that was done I took a punch and made my holes for my for the bolts. Then I ground the backside of the holes down smooth.
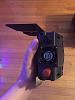
After this was complete I test fitted the inverter in the bracket and the bracket on the jeep. Everything seemed to fit real nice.

I then painted the bracket with some black rattle can. After it dried I added some hobby foam to the underside resting lip to protect the hardtop where it makes contact.

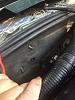
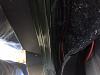
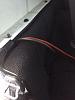
Next step was to run the cabling. I first gained access to inside the cab through the firewall behind the battery. It puts the cable out on the inside just behind the glove box. I then ran it down under the door trim and to the rear. Once near the back seat I zip tied it to the factory wire harness running along the same route.
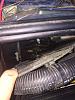

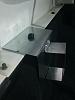
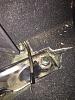
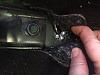
I ran the ground cable down behind the carpet and out by the rear seat bracket and grounded it there.
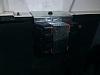
I mounted the inverter and bracket and cut my cables to the proper length. I also put a small cut in the carpet at the top so it would go back in place properly. Then terminated the ends and wrapped them with heat shrink.
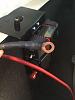
I replace the 80amp fuse that came with the kit with a 30amp fuse. Which should be the correct size for this inverter. Then lastly connected everything.
Thank you for looking.
I went to Home Depot and bought a 1' x 1' piece of thin steel and some small bolts with nuts. I then stopped by a local stereo shop and purchased a amp install kit.
First I made my measurements for my backplate and bracket. Then used my dremel tool to cut and smooth any rough edges. Once that was done I took a punch and made my holes for my for the bolts. Then I ground the backside of the holes down smooth.
After this was complete I test fitted the inverter in the bracket and the bracket on the jeep. Everything seemed to fit real nice.
I then painted the bracket with some black rattle can. After it dried I added some hobby foam to the underside resting lip to protect the hardtop where it makes contact.
Next step was to run the cabling. I first gained access to inside the cab through the firewall behind the battery. It puts the cable out on the inside just behind the glove box. I then ran it down under the door trim and to the rear. Once near the back seat I zip tied it to the factory wire harness running along the same route.
I ran the ground cable down behind the carpet and out by the rear seat bracket and grounded it there.
I mounted the inverter and bracket and cut my cables to the proper length. I also put a small cut in the carpet at the top so it would go back in place properly. Then terminated the ends and wrapped them with heat shrink.
I replace the 80amp fuse that came with the kit with a 30amp fuse. Which should be the correct size for this inverter. Then lastly connected everything.
Thank you for looking.
Last edited by Wolf_425; Jan 2, 2019 at 12:39 PM. Reason: spelling
Thread Starter
JK Enthusiast
Joined: Oct 2011
Posts: 349
Likes: 1
From: Tallahassee, Florida
Hey Blue, that would have been me. I used to work in southwood. Don't recall the jeep unfortunately, but good t hear from you. Are you a Memeber of Tallahassee jeep lovers on Facebook?
JK Freak
Joined: Aug 2007
Posts: 901
Likes: 1
From: Florida Hill Country (Tallahassee)
You mentioned it that day. I waited 3 weeks and couldn't remember the details. I was chasing down capital city keepers which seems defunct. Most of my runs the past 4 years have been in southern cumberlands in Tennessee.
Thread Starter
JK Enthusiast
Joined: Oct 2011
Posts: 349
Likes: 1
From: Tallahassee, Florida
I figured I probably had. I must have been out of cards that day. Well if you're on Facebook. Look it up. Join, say hello and post a pic of your jeep. I wasn't able to make it. But the just had a trail ride with a bonfire at the end Saturday night with 20+ jeeps and they did two Christmas light rides earlier in the week and collected toys for tots.
Trending Topics

JK Newbie
Joined: Apr 2016
Posts: 44
Likes: 0
From: Upstate New York
I was just thinking how I was going to do this and decided to look on here as I'm sure it has been done before. I wasn't expecting such a detailed step by step layout thought. you my friend are a hero.