Anyone replace a 3.8 intake manifold gasket? Tips?
 05-31-2013, 05:17 AM
#1
JK Super Freak
Thread Starter

Hey all -
Setting out to replace my long-block to intake manifold gasket tomorrow. Crossing T's and dotting I's...
If anyone has taken on this task - I have a few questions:
- How long did the repair take?
- Did you purchase a fuel line disconnect tool, make one, or improvise?
- Did you use any RTV around the coolant ports?
- Any tips/tricks or words of wisdom to pass along?
Thanks!
 05-31-2013, 07:07 AM
#2
JK Newbie
Join Date: Sep 2011
Location: Juneau, Alaska
Posts: 48
Likes: 0
Received 0 Likes
on
0 Posts
Took 3-4 hours I think. I used a fuel line removal tool and still fought with fuel line. Would defiantly have one. Only used rtv in corners as per instructions. No need to remove injectors. Also will need inch pound torque wrench.
These are some instructions I compiled from some where on the net. Wasn't a bad project. If your water pump leaks this would be a good time to replace.
These are some instructions I compiled from some where on the net. Wasn't a bad project. If your water pump leaks this would be a good time to replace.
Last edited by oneOone; 05-31-2013 at 07:14 AM.
05-31-2013, 07:32 AM
#3
JK Super Freak
Thread Starter
That is excellent info - Thank you!
From the instructions, it sounds like they only want you to put a dab of RTV up in the corners of the gasket - I assume to help hold it in place?
I did do my water pump already... When I got in there, the aluminum face that mates up with the gasket had corrosion so I used a thin coating of RTV to ensure a good seal. I'm assuming I'm going to see the same corrosion once I get into the intake too. I'm concerned that the new sheet metal gasket wont seal up that kind of imperfection - so as of now, I'm assuming I'll do a thin coating around the coolant ports.
May I ask what you did - and how things are holding up?
05-31-2013, 08:20 AM
#4
JK Newbie
Join Date: Sep 2011
Location: Juneau, Alaska
Posts: 48
Likes: 0
Received 0 Likes
on
0 Posts
I followed instructions, I also was tempted to use sealant on metal flange but resisted as the surfaces looked great.
Didn't need much coolant to refill.
Did mine about five or so months ago with no issues.
That's about all I can think of.
Didn't need much coolant to refill.
Did mine about five or so months ago with no issues.
That's about all I can think of.
06-03-2013, 06:04 AM
#7
JK Super Freak
Thread Starter
Got'er done this past Saturday. Not a job I want to do again 
Took me about 6-7 hours. Easily spent two hours just prepping surfaces once things were torn down - that was probably the most tedious and delicate part. I had lots of deposits built up on the heads and intake manifold mating surfaces; mostly around the coolant ports. Not to mention old, flaking, extremely-brittle stock gasket coating material. To make it more complicated, it's of course a "clean room" environment, so you can't be spreading dust and debris everywhere. Got the surfaces relatively smooth and clean, but they were still tarnished and not perfect, so I ended up using RTV around the coolant ports. Hoping that works out in my favor...
Took about an hour and a half to tear down - 2 or so to clean - and probably 2 to re-assemble. Things go together quickly once you get the lower manifold in place.
A few tips/tricks that I thought I could pass along:
- There is a metal tab at the rear of the intake manifold. It's bolted to the head or block. You cant simply lift the intake off, it must first slide forward a 1/2 or so, then lift off. (I thought something was still connected back there. Knowing what to do minimizes the amount of debris that can fall into the lifter valley and intake ports).
- No real special tools needed. 5/16" fuel line disconnect, deep 13mm, a few 3/8" extensions, and make sure you have appropriate 1/4" extensions for your inch/lb torque wrench. (I did not, and had to fake it).
- I found a shop vac to be extremely handy. Compressed air is handy to blow off debris from the outside of the intake manifold, before lifting it off.
- Like mentioned by oneOone - no need to remove the fuel rail or injectors. You can easily work around them.
- The single lower intake manifold gasket contains all the parts you need (besides RTV for the block-to-head joints). I had a moment of panic when I started pulling at the original gasket and found rubber seals tearing away under it. I didn't notice new ones them attached to the new sheet metal gasket.
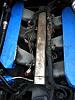
These are about the only two pics I got. About 133K miles on the motor.

Took me about 6-7 hours. Easily spent two hours just prepping surfaces once things were torn down - that was probably the most tedious and delicate part. I had lots of deposits built up on the heads and intake manifold mating surfaces; mostly around the coolant ports. Not to mention old, flaking, extremely-brittle stock gasket coating material. To make it more complicated, it's of course a "clean room" environment, so you can't be spreading dust and debris everywhere. Got the surfaces relatively smooth and clean, but they were still tarnished and not perfect, so I ended up using RTV around the coolant ports. Hoping that works out in my favor...
Took about an hour and a half to tear down - 2 or so to clean - and probably 2 to re-assemble. Things go together quickly once you get the lower manifold in place.
A few tips/tricks that I thought I could pass along:
- There is a metal tab at the rear of the intake manifold. It's bolted to the head or block. You cant simply lift the intake off, it must first slide forward a 1/2 or so, then lift off. (I thought something was still connected back there. Knowing what to do minimizes the amount of debris that can fall into the lifter valley and intake ports).
- No real special tools needed. 5/16" fuel line disconnect, deep 13mm, a few 3/8" extensions, and make sure you have appropriate 1/4" extensions for your inch/lb torque wrench. (I did not, and had to fake it).
- I found a shop vac to be extremely handy. Compressed air is handy to blow off debris from the outside of the intake manifold, before lifting it off.
- Like mentioned by oneOone - no need to remove the fuel rail or injectors. You can easily work around them.
- The single lower intake manifold gasket contains all the parts you need (besides RTV for the block-to-head joints). I had a moment of panic when I started pulling at the original gasket and found rubber seals tearing away under it. I didn't notice new ones them attached to the new sheet metal gasket.
These are about the only two pics I got. About 133K miles on the motor.
Trending Topics
06-03-2013, 06:17 AM
#8
JK Super Freak
Thread Starter
Ps: The intake ports on the factory 3.8 heads are 'huge'. Can't help but think that a lot of low end power could be gained with well designed, smaller ports. Factory ports looked like 230+cc.
One more note - I did not find a whole lot of intake deposits that a lot of people worry about. The worse is by far in the upper intake and back of throttle body. Next is the lower, but it's more of an oily film. Cylinder ports hardly had anything and the tops of the valves and the guide bosses were literally clean steel and aluminum.
I have never run any cleaners through the engine. I did run a catch can for about 6 months year last year, but it's been off since. I try to stick to Sunoco fuel. (What I am trying to say is that I dont do anything fancy for my motor).
Personally I would not bother with any intake cleaning methods outside of making sure the throttle body blade is not getting blocked by deposits.
Last edited by yo_marc; 06-03-2013 at 06:19 AM.
12-19-2014, 06:48 PM
#10
JK Newbie
Join Date: Jun 2011
Location: Charleston, WV
Posts: 38
Likes: 0
Received 0 Likes
on
0 Posts
I know this is a old thread but I'm attempting this project now and I'm struggling to get the two connections loose on top of the gas tank to get the pressure out of the line.