Differential diagram
 09-09-2017, 03:37 PM
#1
JK Enthusiast
Thread Starter

Join Date: Dec 2010
Location: CenCal
Posts: 109
Likes: 0
Received 0 Likes
on
0 Posts
Ive done some searches and had some conflicting diagrams. I also found some diagrams on some online sales for factory parts. I see on these drawings that on the 2008 model the pinion shim is under the crush sleeve, and on the 2009 the shim is under the inner pinion bearing. 
And on the diff, the shim goes on before the carrier bearings. Ive read on some threads on here that the carrier bearings are installed first and then installed into the housing then add shim where necessary. So Ive been pretty confused and ill be tackling an ARB locker install in a few weeks. Just doing my research beforehand and I also have a 2008 factory manual which has the carrier shims on before the bearings.
Can anyone that has done an ARB locker or regear install (if there is any difference on install) lead me on the right track?

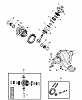
And on the diff, the shim goes on before the carrier bearings. Ive read on some threads on here that the carrier bearings are installed first and then installed into the housing then add shim where necessary.
So Ive been pretty confused and ill be tackling an ARB locker install in a few weeks. Just doing my research beforehand and I also have a 2008 factory manual which has the carrier shims on before the bearings.Can anyone that has done an ARB locker or regear install (if there is any difference on install) lead me on the right track?
 09-10-2017, 10:30 AM
#3
JK Enthusiast
Thread Starter
Join Date: Dec 2010
Location: CenCal
Posts: 109
Likes: 0
Received 0 Likes
on
0 Posts
When setting up pinion depth and backlash, I made a dummy inner and outer pinion bearing by taking off just enough for them to slide on and off, but what are you guys using in place of the crush sleeve? Will I be able to use the new oil slinger and baffle? I don't have the old stuff as I'm installing the ARB lockers, ring and pinion and overhaul kit all new into a front prorock 44.
09-11-2017, 08:10 PM
#6
JK Newbie

Join Date: Aug 2017
Location: Dixon, CA
Posts: 14
Likes: 0
Received 0 Likes
on
0 Posts
FoeDoe,
I'm new here, but it doesn't seem like you are getting your all of your answers. It sounds like you have the concept for making set up bearings for both the pinion shaft and the carrier for set up......and then heat, or press, on the good bearings for final assembly after you have everything set up, which means you are going to use the trail & error method for setting up backlash and tooth pattern, which is fine, just be patient. Measure your old shim packs and try and duplicate them or use some of them to give you a starting point.
When you are setting up a differential this way, leave the crush sleeve out and don't install the pinion seal yet. Hopefully you have an the old lock nut & washer for the pinion yoke and just tighten it enough to duplicate the specified pinion preload (rotating torque to turn the pinion), you can tighten or loosen the nut to get the preload close without the crush washer. Then set in your carrier, try to get close to the proper carrier preload (no clearance to a slight preload for set up, but you will need to have the proper preload on the carrier bearings for final assembly), then set up your ring gear backlash, and check your tooth pattern after you have the backlash set to spec. Use your service manual or find pictures of a proper tooth pattern, I could try to explain it but a picture is worth 1000 words. You are trying get the pinion centered in the sweet spot of the ring gear. The service manual will give you advise of which way the pinion will need to go. This may take you several tries, so don't get frustrated. Once you have everything perfect, then install the good inner pinion bearing cone with your shim pack you set up, slide it up into the housing, drop your new crush sleeve onto the pinion, then your new outer bearing can be installed on the pinion, it isn't as tight a press fit as the inner bearing, but may take a slight tapping with a hammer & punch to get it started onto the pinion, set your oil slinger on, drive your seal into the housing, slide your yoke onto the pinion, and then your pinion washer and lock nut. Spead some RTV sealant on the yoke splines before you slide it on, and if you aren't using a new pinion lock nut, use a good amount of loc-tite on the threads. Then torque the lock nut down to the initial torque and check your rotating torque on the pinion for the proper preload. I've always found that it takes more then the specified torque on the pinion nut to get the crush sleeve to crush down enough to get the proper rolling torque on the pinion. I usually use my old CP 3/4" gun, pit a mark on the socket, and a mark on the pinion, and rattle the nut down a very small amount of movement at a time until I get the right amount of rotating torque on the pinion for proper preload. If you go too much on the crush sleeve, you are screwed and need to pull it apart and throw that sleeve in the trash and start again with a new crush sleeve.....Don't try and just back the nut up, you'll be sorry, just buck it up and put a new crush sleeve on and start again.
As far as parts pictures go, don't always take them for gospel on how to assemble something. Usually the assembly & disassembly sections of the service manual give you a better direction of how parts go together and just look at your differential parts as you tear it down and take note where the shims are located, everything will make sense as you tear it down. The older dana/spicer axles on CJ's usually had the pinion locating shims under the inner bearing cup inside the axle housing. I just changed both of my 44 gear sets from 3.73 to 4.56 gears on my 2015 Rubicon and I found the pinion locating shims under the inner bearing cone on the pinion itself. The older dana/spicer axles used shims between the outer bearing and pinion shoulder to set the pinion preload or rotating torque and no crush sleeve, which is a stronger design in my opinion. You can buy crush sleeve elimination kits that change the pinion over to a solid sleeve and shims to set preload. I didn't go that route, I didn't think I was going to be hard enough on my jeep to make the crush sleeves give up the ghost. Hopefully I didn't go too far here, I was just trying to help someone here, like I've been helped......just gleaning all the information off this forum to help me set up my JK.
Regards, Mike
Trending Topics
09-12-2017, 06:49 AM
#8
JK Enthusiast
Thread Starter
Join Date: Dec 2010
Location: CenCal
Posts: 109
Likes: 0
Received 0 Likes
on
0 Posts
CJ3,
YES!!! That's the answers I'm looking for. The thing is, I'm not doing tear down on my d30. I'm just going to take the knuckles and brake rotors off of the d30. I'm starting fresh with a new prorock44 housing, ARB lockers, and ring/pinion. I get that installing the carrier bearings onto the diff first then install them into the housing without shims and get the initial measurements from side to side. As for the pinion, I didn't get what to use to replace the crush sleeve, but you made it clear I can just leave that out and still can achieve the preload. At this point early in the setup, does pinion preload matter yet? As I understand, preload you have to achieve all at the end first with pinion preload, and then carrier preload added to pinion preload right?
YES!!! That's the answers I'm looking for. The thing is, I'm not doing tear down on my d30. I'm just going to take the knuckles and brake rotors off of the d30. I'm starting fresh with a new prorock44 housing, ARB lockers, and ring/pinion. I get that installing the carrier bearings onto the diff first then install them into the housing without shims and get the initial measurements from side to side. As for the pinion, I didn't get what to use to replace the crush sleeve, but you made it clear I can just leave that out and still can achieve the preload. At this point early in the setup, does pinion preload matter yet? As I understand, preload you have to achieve all at the end first with pinion preload, and then carrier preload added to pinion preload right?
09-12-2017, 07:59 AM
#9
JK Super Freak
Join Date: Apr 2008
Location: Thunder Bay, Ontario
Posts: 1,267
Likes: 0
Received 2 Likes
on
2 Posts
Just to get the proper pinion depth and run your initial ink pattern, you don't need to preload. Once you have completed the build, all the shims are in place, final ink Pattern is done then you can get your pinion preload with the NEW crush sleeve in place. You will need to have the diff back together to be able to apply the force it will take to Cush the sleeve and attain the preload.. Don't be in a rush with this stage you can very easily over torque the crush sleeve.
09-12-2017, 09:43 AM
#10
JK Newbie
Join Date: Aug 2017
Location: Dixon, CA
Posts: 14
Likes: 0
Received 0 Likes
on
0 Posts
I agree with jtphotoJK also, you don't need any preload yet on the pinion to set up backlash and tooth pattern. It just had to be tight enough that there is no play in it. I usually snug up the pinion yoke nut so a feel a little reseistance when rotating the pinion, but it only needs to be tight enough so there is no play in it. You are really starting blind with all new parts and a new housing. There is tooling available to measure the centre of the carrier in relation ship to the pinion depth, but it is expensive and not worth buying for one job. You are going to have to wing it a bit and add some pinion locating shims to start with and then see what the tooth pattern tells you where to move the pinion. On the carrier preload, the book will give you overall rotating torque on both the pinion & carrier bearings, they will also give you a procedure to take all the side to side clearance and then add a certain amount of shim thickness to get the proper carrier bearing preload, you can see which one works best for you. You can use two feeler gauge sets on each side of the carrier bearings to come up with a starting shim pack for each side. You usually don't need an axle housing spreader for a 30 or 44 housing, the carrier should be able to be pried out with a pry bar, and there should be enough preload/side load on the races that you will need a dead blow type of soft mallet to tap them in on each side. The carrier should not just drop in loose and you should not have to beat the races in hard either. Hope this helps.