Notices
JK Show & Tell Whether they're just poser shots in your driveway or hardcore action shots on the trail, if you've got photos or videos of your Jeep JK Wrangler (or any JK for that matter that you think is worth showing off, inside or out), we want to see them so please post them here! Likewise, if you are wanting to see a photo of something specific like an aftermarket JK part or poser shot with a specific setup, this is the place to ask for it.

Homemade show off

Thread Tools
 
Old 01-21-2014, 08:26 PM
  #61  
JK Jedi
 
Jersey_Devil's Avatar
 
Join Date: Jun 2012
Location: Bellmawr, NJ
Posts: 5,255
Received 10 Likes on 9 Posts
Default

Originally Posted by outlaw26
Home built bumper
Wow! Now that's nice!!!

Sent from my obama monitoring device
Old 01-22-2014, 12:11 AM
  #62  
JK Freak
 
AaronJK's Avatar
 
Join Date: Apr 2011
Location: Pottstown, pa
Posts: 631
Likes: 0
Received 0 Likes on 0 Posts
Default

Ok, I'll play.
Click image for larger version

Name:	uploadfromtaptalk1390381481288.jpg
Views:	2345
Size:	66.3 KB
ID:	525494
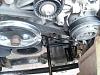
York compressor mount.
Click image for larger version

Name:	uploadfromtaptalk1390381520841.jpg
Views:	2075
Size:	42.7 KB
ID:	525495
Compressor installed.
Click image for larger version

Name:	uploadfromtaptalk1390381580255.jpg
Views:	1992
Size:	66.7 KB
ID:	525496
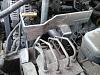
Mount for the air manifold and coalescing filter.
Click image for larger version

Name:	uploadfromtaptalk1390381838606.jpg
Views:	1722
Size:	29.9 KB
ID:	525497
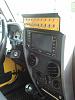
My upper dash panel.
Click image for larger version

Name:	uploadfromtaptalk1390381885243.jpg
Views:	1517
Size:	67.9 KB
ID:	525498
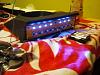
Another shot from testing the leds.
Old 01-22-2014, 05:08 AM
  #63  
JK Enthusiast
 
JW JK's Avatar
 
Join Date: Apr 2013
Location: Idaho
Posts: 118
Likes: 0
Received 0 Likes on 0 Posts
Default

How did you make that dash panel? I like the idea of having all the switches there.
Old 01-22-2014, 06:17 AM
  #64  
JK Freak
 
AaronJK's Avatar
 
Join Date: Apr 2011
Location: Pottstown, pa
Posts: 631
Likes: 0
Received 0 Likes on 0 Posts
Default

Originally Posted by JW JK
How did you make that dash panel? I like the idea of having all the switches there.
First I traced the profile of the stock panel.
Then I moved it up the height I needed for my switch panel.
Next I cut the profile out of a cheap plastic cutting board twice. I bolted them together and made them the exact same shape using a sanding block.
Measure the width of the stock panel and create spacers so you can clamp them together to epoxy them to the stock panel.
Make some tabs or a frame to attach the switch plate to. I used a piece of copper supply pipe from a sink to match the original profile. Epoxy/screw the pipe in place across the front and shape the sides to match.
I used a small plastic bowel to make the bin on top. Make sure you place it so the switch bodies and WIRES have room inside the panel. You'll probably have to cut some pieces of the factory panel to make everything fit. Once everything is together, smooth and shaped to your liking get some pantyhose and stretch it over the frame you made. Make it tight and then use super glue to attach the pantyhose to the frame.
Next step is to coat it with fiberglass resin. I didn't use any actual fiberglass, just resin and pantyhose. You can use the fiberglass mat if you want. Put multiple coats on, sand it smooth as you can, fill with binding, sand again, then paint with Rustoleum truck bed coating our whatever paint you want. Light colors will reflect on the windshield.
Good luck if you try it, it's not to hard, just alot of trial and error.
Old 01-27-2014, 05:13 PM
  #65  
JK Newbie
 
outlaw26's Avatar
 
Join Date: Sep 2012
Location: louisiana
Posts: 86
Likes: 0
Received 0 Likes on 0 Posts
Default

A little side protecton
Attached Thumbnails Click image for larger version

Name:	ForumRunner_20140127_201127.jpg
Views:	535
Size:	40.1 KB
ID:	526906   Click image for larger version

Name:	ForumRunner_20140127_201139.jpg
Views:	560
Size:	28.3 KB
ID:	526907   Click image for larger version

Name:	ForumRunner_20140127_201150.jpg
Views:	668
Size:	24.9 KB
ID:	526908  
Old 01-30-2015, 10:53 PM
  #66  
JK Enthusiast
 
USMC Wrangler's Avatar
 
Join Date: Jul 2013
Location: West Texas
Posts: 217
Likes: 0
Received 0 Likes on 0 Posts
Default Bump!!!

So, in a year, no one has anymore DIY/homebrew stuff?
Old 01-31-2015, 08:21 AM
  #67  
JK Super Freak
 
kaptkrappy's Avatar
 
Join Date: Aug 2011
Location: Punta Gorda, FL.
Posts: 1,220
Likes: 0
Received 1 Like on 1 Post
Default

I made these,

Front bumper
Click image for larger version

Name:	Front Bumper Done 2.jpg
Views:	956
Size:	67.7 KB
ID:	594547Click image for larger version

Name:	Front Bumper Done 1.jpg
Views:	848
Size:	41.4 KB
ID:	594548

Rear bumper
Click image for larger version

Name:	Finish Grinding 1.jpg
Views:	880
Size:	60.0 KB
ID:	594551Click image for larger version

Name:	Done 1.jpg
Views:	889
Size:	34.8 KB
ID:	594552


.
Old 01-31-2015, 11:10 AM
  #68  
JK Junkie
 
D_engel's Avatar
 
Join Date: Sep 2010
Location: Tempe AZ
Posts: 2,539
Likes: 0
Received 2 Likes on 2 Posts
Default

That rear bumper came out great
Old 01-31-2015, 11:17 AM
  #69  
JK Enthusiast
 
USMC Wrangler's Avatar
 
Join Date: Jul 2013
Location: West Texas
Posts: 217
Likes: 0
Received 0 Likes on 0 Posts
Default

Both look great Kapt! I'm starting my tube doors Monday and have a build thread started. I hope to contribute on this thread soon...
Old 02-01-2015, 07:37 PM
  #70  
JK Newbie
 
greenmachine6907's Avatar
 
Join Date: Nov 2012
Location: Chesapeake, VA
Posts: 8
Likes: 0
Received 0 Likes on 0 Posts
Default

Click image for larger version

Name:	image-1869759734.jpg
Views:	802
Size:	44.8 KB
ID:	594902

Homemade bumper. The stinger is the Rough Country stinger that we welded on though.


Quick Reply: Homemade show off


All times are GMT -8. The time now is 03:56 AM.