Looking for a Hood Lock?
 02-02-2012, 04:24 PM
#1
JK Enthusiast
Thread Starter
Join Date: Mar 2011
Location: TN
Posts: 191
Likes: 0
Received 0 Likes
on
0 Posts
Well, I'm looking for a hood lock for my 2011 rubi now. I bought the mopar one, but it will not work with the RIPP intercooler. Any suggestions would be appreciated. Thanks
 02-02-2012, 04:34 PM
#2
JK Freak
Center of the hood locks will all have that issue with Ripp. I have that lock and had to get a different oilcooler that would fit in the space left over. There maybe a lock set that attaches the side clamps down with a key.
 02-04-2012, 11:50 AM
#6
JK Enthusiast
Join Date: Sep 2011
Location: Quitman, Texas
Posts: 243
Likes: 0
Received 0 Likes
on
0 Posts
Hood Lock Mod For RIPP Supercharger Cooler
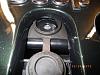
If you had one of the hood locks on your jeep before installing the supercharger you find that it no longer fits above the cooler. The housing and lock lever needs to be cut down by approximately one-half inch.
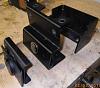
1) Start by disassembling the lock mechanism. Drill out the four �� pop rivets. Two are located on the front and two on the bottom. Remove the lock assembly from the front piece as well.
2) Remove the front grill to gain access to the cooler brackets. Remove the SC cooler brackets. You will no longer need them.
Scribe Line
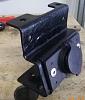
3) Install the front plate of the lock assembly and measure from the bottom of top plate to the top of the cross member. The gap should measure about ��. This measurement will be how much will need to taken out of the vertical run of the bracket below the attachment holes.
4) Scribe a line 1/4� below the bottom edge of the mounting holes and cut below the line.

5) Bracket cut below mounting holes. Second scribe line amount that needs to be removed from previous measurement. In my case it was ��. Cut the bracket along the second scribe line to remove the distance needed.
If you had one of the hood locks on your jeep before installing the supercharger you find that it no longer fits above the cooler. The housing and lock lever needs to be cut down by approximately one-half inch.
1) Start by disassembling the lock mechanism. Drill out the four �� pop rivets. Two are located on the front and two on the bottom. Remove the lock assembly from the front piece as well.
2) Remove the front grill to gain access to the cooler brackets. Remove the SC cooler brackets. You will no longer need them.
Scribe Line
3) Install the front plate of the lock assembly and measure from the bottom of top plate to the top of the cross member. The gap should measure about ��. This measurement will be how much will need to taken out of the vertical run of the bracket below the attachment holes.
4) Scribe a line 1/4� below the bottom edge of the mounting holes and cut below the line.
5) Bracket cut below mounting holes. Second scribe line amount that needs to be removed from previous measurement. In my case it was ��. Cut the bracket along the second scribe line to remove the distance needed.
02-04-2012, 11:59 AM
#7
JK Enthusiast
Join Date: Sep 2011
Location: Quitman, Texas
Posts: 243
Likes: 0
Received 0 Likes
on
0 Posts
Continued
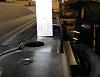
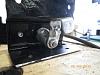
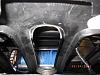
6) This is how the bracket should look before welding. Be sure to check the fit up of the bracket after placing a couple of tack welds on the bracket. If you did not take enough out it is easier to fix it now.
Bolt hole for cooler on bottom front edge
7) After welding put the bracket in place above the cooler and mark the placement for the bolt holes. You will need to grind the back side flush so the bracket will fit properly. Drill the two 3/8� holes in the bottom bracket for the cooler. Now you can paint the front bracket and put it back together. The front cover cannot be installed hanging from the top as pictured. I wasted a couple of pop rivets here and had to drill them back out. Since the lock mechanism has been raised the top edge of the lock is behind the grill. Make sure the cover flap folds up from the bottom.
Grind Edge flush for �� distance from each corner.
8) There is a backing plate on the back side that is installed when pop riveting the font two pieces together. The plate holds the nut in place on the lock cylinder and keeps it from backing off. The bottom edge of this plate protruding out needs to be ground back flush �� from each end so you can access the bolt heads to the top of the cooler.

9) Cut out �� of length out of the locking lever and weld back together. Make sure you match mark one side before cutting so you put it back together the right way.
6) This is how the bracket should look before welding. Be sure to check the fit up of the bracket after placing a couple of tack welds on the bracket. If you did not take enough out it is easier to fix it now.
Bolt hole for cooler on bottom front edge
7) After welding put the bracket in place above the cooler and mark the placement for the bolt holes. You will need to grind the back side flush so the bracket will fit properly. Drill the two 3/8� holes in the bottom bracket for the cooler. Now you can paint the front bracket and put it back together. The front cover cannot be installed hanging from the top as pictured. I wasted a couple of pop rivets here and had to drill them back out. Since the lock mechanism has been raised the top edge of the lock is behind the grill. Make sure the cover flap folds up from the bottom.
Grind Edge flush for �� distance from each corner.
8) There is a backing plate on the back side that is installed when pop riveting the font two pieces together. The plate holds the nut in place on the lock cylinder and keeps it from backing off. The bottom edge of this plate protruding out needs to be ground back flush �� from each end so you can access the bolt heads to the top of the cooler.
9) Cut out �� of length out of the locking lever and weld back together. Make sure you match mark one side before cutting so you put it back together the right way.
Trending Topics
02-04-2012, 12:03 PM
#8
JK Enthusiast
Join Date: Sep 2011
Location: Quitman, Texas
Posts: 243
Likes: 0
Received 0 Likes
on
0 Posts
Continued
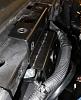
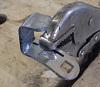
10) Install the lever on the back of the lock and install the front bracket on the vehicle. Install the bolts to the cooler before pop riveting the bracket to the cross member. As you can see from this picture I originally installed the cover folding from the top. It will not work this way.
11) The top edge of the lock is behind the grill. To get the cover to fit the grill will need to be modified slightly from behind.
12) Grind the top edge of the center slot back for access the lock cover. A rotary file works well for this. Just remember this is plastic so do not force the file or you will melt rather than cut the plastic.
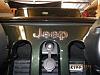
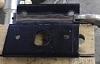
Complete install of lock assembly and ready to use. As you can see I did not install the back plate of the lock assembly. You can do this but it would have to be modified to fit. I just did not see where it was needed.
10) Install the lever on the back of the lock and install the front bracket on the vehicle. Install the bolts to the cooler before pop riveting the bracket to the cross member. As you can see from this picture I originally installed the cover folding from the top. It will not work this way.
11) The top edge of the lock is behind the grill. To get the cover to fit the grill will need to be modified slightly from behind.
12) Grind the top edge of the center slot back for access the lock cover. A rotary file works well for this. Just remember this is plastic so do not force the file or you will melt rather than cut the plastic.
Complete install of lock assembly and ready to use. As you can see I did not install the back plate of the lock assembly. You can do this but it would have to be modified to fit. I just did not see where it was needed.