Factory bumper removal

 01-14-2008, 02:13 PM
#23
JK Super Freak
It didn't take me 3 hours, and it didn't take me 20 minutes. However, after spending about an hour to get the first screw out cleanly, I decided a sharp-edged pry bar and a 2 1/2 lb mallet would make the job much easier. Plastic doesn't have much in the way of shear strength! Just knocked the back sides off. I don't think I spent more than 5 minutes on the plastic parts after that.
03-23-2008, 11:41 PM
#24
JK Newbie

Join Date: Feb 2008
Location: Brisbane, Australia
Posts: 10
Likes: 0
Received 0 Likes
on
0 Posts
Guys, Guys,
What is it with the pry bar? You may need the little blighters later.
You can see below both your problem and solution.
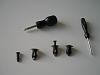
I found if you insert a slim Phillips screwdriver in front of the central core to the insert and push gently upward, while using the larger Phillips to just rotate the core, it just comes out easy. You may need a flat screwdriver to pop out the insert shell but with the central core gone, it is very easy. Simple and less violent.
You will need to get the electrical loom off the bumper. For that you need an edge cutter. Be careful to cut the push mount cable ties, that hold the loom in position, at the base and not cut the loom itself.
Have fun.
Bill
What is it with the pry bar? You may need the little blighters later.
You can see below both your problem and solution.
I found if you insert a slim Phillips screwdriver in front of the central core to the insert and push gently upward, while using the larger Phillips to just rotate the core, it just comes out easy. You may need a flat screwdriver to pop out the insert shell but with the central core gone, it is very easy. Simple and less violent.
You will need to get the electrical loom off the bumper. For that you need an edge cutter. Be careful to cut the push mount cable ties, that hold the loom in position, at the base and not cut the loom itself.
Have fun.
Bill
03-24-2008, 12:18 AM
#25
JK Newbie
Join Date: Feb 2008
Location: Brisbane, Australia
Posts: 10
Likes: 0
Received 0 Likes
on
0 Posts
Thanks to Piginajeep for his write up. However, the plastic bumper that I had has a different construction from his. I do not know if this is an export thing or not.
Anyway, there are four, not two, plastic push pins holding the applique in position. Thus, step 3 in the Mopar instructions were incorrect with my bumper. The plastic applique is not flat but has two wings that go up at each end and that is where the two hidden pins are. They are very difficult to remove, so I did not try.
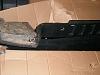
You still need to remove the two central pins but apart from a "Mopar Moment" calling curses down on the Muppet who came up with the idea of the hidden pins, I just got on with it and removed the bumper without removing the applique.
Fun, this Jeep stuff! Ain't it?
Yours,
Bill
Anyway, there are four, not two, plastic push pins holding the applique in position. Thus, step 3 in the Mopar instructions were incorrect with my bumper. The plastic applique is not flat but has two wings that go up at each end and that is where the two hidden pins are. They are very difficult to remove, so I did not try.
You still need to remove the two central pins but apart from a "Mopar Moment" calling curses down on the Muppet who came up with the idea of the hidden pins, I just got on with it and removed the bumper without removing the applique.
Fun, this Jeep stuff! Ain't it?
Yours,
Bill
02-11-2009, 09:30 PM
#27
JK Freak
02-12-2009, 06:44 AM
#28
JK Newbie

Join Date: Jan 2009
Location: Santa Cruz de la Sierra, Bolivia
Posts: 9
Likes: 0
Received 0 Likes
on
0 Posts
Thanks Cesar, I have a TJ also, but my JK is arriving in two months. I just bought one in the US and have to wait for deliver to Bolivia (South America). I want to take all the nice things from my TJ and put it on the new JK
