My Homemade DIY JKU Tube Trail Doors Build
 01-11-2015, 06:58 PM
#1
JK Enthusiast
Thread Starter
Join Date: Jul 2013
Location: West Texas
Posts: 217
Likes: 0
Received 0 Likes
on
0 Posts
A buddy and I are taking a welding class and we get to pick our projects. I chose trail doors of course! Hopefully we will get started in the next few weeks. I plan on posting updates, but below is my part list for now...
2013 Jeep Wrangler JKU tubular trail door material list
Materials
1" ID, schedule 40, black pipe - total length = 51 feet
1/2" ID,schedule 40, black pipe - total length = 1 foot, 6 inches
1/4" plate, 12" x 12" - total pieces this size = 4 (used for latches to attach to each door)
Already have 1/4" plate, 6" x 6" - total pieces this size = 2 (used for side view mirror plates on two front doors)
3/8"-16 x 3 3/4" hex head bolt, stainless steel 18/8 - total needed = 8 (two per door for hinges)
3/8"-16 lock nuts, stainless steel 18/8 - total needed = 8 (two per door for hinges)
3/8" flat washers, stainless steel 18/8 - total needed = 16 (four per door for hinges)
#10-24 machine screw, Phillips pan head, stainless steel 18/8 - total needed = 16 (four per door latch assembly)
#10-24 lock nuts, stainless steel 18/8 - total needed = 16 (four per door latch assembly)
#10 flat washers, stainless steel 18/8 - total needed = 32 (eight per door latch assembly)
Front Door
Top rail 38"
Center rail 38"
Bottom rail 85"
Support angle rail 12"
173" per front door = 14.42 feet or 28.84 feet for both front doors (so get 30 feet)
Rear Door
Top rail 30"
Center rail 25"
Bottom rail 66"
121" per rear door = 10.08 feet or 20.16 feet for both front doors (so get 21 feet)
Door Latches
One pair Rugged Ridge latches - need two sets (one pair on hand now)
http://smile.amazon.com/gp/product/B...?ie=UTF8&psc=1
Door Limiter Straps
Front
http://www.jeep4x4center.com/warrior...-war90798.html
Rear
http://www.jeep4x4center.com/warrior...-war90799.html
Mirrors
http://www.jeep4x4center.com/rugged-...-11025-12.html
Bed-liner/Paint
Still deciding on this, but definitely black

 01-23-2015, 02:13 AM
#5
JK Enthusiast
Thread Starter
Join Date: Jul 2013
Location: West Texas
Posts: 217
Likes: 0
Received 0 Likes
on
0 Posts
Pictures to come...The roller dies on the pipe bender were too big during the test bend. It left dimples in the material, so waiting on replacement rollers. But it wasn't a total wasted day. I made templates for both sets of doors instead of simply going off measurements and running to the Jeep every few minutes to check fit. All that was on hand was black poster board and a pencil. I took pics but the lines don't show. It's been a good learning experience and I promise to post some shots when there is something exciting to see.
01-23-2015, 03:44 AM
#6
JK Junkie
 01-23-2015, 03:55 PM
#7
JK Newbie

Join Date: Dec 2014
Location: Southgate, MI
Posts: 25
Likes: 0
Received 0 Likes
on
0 Posts
Some guys who use Poo pipe (sched 40) and the harbor freight pipe benders will fill the pipe with sand prior to bending. Apparently it keeps the pipe from dimpling and crimping at the pressure points, looks more like a mandrel bend.
I'm not sure if that's something feasible for your, or if you're using that set up though. If so, it might be worth a shot. A little more work for a lot better look.
I'm not sure if that's something feasible for your, or if you're using that set up though. If so, it might be worth a shot. A little more work for a lot better look.
Trending Topics
02-01-2015, 04:49 PM
#8
JK Enthusiast
Thread Starter
Join Date: Jul 2013
Location: West Texas
Posts: 217
Likes: 0
Received 0 Likes
on
0 Posts
Some guys who use Poo pipe (sched 40) and the harbor freight pipe benders will fill the pipe with sand prior to bending. Apparently it keeps the pipe from dimpling and crimping at the pressure points, looks more like a mandrel bend.
I'm not sure if that's something feasible for your, or if you're using that set up though. If so, it might be worth a shot. A little more work for a lot better look.
I'm not sure if that's something feasible for your, or if you're using that set up though. If so, it might be worth a shot. A little more work for a lot better look.
02-01-2015, 05:09 PM
#9
JK Enthusiast
Thread Starter
Join Date: Jul 2013
Location: West Texas
Posts: 217
Likes: 0
Received 0 Likes
on
0 Posts
First, I couldn't find the two roller dies that would fit the 1" ID pipe without paying an arm and a leg. In hindsight I wish I would have paid more for a horizontal bender, especially now that I have more projects bouncing around in my head.
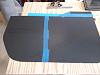
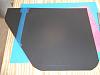
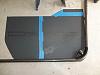
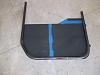
These are the templates I made from poster board. I know it's hard to see my lines against the black poster, buts it's what I had and works in person. I pulled the doors and taped the poster board to the jeep. I traced the opening and just kept trimming with a razor knife until I liked the fit. What I could've done is laid the poster board over the exterior skin and worked from there too. I don't know if either would be less time consuming than the other.
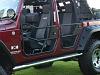
This is the style I decided on after reading lots of reviews and staring at 100's of Google images...
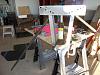
This is the Harbor Freight bender I am using. I noticed if I kept the rollers where they are in this picture, I didn't see any dimples.
Here's my first front door bend that's not quite there...
And the finished lower section...
I'm no rocket scientist so I couldn't start the bends in the right place to keep the lower section all one piece, but I knew I was farther out than needed (I would rather trim a bit than be too short). So I had to cut on the lower flat to make sure fit would be good.
Hopefully, more pics to follow after tomorrow's class.
These are the templates I made from poster board. I know it's hard to see my lines against the black poster, buts it's what I had and works in person. I pulled the doors and taped the poster board to the jeep. I traced the opening and just kept trimming with a razor knife until I liked the fit. What I could've done is laid the poster board over the exterior skin and worked from there too. I don't know if either would be less time consuming than the other.
This is the style I decided on after reading lots of reviews and staring at 100's of Google images...
This is the Harbor Freight bender I am using. I noticed if I kept the rollers where they are in this picture, I didn't see any dimples.
Here's my first front door bend that's not quite there...
And the finished lower section...
I'm no rocket scientist so I couldn't start the bends in the right place to keep the lower section all one piece, but I knew I was farther out than needed (I would rather trim a bit than be too short). So I had to cut on the lower flat to make sure fit would be good.
Hopefully, more pics to follow after tomorrow's class.
Last edited by USMC Wrangler; 02-06-2015 at 08:10 AM.