Rear a/c write up: Overheated gage (not gauge)
 07-18-2015, 05:37 PM
#1
JK Enthusiast
Thread Starter
Join Date: Oct 2011
Location: Sioux Center, IA
Posts: 209
Likes: 0
Received 0 Likes
on
0 Posts
So about 14 months ago, I became a dad for the first time. My wife and I love Moab, but haven't taken our son (Gage) yet. He does however, go with me everywhere. He loves the big tires and bumpy ride and I can't wait til he gets to play outside more! So a week ago, we went for a drive and after 30 min I looked back and saw he was really flushed and hot. I had the A/C maxed, but he was way too hot in his rear facing passenger side car seat. I stripped him down to his diaper and we went back home. I felt bad and my wife said I can't take him in the Jeep when it's hot outside. So I thought.
I've read threads about people using the A/C vent to heat and cool beverages and I even have heated up his bottle in the front A/C vent. I figured there should be a way for me to use some tubing to get the A/C back to him near his car seat. First I tried plain flexible duct vent (like off your dryer vent) but the air wasn't cool b/c it wasn't insulated. Then I tried the insulated flexible duct vent, but it was too big to go over the speaker bar and also was insulated with itchy fiberglass. So I bought up a bunch of PVC pipe and bends and started thinking. What follows is my contribution:

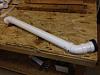
It's a PVC pipe that extends from the front passenger side A/C vent, up over the sound bar and drops just over the rear of the sound bar where my son's car seat sits. The rest of this thread is how to build one and what my dimensions are.
I've read threads about people using the A/C vent to heat and cool beverages and I even have heated up his bottle in the front A/C vent. I figured there should be a way for me to use some tubing to get the A/C back to him near his car seat. First I tried plain flexible duct vent (like off your dryer vent) but the air wasn't cool b/c it wasn't insulated. Then I tried the insulated flexible duct vent, but it was too big to go over the speaker bar and also was insulated with itchy fiberglass. So I bought up a bunch of PVC pipe and bends and started thinking. What follows is my contribution:
It's a PVC pipe that extends from the front passenger side A/C vent, up over the sound bar and drops just over the rear of the sound bar where my son's car seat sits. The rest of this thread is how to build one and what my dimensions are.
Last edited by JeepJeremy; 07-18-2015 at 05:53 PM.
 07-18-2015, 06:12 PM
#2
JK Enthusiast
Thread Starter
Join Date: Oct 2011
Location: Sioux Center, IA
Posts: 209
Likes: 0
Received 0 Likes
on
0 Posts
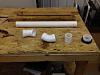
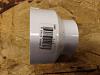
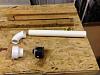
This is made mostly of 2 inch PVC, 2 45 degree PVC bends (2"), 1 90 degree PVC elbow (2"), a 3" to 2" reducer, a 2" coupler, and a very short (1/4") piece of 3" PVC. I also used some 3/4" wide by 3/8" thick closed cell rubber foam strips like used around window A/C or some door seals.
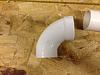
First, we'll start where the PVC attaches to the A/C vent.

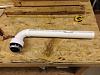
Here is the front half of the piece removed from the Jeep.
And here's what the pieces look like before they're glued.
First, you start with a 2" PVC coupler. Mine measured 1 5/8" long and the recess that the PVC slips into was 3/4" deep. In the picture above, it's in the lower right hand corner. You wrap a piece of the rubber foam around it to make the seal between the PVC and the inside diameter of the A/C vent. The fit is snug but not tight. The next piece is plain 2" PVC measuring 2 1/2". Next is a 45 degree (2") PVC bend. Followed by a 25" long piece of plain 2" PVC. Then another 45 degree (2") PVC bend. This completes the front half.
When you dry fit this part, you will need to jimmy the elbows so it fits right. The 45 degree bends weren't perfect to angle straight up to the roof and back. So I angled the 25" section out towards the passenger window and the second 45 degree bend actually touches the rollbar above the passengers right shoulder. Then the straight 21" PVC (2") piece that heads back over the soundbar actually angles back toward the middle of the back seat. It ends up working pretty well and the 2nd 45 degree bend is then resting against the rollbar for stability.
It looks like this:
First, we'll start where the PVC attaches to the A/C vent.
Here is the front half of the piece removed from the Jeep.
And here's what the pieces look like before they're glued.
First, you start with a 2" PVC coupler. Mine measured 1 5/8" long and the recess that the PVC slips into was 3/4" deep. In the picture above, it's in the lower right hand corner. You wrap a piece of the rubber foam around it to make the seal between the PVC and the inside diameter of the A/C vent. The fit is snug but not tight. The next piece is plain 2" PVC measuring 2 1/2". Next is a 45 degree (2") PVC bend. Followed by a 25" long piece of plain 2" PVC. Then another 45 degree (2") PVC bend. This completes the front half.
When you dry fit this part, you will need to jimmy the elbows so it fits right. The 45 degree bends weren't perfect to angle straight up to the roof and back. So I angled the 25" section out towards the passenger window and the second 45 degree bend actually touches the rollbar above the passengers right shoulder. Then the straight 21" PVC (2") piece that heads back over the soundbar actually angles back toward the middle of the back seat. It ends up working pretty well and the 2nd 45 degree bend is then resting against the rollbar for stability.
It looks like this:
Last edited by JeepJeremy; 07-19-2015 at 08:35 AM.
07-18-2015, 06:23 PM
#3
JK Enthusiast
Join Date: Mar 2015
Posts: 270
Likes: 0
Received 0 Likes
on
0 Posts
I definitely understand how you feel. I have a 14 month old and she sits in the middle though and is front facing. She sits in a Maxi-Cosi Pria 85 and it's an amazing car seat. And and with her in the middle she gets all the AC air flow straight to her. To a point in time where her hair is flying everywhere. Lol. So you should try putting your son in the middle and see how it's goes.
Sent from my iPhone using JK-Forum
Sent from my iPhone using JK-Forum
07-19-2015, 08:22 AM
#5
JK Enthusiast
Thread Starter
Join Date: Oct 2011
Location: Sioux Center, IA
Posts: 209
Likes: 0
Received 0 Likes
on
0 Posts
...Continued...
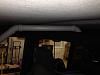
Now we'll do the back half. We'll start from carseat and move forward. Here's what it looks like:
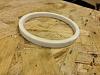
I want to retain the use of the vent that I removed from the dash so I could remove the PVC contraption and put the vent back whenever I wanted for ease. I found that the OE vent fit nicely into the 3" part of a 3" to 2" PVC reducer, but that it was sloppy and wouldn't stay in place. Therefore, I bought a short section of 3" PVC and cut off only 1/4" of it (very small) and slipped it into the 3" side of the reducer. See below:

...Continued...
Now we'll do the back half. We'll start from carseat and move forward. Here's what it looks like:
I want to retain the use of the vent that I removed from the dash so I could remove the PVC contraption and put the vent back whenever I wanted for ease. I found that the OE vent fit nicely into the 3" part of a 3" to 2" PVC reducer, but that it was sloppy and wouldn't stay in place. Therefore, I bought a short section of 3" PVC and cut off only 1/4" of it (very small) and slipped it into the 3" side of the reducer. See below:
...Continued...
Last edited by JeepJeremy; 07-19-2015 at 08:48 AM.
07-19-2015, 08:58 AM
#6
JK Enthusiast
Thread Starter
Join Date: Oct 2011
Location: Sioux Center, IA
Posts: 209
Likes: 0
Received 0 Likes
on
0 Posts
...Continued...
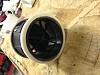
This then gives the inner part of the OE vent something to grab onto (where the OE vent has a thin strip of foam. It seats very well and can be easy to remove. I will probably still put a little tape on the seam to keep it from dropping on my son's head (depending on his mood). See pics:
This above picture is only for orientation. You'll want to seat the 3" PVC 1/4" ring into the 3" part of the reducer and leave it there.
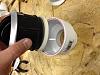
Now, continuing from the 2" side of the reducer, a 90 degree 2" PVC bend fits next. Do note that my 90 degree bend is straight PVC on one side and flanged on the other. This allowed my vent not to stick down too far.
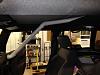
Lastly, a straight piece of 2" PVC measuring 21" connects to the 90 degree elbow and heads forward over the speaker bar connecting to the front half. Note: when you glue this contraption together, DO NOT glue this last joint!!! It will allow you to remove it easier in 2 sections. Here's what it looks like before gluing.
This then gives the inner part of the OE vent something to grab onto (where the OE vent has a thin strip of foam. It seats very well and can be easy to remove. I will probably still put a little tape on the seam to keep it from dropping on my son's head (depending on his mood). See pics:
This above picture is only for orientation. You'll want to seat the 3" PVC 1/4" ring into the 3" part of the reducer and leave it there.
Now, continuing from the 2" side of the reducer, a 90 degree 2" PVC bend fits next. Do note that my 90 degree bend is straight PVC on one side and flanged on the other. This allowed my vent not to stick down too far.
Lastly, a straight piece of 2" PVC measuring 21" connects to the 90 degree elbow and heads forward over the speaker bar connecting to the front half. Note: when you glue this contraption together, DO NOT glue this last joint!!! It will allow you to remove it easier in 2 sections. Here's what it looks like before gluing.
07-19-2015, 09:10 AM
#7
JK Enthusiast
Thread Starter
Join Date: Oct 2011
Location: Sioux Center, IA
Posts: 209
Likes: 0
Received 0 Likes
on
0 Posts
...Continued...
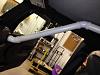
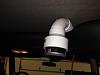
Finally, fit the whole mess in place and make reference marks for orientation of each joint so that you can glue it together outside of the jeep. Be sure that all the joints are well seated when dry so that you get all the angles right. Then glue all the pieces of the front together, and the back together and don't forget to leave the middle joint dry for easy removal. Then, after the glue is all set and dry you can reassemble it. I had my soft top on and the 2" PVC fit nicely between the soundbar and the underside of the soft top (including the soft top support bar). See below:
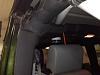
And there you go! Test the amount of A/C air coming through the vent with your A/C set on both dash and leg vents, and just dash vents. Also, you can open and close the other three dash vents depending on how much air your back seat needs. As before, you can twist and angle the OE vent so that it's not dumping directly on your rear seat passenger.
I usually don't have anyone riding shotgun when I take my son places, but even with this thing in place it's still possible. Though getting in and out on the passenger side is harder. Hope this helps somebody else or gives someone a laugh at fatherhood.
Finally, fit the whole mess in place and make reference marks for orientation of each joint so that you can glue it together outside of the jeep. Be sure that all the joints are well seated when dry so that you get all the angles right. Then glue all the pieces of the front together, and the back together and don't forget to leave the middle joint dry for easy removal. Then, after the glue is all set and dry you can reassemble it. I had my soft top on and the 2" PVC fit nicely between the soundbar and the underside of the soft top (including the soft top support bar). See below:
And there you go! Test the amount of A/C air coming through the vent with your A/C set on both dash and leg vents, and just dash vents. Also, you can open and close the other three dash vents depending on how much air your back seat needs. As before, you can twist and angle the OE vent so that it's not dumping directly on your rear seat passenger.
I usually don't have anyone riding shotgun when I take my son places, but even with this thing in place it's still possible. Though getting in and out on the passenger side is harder. Hope this helps somebody else or gives someone a laugh at fatherhood.
Trending Topics
07-19-2015, 09:12 AM
#8
JK Enthusiast
Thread Starter
Join Date: Oct 2011
Location: Sioux Center, IA
Posts: 209
Likes: 0
Received 0 Likes
on
0 Posts
I definitely understand how you feel. I have a 14 month old and she sits in the middle though and is front facing. She sits in a Maxi-Cosi Pria 85 and it's an amazing car seat. And and with her in the middle she gets all the AC air flow straight to her. To a point in time where her hair is flying everywhere. Lol. So you should try putting your son in the middle and see how it's goes.
Sent from my iPhone using JK-Forum
Sent from my iPhone using JK-Forum
07-22-2015, 10:33 AM
#9
JK Enthusiast
Join Date: Nov 2012
Location: Centereach, NY
Posts: 338
Likes: 0
Received 0 Likes
on
0 Posts
Awesome cencept!! I will have to poll all my children but they have been fine up until now. I have my 8 month old that is in his rear facing car seat in the middle row with my 16 year old, and my 3 and a half year old twins are in the third row. I did get rid of my soft top and went with a hard top and they said it is a little better in there.
07-23-2015, 10:16 AM
#10
There is a product called a "cool cop" a/c attachment. There are also attachments for k9 kennels in vehicles too. Flexible outdoor electrical conduit is a poor mans version of this. A better approach might be to attach some flex tube to the underside of the carseat and route the line beside the door jamb. Think air hockey table to keep the seat cool and breathing. Also, have you ever seen pvc shatter? If you were in a wreck it could become a frag grenade. Not likely, but still i would have issue. Concept is good though.