Rugged Ridge XHD Modular Snorkel
 01-20-2015, 07:03 PM
#1
JK Enthusiast
Thread Starter
Join Date: Nov 2013
Location: 16648, PA
Posts: 494
Likes: 0
Received 0 Likes
on
0 Posts
Well I know there are plenty of debates going on about the snorkel right now but I had been thinking about this particular one for about six months now. I installed mostly on my own, a buddy stepped in to help later, I'll explain below. This is my first write up so go easy on me.
First of all let me start by saying the included instructions are pretty good.
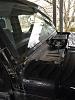
Start by pulling the windshield bracket, wipers and cowl. Be careful not to be a dumbass like myself and kneel on the cowl when climbing up to pull them stupid plastic push pins. You'll need a T30 and T40 Torx Bits and a 13 mm socket for the wipers.
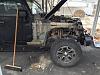
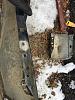
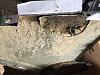
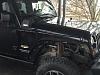
Next your going to need a 10 mm socket and wrench and a 13 mm socket. Start by removing whatever rail you have, mine you can see under the vehicle. Then remove the 10 mm bolts holding the fender on. If you have stock flares you'll have to remove these also. As you can see by the dirt I removed mine a while back, it's a bitch to clean up there! Once done, I did this alone, using a pair of grips or channel locks remove the radio coax while doing your best to support the fender.
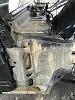
Once the fender is off you'll have to drill out the 4 spot welds and separate the cowl from the fender. Once drilled I used a putty knife to separate trying not to cause to much damage to either.
First of all let me start by saying the included instructions are pretty good.
Start by pulling the windshield bracket, wipers and cowl. Be careful not to be a dumbass like myself and kneel on the cowl when climbing up to pull them stupid plastic push pins. You'll need a T30 and T40 Torx Bits and a 13 mm socket for the wipers.
Next your going to need a 10 mm socket and wrench and a 13 mm socket. Start by removing whatever rail you have, mine you can see under the vehicle. Then remove the 10 mm bolts holding the fender on. If you have stock flares you'll have to remove these also. As you can see by the dirt I removed mine a while back, it's a bitch to clean up there! Once done, I did this alone, using a pair of grips or channel locks remove the radio coax while doing your best to support the fender.
Once the fender is off you'll have to drill out the 4 spot welds and separate the cowl from the fender. Once drilled I used a putty knife to separate trying not to cause to much damage to either.
Last edited by bevan7170; 01-24-2015 at 04:23 PM.
 01-20-2015, 07:33 PM
#2
JK Enthusiast
Thread Starter
Join Date: Nov 2013
Location: 16648, PA
Posts: 494
Likes: 0
Received 0 Likes
on
0 Posts
Once you have separated the fender and cowl you'll need to grab a tape measure and do the template thing! Measure it as per the instructions, if it's not right now is the time to fix it. Tape it on to the fender. The square cut out should line up with the square on the fender. Don't worry about the circular hole. I confirmed with a call to tech support, this hole is no longer relevant to the build. I used a dremel to do the cutting after marking the fender.
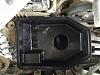
Pull the stock air box and get the stainless pipe put in place behind the front brake line bracket. Now you need to figure out your pipe lengths. Once happy get the sealant out and do as instructed!!! Don't forget to do the bolts in the air box too.

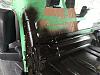
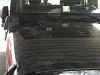
Next I taped up the corner of the windshield and plasti-dipped everything you see in the photo below. I did cover the bolt holes so as not to clog them up.
Pull the stock air box and get the stainless pipe put in place behind the front brake line bracket. Now you need to figure out your pipe lengths. Once happy get the sealant out and do as instructed!!! Don't forget to do the bolts in the air box too.
Next I taped up the corner of the windshield and plasti-dipped everything you see in the photo below. I did cover the bolt holes so as not to clog them up.
Last edited by bevan7170; 01-20-2015 at 07:57 PM.
01-20-2015, 07:49 PM
#3
JK Enthusiast
Thread Starter
Join Date: Nov 2013
Location: 16648, PA
Posts: 494
Likes: 0
Received 0 Likes
on
0 Posts
Well this is where I had a little trouble. Once I got the Z-Bracket on and dry fitted the snorkel section seen below I found it did not want to fit. This is where I needed help. But first I had to run to Home Depot. I got a M5x35mm bolts, 2 of them as the bolts supplied for securing to the Z-Bracket will fit but the longer bolts just made it easier. The fit was poor at best and I needed a wrecking bar to get up under the snorkel to push it up while pushing it back towards the windshield. Also lining the plate up under the snorkel was a pain in the ass. If it wasn't for my buddy I'd have smashed the shit out of it, truly frustrating.
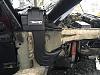
Once everything was bolted up good I found something else that didn't jive well for me. The Z-Bracket seems to sit lower, pulling the cowl down on the passenger side so it does not line up with the windshield. Putting my knee on it and bending it sure didn't help anything. Once I get some more free time I'm gonna straighten the sucker out and see if I can fit some spacers under the cowl to level it back out.
Once secured It was time to get the fender back on and the side rail. All in all not bad really. I had 6.5 hours in it, mostly on my own, I only had help for that one section. It I had to do it again I sure would do some things a little different but not a bad project. I haven't installed the high mount yet so cannot comment on that and there certainly isn't enough miles on it to comment about anything else. If you do decide to go this route and need anything just shoot me a PM.
And for my next project she'll get new oil and a soapy bath!
Last edited by bevan7170; 01-20-2015 at 07:59 PM.
02-12-2015, 04:04 PM
#4
JK Super Freak
Join Date: Feb 2009
Location: Pittsburgh, PA
Posts: 1,236
Likes: 0
Received 0 Likes
on
0 Posts
Thanks for doing the write up. Any suggestions for things you'd do differently? If I'm going to install one, I want to do it before I put my rock sliders on in the spring since they have nutserts in the fender that needs removed.
I haven't made the purchase yet but I've read the instructions 3 times now and man are there a lot of steps...
I haven't made the purchase yet but I've read the instructions 3 times now and man are there a lot of steps...
02-13-2015, 04:02 AM
#5
JK Enthusiast
Thread Starter
Join Date: Nov 2013
Location: 16648, PA
Posts: 494
Likes: 0
Received 0 Likes
on
0 Posts
There are a lot of steps. Most of the work is in the prep. Gather everything and just be patient. There really isn't anything I'd do different. Just be methodical about working through those instructions. There are a few steps you can skip, complete/prep something else and the come back. But I'd do it all again.
02-26-2015, 09:22 PM
#7
JK Enthusiast
Thread Starter
Join Date: Nov 2013
Location: 16648, PA
Posts: 494
Likes: 0
Received 0 Likes
on
0 Posts
Trending Topics
02-28-2015, 05:55 AM
#8
..I installed this snorkel on my 2010 ...
And didn't put any anti-seize on the bolts that attach the High mounted Snorkel to the base ...
Top bolt threads were corroded and the inserts are epoxied into the base ...taking them off the inserts just snapped and the bolts were just spinning ...RR sent me replacement parts ...
But taking the base off requires fender removal ...
fYI ...anti-seize all bolts .....
02-28-2015, 04:01 PM
#9
JK Enthusiast
Thread Starter
Join Date: Nov 2013
Location: 16648, PA
Posts: 494
Likes: 0
Received 0 Likes
on
0 Posts
..I installed this snorkel on my 2010 ... And didn't put any anti-seize on the bolts that attach the High mounted Snorkel to the base ... Top bolt threads were corroded and the inserts are epoxied into the base ...taking them off the inserts just snapped and the bolts were just spinning ...RR sent me replacement parts ... But taking the base off requires fender removal ... fYI ...anti-seize all bolts .....
03-01-2015, 04:24 AM
#10
JK Enthusiast
..I installed this snorkel on my 2010 ...
And didn't put any anti-seize on the bolts that attach the High mounted Snorkel to the base ...
Top bolt threads were corroded and the inserts are epoxied into the base ...taking them off the inserts just snapped and the bolts were just spinning ...RR sent me replacement parts ...
But taking the base off requires fender removal ...
fYI ...anti-seize all bolts .....
And didn't put any anti-seize on the bolts that attach the High mounted Snorkel to the base ...
Top bolt threads were corroded and the inserts are epoxied into the base ...taking them off the inserts just snapped and the bolts were just spinning ...RR sent me replacement parts ...
But taking the base off requires fender removal ...
fYI ...anti-seize all bolts .....