Stubby Front Bumper
 07-25-2014, 04:13 PM
#1
JK Newbie
Thread Starter

Join Date: Nov 2013
Location: Nixa, MO
Posts: 12
Likes: 0
Received 0 Likes
on
0 Posts
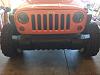
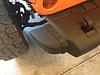
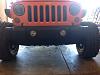
I just finished up this project based on info from another thread, it took me about 5 hours to cut, grind, trim and fit the pieces together then I coated it with a flexible bed liner coating.


Next the rear bumper!
Next the rear bumper!
 07-25-2014, 07:04 PM
#3
JK Newbie
Thread Starter
Join Date: Nov 2013
Location: Nixa, MO
Posts: 12
Likes: 0
Received 0 Likes
on
0 Posts
They are the factory ends, I just cut them down to fit inside the hollow part of the plastic bumper and bolted them in place. It's a cheap build, I have $14.00 in doing this project, $11.00 of it was for the Dupli-Color Bed Armor and the rest was for the screws to bolt it together.
I cut the bumper 2.25 inches from the edge of the bumper bulge then ground it down to a clean strait edge then I cut the ends that were cut off down to about 5 inches in length and trimmed them on a belt sander until they fit inside the main part of the plastic shell. My bumper was pretty faded so I chose to spray it with the bed liner to finish it off.
The tools I used were:
Sawzall (Borrowed from neighbor)
Angle grinder
Drill
Belt sander
80 and 180 grit sand paper
07-26-2014, 02:06 AM
#4
JK Enthusiast
Join Date: May 2013
Location: New york
Posts: 140
Likes: 0
Received 0 Likes
on
0 Posts
Awesome If I have time this weekend I'm gonna do it also, the spray makes it and I like this so much more than the bulky end caps you buy.
Thanks a lot I'll post it up here if I get it done this weekend
Thanks a lot I'll post it up here if I get it done this weekend
07-26-2014, 02:28 AM
#5
JK Freak

Join Date: Jul 2014
Location: Lake Metigoshe, North Dakota
Posts: 863
Likes: 0
Received 0 Likes
on
0 Posts
all the stock ends seem to do at stock length is collect mud.... and you spent more then $14! 5 hours of labor, mechanic work, so $20 an hour, $100 dollars in labor going by cheapo rates! 
Trending Topics
07-26-2014, 08:43 AM
#8
JK Newbie
Thread Starter
Join Date: Nov 2013
Location: Nixa, MO
Posts: 12
Likes: 0
Received 0 Likes
on
0 Posts
True but the labor I would have had to do even if I bought the after market end-caps.
07-27-2014, 05:50 PM
#10
JK Newbie
Thread Starter
Join Date: Nov 2013
Location: Nixa, MO
Posts: 12
Likes: 0
Received 0 Likes
on
0 Posts
