
viair 10005 heavy duty oba setup.
 08-02-2016, 07:50 AM
#1
JK Enthusiast
Thread Starter
My wonderful wife bought me the viair 10005 kit for my birthday and I figured i should start a write up on the install. We just had a second kid so I'll be taking my time with this so please bear with me during this.
Main purpose for wanting to add OBA is that I spend a decent amount of time mountain biking/camping. On the bike side, it would be great to be able to quickly inflate tires, fix tubeless issues and generally cut down on the times I forget a pump or forget to check air pressure before leaving the house For camping with the little ones, I'm tired of blowing up inflatables with hand pumps or D cell battery type pumps that always break and don't work when you need them so why not add a compressor to the vehicle. Also who knows, I may turn this thing into a part mobile repair shop so being able to add on to a system and possibly run tools down the road isn't a bad thought either :pipedream:
Basic parameters are as follows
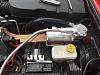
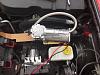
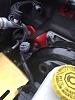
use an under hood bracket to mount compressor
Make custom manifold bracket and aluminum manifold that can handle pressure switch, output line to tank output line to front of vehicle quick connect and a port for a possible regulator for future lockers
Relocate Evap to above axle
Build custom skid/box for under vehicle to handle air tank,
plumb line from tank for air chuck mounted to somewhere in the rear
Sort solution for on off switch/gauge that doesn't hack up interior too bad(suggestions welcome)
This is my first attempt at anything like this so I'm sure there will be some learnings (read as f-ups) I can share
Am I missing anything?
Sit back grab a beer and enjoy the show
Main purpose for wanting to add OBA is that I spend a decent amount of time mountain biking/camping. On the bike side, it would be great to be able to quickly inflate tires, fix tubeless issues and generally cut down on the times I forget a pump or forget to check air pressure before leaving the house For camping with the little ones, I'm tired of blowing up inflatables with hand pumps or D cell battery type pumps that always break and don't work when you need them so why not add a compressor to the vehicle. Also who knows, I may turn this thing into a part mobile repair shop so being able to add on to a system and possibly run tools down the road isn't a bad thought either :pipedream:
Basic parameters are as follows
use an under hood bracket to mount compressor
Make custom manifold bracket and aluminum manifold that can handle pressure switch, output line to tank output line to front of vehicle quick connect and a port for a possible regulator for future lockers
Relocate Evap to above axle
Build custom skid/box for under vehicle to handle air tank,
plumb line from tank for air chuck mounted to somewhere in the rear
Sort solution for on off switch/gauge that doesn't hack up interior too bad(suggestions welcome)
This is my first attempt at anything like this so I'm sure there will be some learnings (read as f-ups) I can share
Am I missing anything?
Sit back grab a beer and enjoy the show
 08-02-2016, 08:02 AM
#2
JK Enthusiast
Thread Starter
Step 1 under way
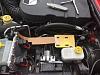
Installed the Metalcloak single ARB bracket last night and am working on mocking up the extension for the manifold. I need to drill for my viair compressor mounting holes but need to sort which direction compressor will face
Cylinder to the rear puts output in line with future manifold
Reverse I'll have to loop steel line but it clears brake booster without relocating sensor as much...

More to come
Installed the Metalcloak single ARB bracket last night and am working on mocking up the extension for the manifold. I need to drill for my viair compressor mounting holes but need to sort which direction compressor will face
Cylinder to the rear puts output in line with future manifold
Reverse I'll have to loop steel line but it clears brake booster without relocating sensor as much...
More to come
08-03-2016, 09:14 PM
#5
JK Enthusiast
Join Date: Aug 2011
Location: Santa Clara, CA
Posts: 292
Likes: 0
Received 0 Likes
on
0 Posts
This is a neat project. My install was similar - I solved the under carriage mounting of the air tank by starting with the river raider air tank / evap mount and modifying it to hold both the tank and compressor. The result was a cradle that is self contained, remove 3 bolts and it drops out for maintenance. Only had to run electrical to the spod and battery, then mounted a quick connect for air near the front bumper.
I have pics posted somewhere.
I have pics posted somewhere.
08-04-2016, 08:42 AM
#6
JK Enthusiast
Thread Starter
I looked at the river raider setup and love the concept and how clean it is but don't like the idea of the compressor being underneath. I also cocouldn't stomach the price of it as I've got access to a few talented fabricators and a full scale machine shop.
The other location I'm toying with for the tank is inside the front bumper on the cross member but don't want to have to relocate if I switch the bumper out from stock to a LOD armor lite or other similar bumper where winch sits a bit lower. I'm into the one and done install type of thing
The other location I'm toying with for the tank is inside the front bumper on the cross member but don't want to have to relocate if I switch the bumper out from stock to a LOD armor lite or other similar bumper where winch sits a bit lower. I'm into the one and done install type of thing
08-06-2016, 10:06 AM
#7
JK Enthusiast
Join Date: Aug 2011
Location: Santa Clara, CA
Posts: 292
Likes: 0
Received 0 Likes
on
0 Posts
Yeah, there's not a lot of options for tank mounting locations.
I originally mounted my air compressor under the hood using a Synergy mount, but the compressor would overheat, even on cool days. And when it wasn't overheating, the hose and disconnect would be too hot to touch. I haven't had any heat issues since I moved it underneath.
I originally mounted my air compressor under the hood using a Synergy mount, but the compressor would overheat, even on cool days. And when it wasn't overheating, the hose and disconnect would be too hot to touch. I haven't had any heat issues since I moved it underneath.
Trending Topics
08-07-2016, 04:16 AM
#8
JK Enthusiast
Thread Starter
Thanks for the info on overheating. I don't see myself using it that much for that to be an issue.like I mentioned most of my use will be limited to MTB trips and camping where vehicle won't be too warm. I will probably design tank skid to fit compressor just in case though
08-10-2016, 08:00 PM
#9
JK Enthusiast
Thread Starter
ok,
need to order a bunch of fittings.lines etc...
thinking of doing the rugged ridge A pillar switch...cant justify buying a SPOD for 1 acc even though i really like the location of their switch panel... really doesnt make sense $ wise.
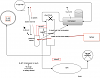
take a look at this diagram and let me know if im missing something
manifold will have
Pressure switch
pressure relief valve(is this needed if one is on tank)
output to in dash air gauge(1" near switch)
output to tank
input from compressor
plug for possible future regulator/ locker output
tank
mostly plugs outside of drain and pressure relif valve
and one output to rear bumper with quick connect
electrical
hot to pressure switch
switch to compressor
wire to dash switch
ground
ground to compressor
need to order a bunch of fittings.lines etc...
thinking of doing the rugged ridge A pillar switch...cant justify buying a SPOD for 1 acc even though i really like the location of their switch panel... really doesnt make sense $ wise.
take a look at this diagram and let me know if im missing something
manifold will have
Pressure switch
pressure relief valve(is this needed if one is on tank)
output to in dash air gauge(1" near switch)
output to tank
input from compressor
plug for possible future regulator/ locker output
tank
mostly plugs outside of drain and pressure relif valve
and one output to rear bumper with quick connect
electrical
hot to pressure switch
switch to compressor
wire to dash switch
ground
ground to compressor
08-20-2016, 07:56 PM
#10
JK Enthusiast
Thread Starter
the two year olds naptime was spent moving the evap. When he woke up he handed me some tools and helped button up the project pretty great having an extra set of tiny hands that wants to sit under my jeep.
photos
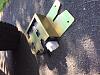
 installed rivnuts, had to use a combination of a 1/2" bit and step drill to put them in, couldnt find right size bit anywhere
 the plastic lines didnt like the new bends, so i installed new.rubber ones
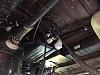
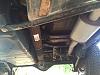
all done
also went through and made a sketchup of plans for the box.
i really like the new Klein setup they are selling but id rather make my own to go in place of the evap. its tucked further back and my logic(could be flawed) is that it is a bit more out of harms way further back than smack dab in the middle where having the extra .5-1 inch of clearance may help
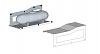
in a perfect world, it will use the same mounts as the evap did, plus one extra in the rear where there is only one hole...ill probably make some sort of nut strip to go up in the frame to accomodate this or use soemthing similar to what alot of trailer hitches use with a fished bolt through the frame. the tank i have is the 2.5 gal one that came with the kit. I may cut the feet off and machine some delrin blocks for it to sit on. gotta talk to my fabricator guys about next step.....
pretty great having an extra set of tiny hands that wants to sit under my jeep.photos
all done
also went through and made a sketchup of plans for the box.
i really like the new Klein setup they are selling but id rather make my own to go in place of the evap. its tucked further back and my logic(could be flawed) is that it is a bit more out of harms way further back than smack dab in the middle where having the extra .5-1 inch of clearance may help
in a perfect world, it will use the same mounts as the evap did, plus one extra in the rear where there is only one hole...ill probably make some sort of nut strip to go up in the frame to accomodate this or use soemthing similar to what alot of trailer hitches use with a fished bolt through the frame. the tank i have is the 2.5 gal one that came with the kit. I may cut the feet off and machine some delrin blocks for it to sit on. gotta talk to my fabricator guys about next step.....