Got Rid of the DARN Door Chime with Chime Buster


Thread Starter
JK Newbie
Joined: Nov 2010
Posts: 82
Likes: 0
From: Durango, Colorado
 Got Rid of the DARN Door Chime with Chime Buster
I hate door chimes. I hate opening my Jeep door and having the chime blare. I hate trying to listen to the radio while woking on the Jeep and having the door chime drown out the tunes. I hate nannys.
I asked the Jeep dealer to use their computer programming and turn the damn thing off, some lil service managerette told me that they couldnt as "it is a safety issue". Safety issue my butt!! As much as the current corrupt regime in DC would want it, I dont need no nanny. I didnt want to destroy the buzzer cuz it probably shares some other electronic stuff that would mess up dash warning lights etc, so I looked to Australia for help.
Enter the DTec Chime Buster.

DTec sent their Chime Buster to me complete with simple installation instructions.
To install all you need is to access the wiring under the fusebox along with wire cutters, knife, tape, and a soldering iron and some solder. I guess one could install the Chime Buster without soldering the connections, but why?


Follow the instructions and find the correct connector and wire.

Cut and splice in the wires of the Chime Buster.

Get some power, as per instructions.

Tape it up..

Secure the wiring harness as it was before you started messing with it and secure the Chime Buster so when you close the fuse box back up everthing fits nicely.

Its a simple modification and well worth it. The Chime Buster is able to 'learn' different chime setting but I chose to leave it in its default setting of allowing the door chime to chime for 5 seconds then shutting it off. I figured even tho I dont need a chime indicating the key is in the ignition maybe some Jeep mechanic or some friend accessing my Jeep might. I can live with a 5 second chime.
*Disclaimer. I have no interest in Chime Buster, or DTec, financial or otherwise. I am just a satisfied customer and which to pass on my experience.

I asked the Jeep dealer to use their computer programming and turn the damn thing off, some lil service managerette told me that they couldnt as "it is a safety issue". Safety issue my butt!! As much as the current corrupt regime in DC would want it, I dont need no nanny. I didnt want to destroy the buzzer cuz it probably shares some other electronic stuff that would mess up dash warning lights etc, so I looked to Australia for help.
Enter the DTec Chime Buster.
DTec sent their Chime Buster to me complete with simple installation instructions.
To install all you need is to access the wiring under the fusebox along with wire cutters, knife, tape, and a soldering iron and some solder. I guess one could install the Chime Buster without soldering the connections, but why?
Follow the instructions and find the correct connector and wire.
Cut and splice in the wires of the Chime Buster.
Get some power, as per instructions.
Tape it up..
Secure the wiring harness as it was before you started messing with it and secure the Chime Buster so when you close the fuse box back up everthing fits nicely.
Its a simple modification and well worth it. The Chime Buster is able to 'learn' different chime setting but I chose to leave it in its default setting of allowing the door chime to chime for 5 seconds then shutting it off. I figured even tho I dont need a chime indicating the key is in the ignition maybe some Jeep mechanic or some friend accessing my Jeep might. I can live with a 5 second chime.
*Disclaimer. I have no interest in Chime Buster, or DTec, financial or otherwise. I am just a satisfied customer and which to pass on my experience.

JK Jedi
Joined: Oct 2010
Posts: 5,192
Likes: 3
From: REDONDO BEACH, CA

I think you went overboard. There's instructions on how to disable the chime in the owners manual by following a few simple steps. There's definitely one for the seatbelt which works perfectly.
If you turn the key to ACC, you can listen to the radio with doors open without the chime. If the engine is on, you can listen to the radio with open doors without a chime so long as you're not moving. Maybe I'm wrong, but I don't have this annoying door chime problem you're describing.
If you turn the key to ACC, you can listen to the radio with doors open without the chime. If the engine is on, you can listen to the radio with open doors without a chime so long as you're not moving. Maybe I'm wrong, but I don't have this annoying door chime problem you're describing.

JK Freak
Joined: Jun 2010
Posts: 624
Likes: 1
From: ireland
I think you went overboard. There's instructions on how to disable the chime in the owners manual by following a few simple steps. There's definitely one for the seatbelt which works perfectly.
If you turn the key to ACC, you can listen to the radio with doors open without the chime. If the engine is on, you can listen to the radio with open doors without a chime so long as you're not moving. Maybe I'm wrong, but I don't have this annoying door chime problem you're describing.
If you turn the key to ACC, you can listen to the radio with doors open without the chime. If the engine is on, you can listen to the radio with open doors without a chime so long as you're not moving. Maybe I'm wrong, but I don't have this annoying door chime problem you're describing.
maybe it's just different markets have different regulations...
my UK spec JK has a b**!**$ of a chime that i hate...
paperclip fix had cured the seatbelt...it's the only way to shut it up 100%...
my chime continues non stop in ACC mode with doors open...
it never shuts up...gonna kill it with the box above...long as its cheap...
cheers Dman ... sweet fix ...




JK Enthusiast
Joined: Jul 2011
Posts: 211
Likes: 1
From: Columbia, MD
Also, there is a tiny speaker on the back of the instrument cluster for the chime. You could also just remove the little speaker and no longer have to deal with the chime.
Really there is no reason to waste 100 dollars on the chimebuster.
Really there is no reason to waste 100 dollars on the chimebuster.

JK Enthusiast
Joined: Feb 2011
Posts: 264
Likes: 0
From: mclean va

JK Enthusiast
Joined: Jul 2011
Posts: 211
Likes: 1
From: Columbia, MD
Tools needed:
Flat blade screwdriver for prying
7mm socket
Ratchet for socket
6" extension for socket
Start by removing the bottom knee bolster on the drivers side. Pull at it and it will pop free.
Remove the upper portion of the lower dash beneath the steering column(the "U" shaped piece) by either getting your fingers between the steering column at the top side, or by using a screwdriver to pop it out on the outside. Start at the top and work down. The retaining clips are the same as on the centerstack. The bottom is hinged similar to the glovebox.
Once this piece is removed, you will see 2 7mm bolts on either side of the steering column toward the bottom of the dash. These retain the instument surround piece. Remove them.
BTW, tilting the steering wheel up and down helps in accessing the fasteners and removing the pieces throughout this process.
Grasp the surround at the top and give it a tug straight back toward you. It will pop free. Same clips as on the centerstack, located at the top.
Now you will see the four 7mm bolts holding the instrument cluster in place. Remove them.
Carefully tilt the cluster toward you and you will see three wire harnesses connected in the back on the top. Push the little retaining tab and pull the connectors free from the cluster. The interior lamp will go off, so don't freak out when it does.
You may now take the cluster inside to work on it. There are nine tabs holding the back on. How these work will be evident when you see them ,they are simple snap tabs.
Here are the tab locations.
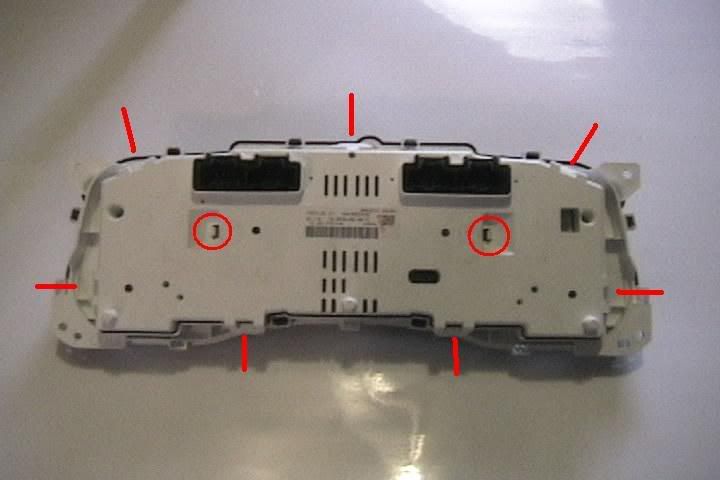
Remove the back. Now is the time to be extra careful, as the back indexes the circuitboard to the rest of the assembly. It will float free, but will not come out because of the needles on the guages. Please be careful.
Here is what you will see.
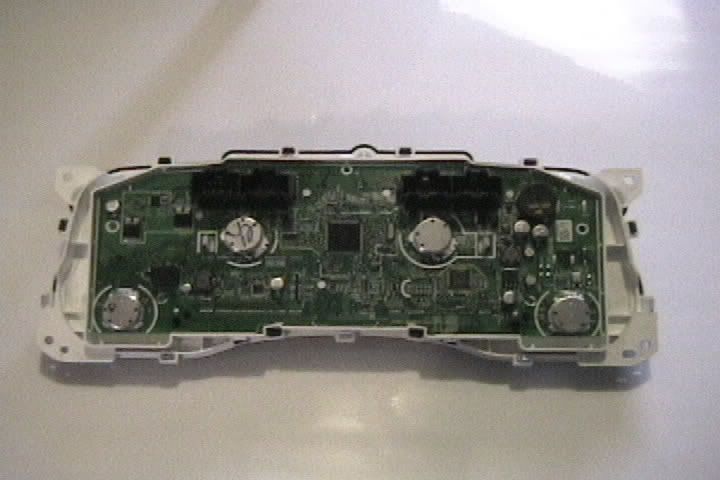
Here is the offending item, the round black thingy with a hole in it, marked TMX-12S located in the upper right hand portion of the cluster.
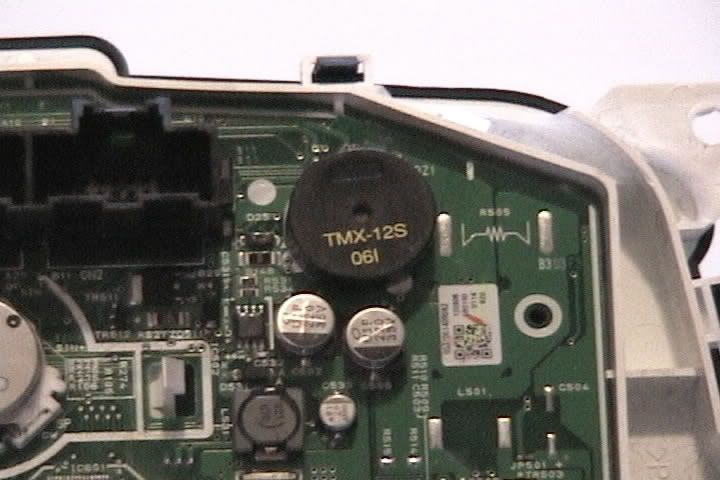
At this point you can either cover it with electrical tape, it will mute it some so it is less annoying. Or just remove it all together with a little twist.

After you have silenced the beast, pop the cover back on carefully, and re-assemble the cluster in the dash in reverse order.
Hope this helps everyone and saves you some money and you wont have to cut into your main wiring harness.
Flat blade screwdriver for prying
7mm socket
Ratchet for socket
6" extension for socket
Start by removing the bottom knee bolster on the drivers side. Pull at it and it will pop free.
Remove the upper portion of the lower dash beneath the steering column(the "U" shaped piece) by either getting your fingers between the steering column at the top side, or by using a screwdriver to pop it out on the outside. Start at the top and work down. The retaining clips are the same as on the centerstack. The bottom is hinged similar to the glovebox.
Once this piece is removed, you will see 2 7mm bolts on either side of the steering column toward the bottom of the dash. These retain the instument surround piece. Remove them.
BTW, tilting the steering wheel up and down helps in accessing the fasteners and removing the pieces throughout this process.
Grasp the surround at the top and give it a tug straight back toward you. It will pop free. Same clips as on the centerstack, located at the top.
Now you will see the four 7mm bolts holding the instrument cluster in place. Remove them.
Carefully tilt the cluster toward you and you will see three wire harnesses connected in the back on the top. Push the little retaining tab and pull the connectors free from the cluster. The interior lamp will go off, so don't freak out when it does.
You may now take the cluster inside to work on it. There are nine tabs holding the back on. How these work will be evident when you see them ,they are simple snap tabs.
Here are the tab locations.
Remove the back. Now is the time to be extra careful, as the back indexes the circuitboard to the rest of the assembly. It will float free, but will not come out because of the needles on the guages. Please be careful.
Here is what you will see.
Here is the offending item, the round black thingy with a hole in it, marked TMX-12S located in the upper right hand portion of the cluster.
At this point you can either cover it with electrical tape, it will mute it some so it is less annoying. Or just remove it all together with a little twist.
After you have silenced the beast, pop the cover back on carefully, and re-assemble the cluster in the dash in reverse order.
Hope this helps everyone and saves you some money and you wont have to cut into your main wiring harness.
Last edited by WhosUrBuddiee; Jan 22, 2012 at 03:07 PM.
Trending Topics

JK Enthusiast
Joined: Feb 2011
Posts: 264
Likes: 0
From: mclean va

Tools needed:
Flat blade screwdriver for prying
7mm socket
Ratchet for socket
6" extension for socket
Start by removing the bottom knee bolster on the drivers side. Pull at it and it will pop free.
Remove the upper portion of the lower dash beneath the steering column(the "U" shaped piece) by either getting your fingers between the steering column at the top side, or by using a screwdriver to pop it out on the outside. Start at the top and work down. The retaining clips are the same as on the centerstack. The bottom is hinged similar to the glovebox.
Once this piece is removed, you will see 2 7mm bolts on either side of the steering column toward the bottom of the dash. These retain the instument surround piece. Remove them.
BTW, tilting the steering wheel up and down helps in accessing the fasteners and removing the pieces throughout this process.
Grasp the surround at the top and give it a tug straight back toward you. It will pop free. Same clips as on the centerstack, located at the top.
Now you will see the four 7mm bolts holding the instrument cluster in place. Remove them.
Carefully tilt the cluster toward you and you will see three wire harnesses connected in the back on the top. Push the little retaining tab and pull the connectors free from the cluster. The interior lamp will go off, so don't freak out when it does.
You may now take the cluster inside to work on it. There are nine tabs holding the back on. How these work will be evident when you see them ,they are simple snap tabs.
Here are the tab locations.
Remove the back. Now is the time to be extra careful, as the back indexes the circuitboard to the rest of the assembly. It will float free, but will not come out because of the needles on the guages. Please be careful.
Here is what you will see.
Here is the offending item, the round black thingy with a hole in it, marked TMX-12S located in the upper right hand portion of the cluster.
At this point you can either cover it with electrical tape, it will mute it some so it is less annoying. Or just remove it all together with a little twist.
After you have silenced the beast, pop the cover back on carefully, and re-assemble the cluster in the dash in reverse order.
Hope this helps everyone and saves you some money and you wont have to cut into your main wiring harness.
Flat blade screwdriver for prying
7mm socket
Ratchet for socket
6" extension for socket
Start by removing the bottom knee bolster on the drivers side. Pull at it and it will pop free.
Remove the upper portion of the lower dash beneath the steering column(the "U" shaped piece) by either getting your fingers between the steering column at the top side, or by using a screwdriver to pop it out on the outside. Start at the top and work down. The retaining clips are the same as on the centerstack. The bottom is hinged similar to the glovebox.
Once this piece is removed, you will see 2 7mm bolts on either side of the steering column toward the bottom of the dash. These retain the instument surround piece. Remove them.
BTW, tilting the steering wheel up and down helps in accessing the fasteners and removing the pieces throughout this process.
Grasp the surround at the top and give it a tug straight back toward you. It will pop free. Same clips as on the centerstack, located at the top.
Now you will see the four 7mm bolts holding the instrument cluster in place. Remove them.
Carefully tilt the cluster toward you and you will see three wire harnesses connected in the back on the top. Push the little retaining tab and pull the connectors free from the cluster. The interior lamp will go off, so don't freak out when it does.
You may now take the cluster inside to work on it. There are nine tabs holding the back on. How these work will be evident when you see them ,they are simple snap tabs.
Here are the tab locations.
Remove the back. Now is the time to be extra careful, as the back indexes the circuitboard to the rest of the assembly. It will float free, but will not come out because of the needles on the guages. Please be careful.
Here is what you will see.
Here is the offending item, the round black thingy with a hole in it, marked TMX-12S located in the upper right hand portion of the cluster.
At this point you can either cover it with electrical tape, it will mute it some so it is less annoying. Or just remove it all together with a little twist.
After you have silenced the beast, pop the cover back on carefully, and re-assemble the cluster in the dash in reverse order.
Hope this helps everyone and saves you some money and you wont have to cut into your main wiring harness.
thank you very much! more complicated than i thought but defiantly gonna give it a try!