
switch panel


Thread Starter
JK Newbie
Joined: Nov 2010
Posts: 6
Likes: 0
From: Memphis
Any reason you want to mount them overhead? Depending on your model, you could fit at least 5, if not 6 switches on the front of your center console and tuck one or two on the side
<img src="https://www.jk-forum.com/forums/attachment.php?attachmentid=582239"/>
<img src="https://www.jk-forum.com/forums/attachment.php?attachmentid=582240"/>
<img src="https://www.jk-forum.com/forums/attachment.php?attachmentid=582239"/>
<img src="https://www.jk-forum.com/forums/attachment.php?attachmentid=582240"/>


JK Enthusiast
Joined: May 2012
Posts: 169
Likes: 0
From: Palo Alto, CA
Pretty simple. the only thing that is behind that front piece of plastic is the cigarette lighter plug and the USB plug inside the console. I have a Rubicon so I just popped out the 120V plug using a trim-pull tool (or whatever they are called) and I could easily get my fingers in there enough to spin the lock nut to secure the switches. I had the switches all pre-wired, and unscrewed the two screws on either side of the console on the back (move both front seats forward and you'll see one screw on either side). This lets you lift up the console. Once you raise the console, you can just drop the wires down and pull them through to where they come out on whatever side of the console you want. I then tucked them under the carpet and ran them to the side of the jeep where they tie into the wiring harness and will be hidden under the side trim.
JK Enthusiast
Joined: Nov 2013
Posts: 225
Likes: 0
From: Orlando, FL
EDIT: disregard this. I thought the question was directed at me. But, just in case anyone else wants to know what I did for the overhead mount.
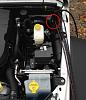
I routed the power wire to the left (driver's side) side of the track, under the plastics down the A pillar, and through the firewall. There is a rubber grommet under the dash on the driver's side, above and just to the left of the brake pedal. I sliced a hole in it and ran the power wire through. It comes out in the engine compartment just below the hood seal on the far right (driver's ) side . I circled it in the photo from darkknight1999. I do have an sPod, so routing it that way just made sense. If you have a manual transmission, I heard that grommet is used to the clutch cable (possibly). I have an auto, so I can't say for sure.
The coax wire was run to the right (passenger) side, then under the roll bar padding all the way back to the tailgate. I removed the plastic tailgate piece and fed the wire through the vent holes behind the spare tire, to an antenna mount attached to the spare tire carrier. Grounded it to make sure I had a solid connection, and I run a Firestick CB antenna. Tuned it up and it works great. All wires were zip tied to the bracket to keep them out of the way. I still have access to the fuse in the power line just in case. You can see it laying in the track.
Routing the wires like this keeps the power and coax wires separate to prevent static bleed over through the CB, just in case it would have happened. I have since added 75# S-biners (made by nite ize innovations) to hang various things (mostly used for the wires for portable DVD players for the kids, they also hold the head phones as well to keep them out of the way. I have a survival knife up there (properly sheathed for all the safety monitors out there), and various other things from time to time.)
Last edited by Reepo; Oct 31, 2014 at 02:49 AM.
JK Super Freak
Joined: Jul 2011
Posts: 1,384
Likes: 2
From: Calgary, AB
Attachment 582396
Routing the wires like this keeps the power and coax wires separate to prevent static bleed over through the CB, just in case it would have happened. I have since added 75# S-biners (made by nite ize innovations) to hang various things (mostly used for the wires for portable DVD players for the kids, they also hold the head phones as well to keep them out of the way. I have a survival knife up there (properly sheathed for all the safety monitors out there), and various other things from time to time.)
Routing the wires like this keeps the power and coax wires separate to prevent static bleed over through the CB, just in case it would have happened. I have since added 75# S-biners (made by nite ize innovations) to hang various things (mostly used for the wires for portable DVD players for the kids, they also hold the head phones as well to keep them out of the way. I have a survival knife up there (properly sheathed for all the safety monitors out there), and various other things from time to time.)
For the OP, for my switch panels I have one overhead that I got off sPod. Didn't want their system, just the switch pod and they sell it separately if you ask. Not cheap though, about 70 bucks with shipping I think it was, but it was cheaper then the fiberglass option since I've never done fiberglass work and would have to buy all the components with a lot left over.