When you click on links to various merchants on this site and make a purchase, this can result in this site earning a commission. Affiliate programs and affiliations include, but are not limited to, the eBay Partner Network.
Now the Jegs site says the axle will ship on 9/11, so I called and spoke to Customer Service, and have been told "the (Dana 60 rear) axle is absolutely on order and is listed in the computer as having an expected ship date of 9/16". I've decided to keep the order open until at least October. My preference is still the UD60, as I really prefer the ground clearance and e-locker for my needs. If the axle doesn't ship by then, I'm just going to assume that they simply aren't able to get one and will begin working on that 14 Bolt, just in time for Black Friday Sales.
That all said, I don't like just waiting around and get antsy to do stuff. I figured I'd at least start tearing the axle down and cleaning up the housing. I ground down all the bracket welds and got more of the scale and rust off. I have a needle scaler coming this weekend to get the rest of the scale on the center chunk. I wasn't able to get the bolts out of the diff cover as they had rusted round, and the ones I was able to get out have AMPLE amounts of Red Loctite on them for some reason. What type of psycho uses Red Loctite on the diff cover?!?!?! Anyway, a trip to the hardware store to pick up some 9/16" nuts gave me enough tries to get the stuck bolts off with the old "weld-on-a-nut" trick.
Gears look good (factory 4.10's) and what I think is a GovLoc. I'm going to brake clean the inside of the housing out, pull the shafts, and strip the hubs. From there I'll run a tap down each of the diff cover bolt holes and then finish cleaning up the housing and tubes to make it "weld ready" - which reminds me, I need to pick up some weld-thru primer...
Well, I got another two notifications from Jegs about the rear Mopar Performance D60 being "backordered", and for the first time the date has been moved out past October now. It's not looking good, but I'll keep my fingers crossed. In the meantime, I'm going to start working on the 14B and keep it moving along. Since the backing plates are rusted off and the brakes/rotors are gross, I've started to look at ordering some replacement parts. I have already ordered the Mopar-style e-brake cables, so I had to make a decision - since I was running out of time on my return window - as to whether I should send them back.
After looking at some photos and specs, it looks like the UD/MP60 rear axle shares many parts with the Ram 2500/3500 AAM 10.5", which itself shares a lot of commonality with the newer GM "14 Bolt" AAM 10.5" axles. As I got to thinking about how I'd possibly adapt the Mopar extended brake cables for the UD60 rear to the 14B, I think that solution will be much easier than anticipated.
Here's the GM-style parking brake lever:
And here's the AAM/Ram style lever...
They're basically identical except for the eyelet portion (the Mopar brake cables utilize the rod + eyelet style ends). Looking closer, the entire backing plates may actually interchange, so I may order a loaded set of each and compare. If not, I think I can make the parking brake levers work like factory. I guess next up is to pull the shafts, get the hubs off, and see how the rest of it looks. I've been looking at used sand blasting cabinets on Marketplace, as well as a used 220v air compressor to run it (which could be handy for a plasma cutter as well).
I am still really on the fence about the ARB though, and really it's the only reason I haven't cancelled the UD/MP60 rear axle order. I know they're reasonable reliable in 14 Bolt applications, but the thought of getting a compressor, finding a home, running air lines and solenoids, etc. - vs simply running two 14 AWG wires to the locker - hurts my heart a little. It be one thing if I needed OBA or ran an ARB front locker, but to go through the headache for just a rear locker is a pain in the a$$. I have even toyed with the idea of picking up a cheap open diff carrier from ECGS and stuffing a Detroit or Grizzly inside it. It might not be the best for road manners, especially not in the winter, but you know it's dead nuts reliable and simple.
Not sure if it was posted but what suspension are you running? That is the big gamble. Great build BTW.
Thanks! I have a 2.5” Metalcloak Game Changer Kit ready to go (which should net 3.5” of lift on the UD60’s due to tube diameter). The short term goal will be to get it set up for 37”s, then get the Hemi swapped in. From there, I might relocate the gas tank and prep for a 3-link/4-link setup (I’m gonna wheel it first and see how she does locally).
Well, Jegs told me on Monday that the order is unable to be filled and that the distributor updated the invoice to "No ETA Available". We cancelled the order, so now I'm full-bore into the 14B build. I ordered an Artec APEX 14B Truss kit (got lucky and caught the end of a flash sale!), as well as new backing plates that I f ound cheap on Amazon.
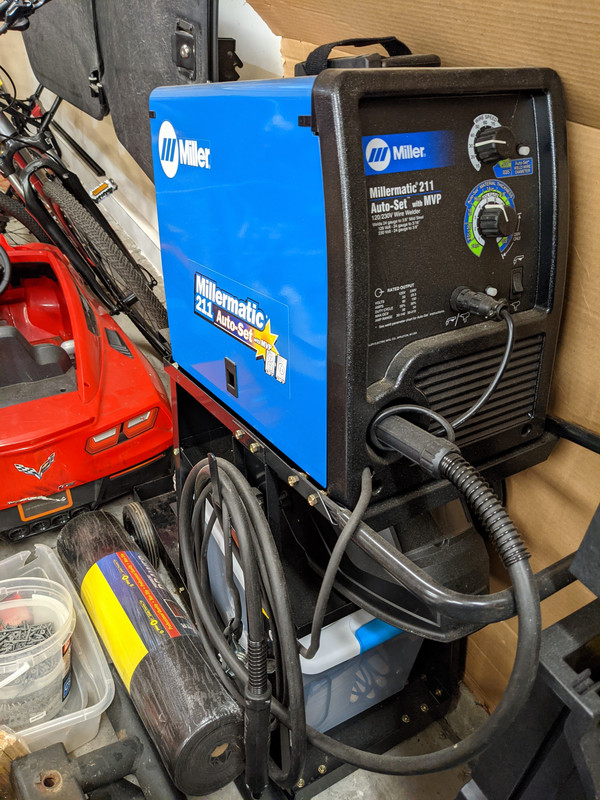
In preparation of the work, I also picked up a brand-new Miller 211. I was undecided on what to do for welder. I found a few okay deals on Marketplace, but nothing close by and the one that was, the guy sold the welder out from under me even though we had already made plans to meet up later in the day. Getting frustrated, I checked the local Airgas shop nearby and they had two brand-new 211's on the shelf, one of which was being offered with a discounted Spoolmate 100 spool gun. They have their "Build with Blue" rebate program going on, so the extra $500 savings put me over the edge to make the decision. I was considering a bigger option, particularly the Miller 252, but having used a 211 before to build axles and engine brackets, it's perfect for what I need and will allow me to tuck it away in the corner of the shop without getting in the way too much. It's also small enough for me to carry it in the basement for some future renovation projects as well.
The weather has been cool the past few days and when I finally turned the heat on, I got the distinct and recognizable whiff of mouse poop. I stick my inspection camera down the vents and sure as can be, there's an old nest inside there. I watched a few YouTube videos on how best to tackle this without having to tear apart the dash and will give it a whirl. The best method seems to be drilling a 1" hole in the side of the HVAC box that will let you pull the material out, and will then let you wet-vac out and cleaning solution sprayed inside. This will be my weekend project because the cool weather is certainly coming and I can't stand that smell. Ironically enough, there was zero smell with just the A/C on.
This weekend's plans are quiet, so I should be able to get the 14B fully stripped down and cleaned up. With any luck, my new welding cart should arrive soon and I'll get a few test beads laid down on some scrap metal.
I'm still struggling on what to do with the 14B in terms of traction aid. I have toyed with the idea of running a TrueTrac back there, since the type of terrain around here does well with a LSD (mud, slick rock, snow, ice), plus the rear should be flexible enough to keep both wheels planted. The TrueTrac does well with higher horsepower applications on the street too, something I have to keep in mind with the planned Hemi swap.
I picked up a cheap set of 18" 4th Gen Ram 2500 wheels with 35" tires on it. They're bald as can be, but hold air and will work for rollers in the garage. A quick hit with the power washer and they are actually nicer looking than I thought. I wouldn't be opposed to eventually picking up a set of 37" A/T tires for winter and running them on these wheels, assuming they clear everything nicely.
Since I just recently rewired and redid the sheetrock in the garage, so when the MP60 was dropped off, I left it in the crate tucked in the corner. Now the crate has been getting in the way and I wanted to be able to tuck it in another area where the crate became problematic.
I'm probably going to order the gearset and related parts this weekend. I figured it was a good a time as any to start cleaning up the housing and prep the tubes some more. One thing I did not miss about the east coast is rust and scale. The tubes are mostly clean, though I do need to pick up a portable belt sander to get them smooth and ready for the truss.
The housing on the other hand needed a bit more attention...
After a quick first-pass degreasing, I went back to work with the flap disc, cleaning up some of the "ribs", smoothing out a few nicks and burrs, while also smoothing out the transitions in some areas. Once finished, I hit the rear again with some Super Clean degreaser and the power washer.
A quick hit with some compressed air and a little time in the sun got it dry enough to hit with some Rust-Oleum Rust Reformer:
Again, not pretty but fine for what I need:
I still need to work on the tubes, so that is this week's project next steps. I'll get them sanded down a bit, then will fill in some of the gouges with the welder that I left by my unhandy work with the angle grinder (while I was getting the factory brackets cut off). It will be a good opportunity to get the feel of the Miller 211 in action on thick metal and see how she holds a puddle.
At that point, I'll come back and clean up the rest of the tubes, wire wheel the tube-to-center chunk area to bare metal, degrease again, and hit with galvanizing weld-thru primer. I need to build a support dolly for this axle so that I can easily rotate it around as I'm welding up the tubes. Once I get those done, I can start working on prepping for the Artec truss and bracketry (which just arrived yesterday).
I ordered the Artec "Apex" 14 Bolt JK-swap truss kit during a 10% flash sale. I got everything unboxed, scrubbed and sprayed with a quick coat of Seymour Weld-Through PBE primer. I've used this stuff a lot and have had excellent results, so it's really my go-to for stuff like this...
With the center chunk done, it was time to turn my attention to the tubes and get them prepped. A cheap $30 belt sander from Harbor Freight helps get things smooth and takes out some of the waves from cutting/grinding.
Another coat of PBE weld-thru and she's ready to get brackets welded on soon. As you can see on the end of the tubes, there's a bit of surface pitting. This shouldn't be an issue as the tubes are plenty thick, but it certainly isn't as pretty as the MP60 front. I spent some extra time focused on getting the tube-to-center joint cleaned really well and primed. I've got a few busy weekends coming up, as well as a work trip, but my intent is to take a few days off towards the end of the month and get this rear all setup and done. This way I can just tuck it in the corner of the garage and get it out of my way.
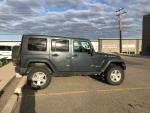
The front banging going over bumps is getting old and also more prominent. I'm gonna have to swap out the shocks as the bushings are heavily compressed and nearly gone. The jounce bumpers in the front are also missing, I think because of the heavy spring sag - based on what I've seen online, this is about 1.25" of sag.
Rather than waste money on short-term shocks, I'm just planning on installing my 2.5" MetalCloak Dual Rate kit with Rocksports in the next few weeks. I was toying with the idea of getting some decently priced 33"s to throw on after the lift so it doesn't look like I skipped leg day, and I finally got lucky. I found a real nice set of wheels and barely used tires about 10 miles away.
I got all 5 for $1000 - the tires have less than 1000 miles, there are even some "nubs" on the tread blocks. The guy even threw in some brand new polished splined lug nuts and the TPMS sensors are brand new. I can sell the Recon wheels and tires I bought for $700 or so, so for $300, these will work well until spring time rolls around. And if I get lucky and my daughter isn't able to take her Jeep to school next year, I'll throw them on her Islander!
They look good, albeit a little "stuffed" inside the wheel wells, but they ride nice and quiet, even compared to the Coopers I have been running...