When you click on links to various merchants on this site and make a purchase, this can result in this site earning a commission. Affiliate programs and affiliations include, but are not limited to, the eBay Partner Network.
Install (First Try)
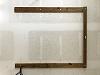
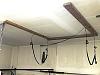
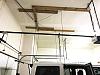
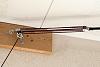
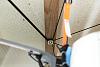
I started my first big project of the year in early April. Step one was to replace the three crappy single-bulb light fixtures in the garage with 48” shop lights so I could work well into the night when needed. After that I started to rough out the location of the frame and pigtail lag screws but quickly ran into my first issue. The angle iron used to hang the garage door opener and one side of the track was in the way. Really my only good option was to reconfigure the angle iron so that the angled supports ran away from the hoist rather than towards it, allowing the frame to sit within. No part of this task was terribly difficult but it did manage to burn up a good bit of time. Once I got over that hurdle I very closely followed the instructions specific to my rafter layout and installed the 2x’s (the orientation of the rafters in the ceiling does dictate which of two sets of instruction you must follow). Once the lumber was mounted to the ceiling I then installed the wall anchor, safety cleat, block and tackle, collector and pigtail lag screws / pulleys (based on the plumb marks).
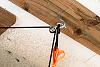
Once I had the rope ran and hanging from each of the four pulleys I had to complete four complex knots which secure the rope ends to the buckle straps. Tying the knots were kind of maddening at times but I did find that it was much easier to get it tied with a shorter end and then adjust rather than trying to run a long end through the various loops. I spent a good bit of time adjusting the knots to get all 4 ends the same length, and the knots as close to the buckle strap loops as possible (leaving too much length there will limit how close to the ceiling you can get).
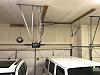
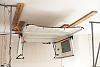
I pulled the jeep into the garage and got everything loosely hooked up and then slowly removed the slack so I could make final adjustments to one corner or another as needed. Once it appeared I would be able to achieve a level lift I slowly began to hoist my hardtop into the air until it was maybe halfway up. The force needed to make upward progress was achievable with just my arms (no body weight needed) and the safety cleat functioned like a champ, locking the rope into place securely each time the end you are pulling on was perpendicular to the ground (think mini blind). At this point I felt pretty good about my install and decided to hoist the hardtop all the way to the ceiling.
As I got near the ceiling I started to notice that the hardtop was gradually becoming less and less level (from front to back). I really wish I had taken some pics but I guess at that point I was too busy banging my head against the wall so you will have to take my word for it. It became apparent after a good bit of thought that I had a geometry issue (damn math!) and then I became concerned that I may be putting too much stress on the back pulleys so I lowered the hardtop back onto the Jeep and called it a weekend. Then Iowa got cold as hell again and things came to a halt for a few weeks.
Install (Finished Product)
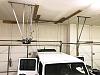
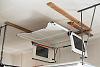
I spent the weather delay considering why the hardtop wasn’t raising evenly and how I might resolve. The answer came to me when I was looking at the position of the pigtail lag screws. Due to the orientation of my ceiling joists, the instructions layout both right side pigtails on one 2x6 and both left side pigtails on the other 2x6. This layout forces you to place the rear pigtails the same distance apart from one another as the front pigtails but if you measure the distance between the rear contact points on the hardtop, they measure 8” less than the front contact points. So I conjured up what little 9th grade geometry remains in my brain and determined that if I moved the rear pigtails closer together, matching the relative distance between the pigtails and hardtop contact points that I would get even lift. The weather finally improved a couple weeks before the planned Jeep build so I mounted some additional lumber to the ceiling and moved the rear pigtails closer together. After some adjustments to the straps I hoisted the hardtop once again and sure enough it remained level from Jeep to ceiling. After securing the excess rope in a spool out of the way of getting snagged I adding a couple of barely loose, mid-duty ratchet straps as a failsafe and called it good.
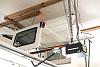
My final assessment is this… overall I really, really like this hoist even though the install was kind of a pain. The price is very affordable ($250ish all in) and the quality of each and every hoist component is top notch. Once configured correctly, the hardtop can be raised solo, with moderate effort and more impressively can be lowered with one hand on the rope and the other on the hardtop, guiding it into place. The safety cleat feels very reliable during both raising and lowering and the movement of the rope is smooth in both directions. I added some towels between the straps and hardtop so unlike the Lange hoist there really is no opportunity for damage outside of catastrophic failure (which the ratchet straps should prevent). I really like everything about the functionality, quality and price of this hoist!
My one gripe would be with the install instructions. Now, all of the info needed to successfully install is included in the instructions but the document layout is poor and hard to follow. I also believe that they are unnecessarily complex. The instructions ask you to take certain measurements from your hardtop to determine the four lift points which ultimately dictates how you build the frame and place the pigtail lag screws. I get that by having the installer determine the measurements that the instructions “work” for all OE and aftermarket hardtops but I’m betting that a great percentage of the people using this hoist are raising an OE hardtop. For me, if they would have supplied even just the measurements for the position of the pigtail lag screws based on the JKU OE hardtop, I feel like the entire install would have been much, much easier. The construction of the frame and placement of all the hardware required a great deal more thought than the final product would suggest.
At the end of the day if you can get this hoist installed correctly, it is well worth the effort and expense!
The Build: Part One
So after months of preparation I began my marathon build on Friday, May 4th, 2018. I spent that afternoon (after work) touching up the paint on the control arms and setting up the garage so I could start tearing the front end apart first thing the next morning. I would liked to have been able to spend a little more than a few hours on the touch-up but knowing I only had 4 days to complete the build I opted for good enough. I cleared out a large area in the center of the garage for the Jeep and setup 3 tables for parts and tools. I tried to get my stack of printed install instruction in the order I would work through them and got my Macbook fired up with Google awaiting my first question. Then I tried to sleep.
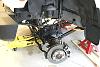
Lowering the Front Axle
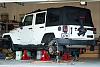
I got up early the next morning and got the wife’s gc out of my new workshop and parked the JK in what would end up being her resting place for the next 9 days. Even though the garage is three cars wide, its kinda shallow, especially with the work bench and shelves against the back wall so I opted to pull the Jeep in at an angle to allow for more room to work. It took me a little bit to get her on the stands and level due to the slight slope of the garage floor but once all four of the big stands were solidly under the frame I placed 3-ton stands under the front and rear axles, removed the tires, pulled out the install instructions and started to tear the front end apart.
The steering damper, shocks, track bar and end links all came out pretty easy. I was also able to get the drag link separated from the pitman arm without much trouble with the aid of a puller from the front end service kit I purchased. Next I drained the differential fluid and disconnected the front drive shaft from the differential (a ratchet strap came in handy for supporting the drive shaft so I didn’t have to take it all the way out, at least not yet). Throughout this and all future steps of the build I made sure to place all of the OE bolts in marked ziplock bags so I could easy find them when reinstalling. This definitely slowed the process down some but I have to believe it was worth the effort.
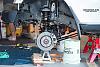
Next came disconnecting the electrical, brake hoses and ABS lines from the axle and sliding the differential breather hose bracket far enough down the upper shock mount to allow for plenty of slack. While the electrical completely disconnects from the axle, the brake and ABS lines remain connected at the hub/caliper so I made sure to lower in stages and check for hang-ups frequently. Once I was able to lower the axle far enough the springs came right out and I stepped back and looked at all I had accomplished in the first half day of work. If only everything else came apart that easy.
Front Control Arms
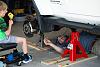
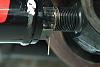
I didn’t have any time to waste so I immediately dove into the front control arms. I made sure to give the threads on each new arm a good coating of anti-seize prior to adjusting to the needed length. I only tightened the jam nuts down by hand as I planned to use my new monster adjustable wrench to tighten them down once bolted into place. Once the new arms were ready to go I crawled under the Jeep and started pulling out the OE arms, one at a time and replacing each with the Rancho arms. The OE arms all came out without much trouble (with a little help from a breaker bar) and the Rancho arms slid in nice and snug. By taking each one out and replacing it before moving to the next I had very little trouble getting everything to line up. I made sure to clean all of the OE bolts good with a wire brush and applied a healthy coat of red Loctite to each before reinstalling (one of a few steps my little dude was able to help me with). Once all of the bolts were torqued to spec (except the upper arm bolts at the axle which would be torqued when the Jeep was back on the ground, per the instructions) I used the adjustable wrench to tighten each jam nut. In hindsight I might have been better off with the 18” adj. wrench rather than the 24” but I was still able squeeze it in and got each tightened down nice and tight. The instructions said to torque the jam nuts to 200ft-lbs but without the needed crowfoot socket I just tightened until the arms started to twist (at the bushings).
Even though I felt pretty good about the jam nuts staying tight I had planned one additional fail-safe. I read a suggestion somewhere on the web to install safety wire in the threads just above each jam nut. Now the suggestion was to use an electric drill to twist the wire but a little research led me to a cheap pair of safety wire twist pliers from Harbor Freight (which got the job done but are pretty poor quality). I used .041” stainless steel locking wire (also from HF), wrapped it twice around the threaded part of the arm, just above the jam nut, and used the pliers to twist the wire to 10+ twists/inch and then trimmed to a min. of 1”. It took a couple tries to get it right but after figuring out how to get the wire to stay in the threads while locking the pliers, each end of each arm only took a few minutes to complete. I personally feel this adds a little personality and uniqueness to the final product in addition to the reassurance the jam nuts will stay tight until I have a need to loosen them.
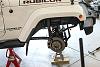
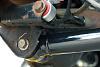
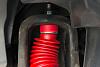
Front Bump Stop, Springs & Shocks
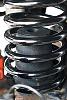
After getting the control arms in I moved on to the bump stop installation. Both the lift kit and knuckles came with a set of front bump stops (different sizes) but I figured that since the lift could technically be installed without the high steer knuckles that the bump stops that came with the knuckles were the correct ones to use. The instructions had me drill a hole in the center of the spring axle pads to receive the bolt which would hold the bump stop in place. The kit came with a self-tapping bolt but I opted to tap the hole and use the bolt included for that option. Once both sides were drilled, tapped and tested I lowered the axle enough to get the new springs in with the bump stops inside. I will note here that I had to lower the axle (what felt like) a mile to get the springs in, to the extent that the pointed corners on the lower control arm mounts scraped the lower control arms a little but nothing a little more touch-up paint couldn’t fix. Getting the bump stops bolted in was a little tricky due to having to work the ratchet/torque wrench inside the spring but I eventually figured it out.
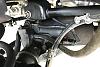
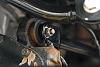
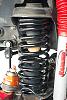
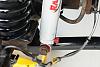
I wasn’t able to take as many pics during this phase as I would have liked so all of the images below are from the other day (just FYI). HiResHiResHiRes
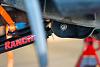
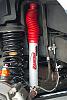
After getting the springs and bump stops in I raised the axle some and installed the new shocks. I couldn’t get a torque wrench on the upper mount nuts but the instructions indicated I could tighten until the bushing was slightly wider than the mounting washer so I just did that. For the axle mounts, once again I made sure to clean the OE bolts good and applied some red Loctite before installing and torquing the lower mounting bolts.
At this point I think it was maybe noon on Sunday (2 1/2 days left) and while I knew I had a good bit to go, I was feeling really good about my progress and lack of issues up to this point. This was also the point where I transitioned away (temporarily) from the lift instructions and on to the knuckles, track bar relocation bracket, and flipped drag link. I was a little worried about being in the middle of one set of instructions and starting another but it didn’t seem to make much sense to take things apart more than once but I’ll get into that next time.
No reply in a bit and I'm curious how your rancho lift handles? I know the company has been around for quite sometime I wasn't sure the quality of the lift.
Hi, really like all mod and build, quick reply to joister and "EZ Top Cap Lift": I think to put zroad (or something similar) support for ledlight in rear window so think tu use that support to hang up the hardtop
Last edited by Alextorello; Sep 10, 2018 at 02:27 AM.
Reason: explain quick post
No reply in a bit and I'm curious how your rancho lift handles? I know the company has been around for quite sometime I wasn't sure the quality of the lift.
So, I'm planning to go into great detail on this after I complete the install posts but I'll give you my high level assessment after about 2000 miles on the road. If you have specific questions or need more detail feel free to PM me directly.
In-town driving with 1 being total crap and 10 being exactly like stock = 8-9
Highway driving with 1 being total crap and 10 being exactly like stock = 5-6
In-town driving is pretty much the same except you can feel the bumps more and the turn radius has been reduced. I really like how my JK feels in-town post lift. Highway driving is a different story. The ride is much harsher than stock but not unbearable. I also feel like the jeep wants to wander a little bit now at highway speeds. All of the front suspension joints are brand new so the steering feels nice and tight and the alignment is good but I feel myself correcting more than I used to from one side to the other. Currently I am running the shocks at 5 so even a little adjustment there may improve/hurt the ride.
I suspect that the ball joints, tires, wheels and shocks all have as much to do with the ride as the actual lift so no guarantees you would get exactly the same results if you go a different route on any of those items. Overall I am very happy with my build but in a perfect world the JK would ride a little smoother on the highway. Pretty sure its a give and take situation though.
Hey Newcomb - you going to take that thing off road and get some scratches and permanent mud (IE mud that never gets cleaned away) on it or what? Eager to see if there was a big difference. Death wobble should not occur but did you get a professional alignment with all that adjustability? I like the tire choice - looks like good mud/rock tires.


 It became apparent after a good bit of thought that I had a geometry issue (damn math!) and then I became concerned that I may be putting too much stress on the back pulleys so I lowered the hardtop back onto the Jeep and called it a weekend. Then Iowa got cold as hell again and things came to a halt for a few weeks.