


Hello From the North East of England!


Thread Starter
JK Newbie
Joined: Jan 2017
Posts: 8
Likes: 0
From: Newcastle- GB
 Hello From the North East of England!
So New Years day 2016, I went out on a day trip and hit some trails with some friends. I was driving my pick up which had 2.5" of lift and 33" tyres. She had done me proud until this day. I was following a friend and his JKU the entire day, it just skipped over every obstacle making it look easy. Id had enough, the time had come to sell my rig and move towards the light. Two months later I had sold my Pick-up and traveled south to pick up my NEW JEEP JKU!!!
2008 Jeep Wrangler Sahara CRD with only 33,000 miles on the clock (Previously a chelsea tractor around London) I drove it home that day and fell in love!
So after a month of driving, the time had come. I ordered the following-
-OME 4" lift kit
-Rubicon Express adjustable Control Arms
-16" x 8" Modular Rims
-35" Cooper STT Pros
-Albrecht AE-6891 remote head CB
-Sirio Hi-Power 3000PL Antenna
-Pioneer SPH-DA120 App Radio
Instead of using the caster correction plates that came with the OME kit, I went with new Rubicon Express Control Arms.
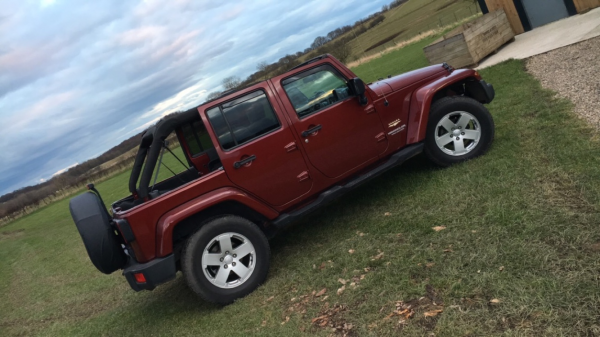

2008 Jeep Wrangler Sahara CRD with only 33,000 miles on the clock (Previously a chelsea tractor around London) I drove it home that day and fell in love!
So after a month of driving, the time had come. I ordered the following-
-OME 4" lift kit
-Rubicon Express adjustable Control Arms
-16" x 8" Modular Rims
-35" Cooper STT Pros
-Albrecht AE-6891 remote head CB
-Sirio Hi-Power 3000PL Antenna
-Pioneer SPH-DA120 App Radio
Instead of using the caster correction plates that came with the OME kit, I went with new Rubicon Express Control Arms.
Last edited by jedg; Jan 20, 2017 at 12:45 AM.
Thread Starter
JK Newbie
Joined: Jan 2017
Posts: 8
Likes: 0
From: Newcastle- GB
Time To Work
The Lift took a total of 10 hours to complete, start to finish.
I had a basic set of tools- Spanners, Wrenches, a Socket set, one pillar jack and breaker bar.
I was pretty pleased with how it went, it was the first full lift I've ever done.
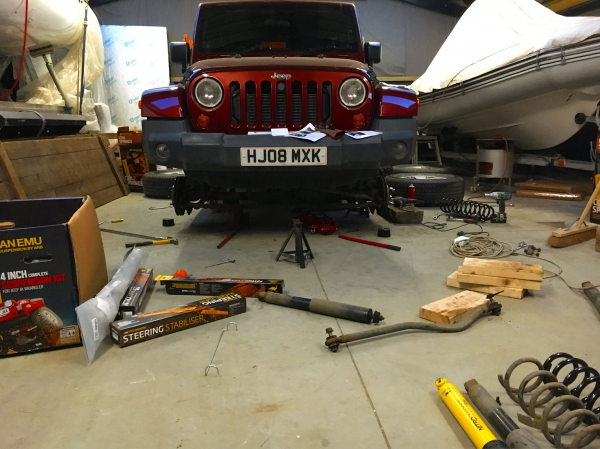
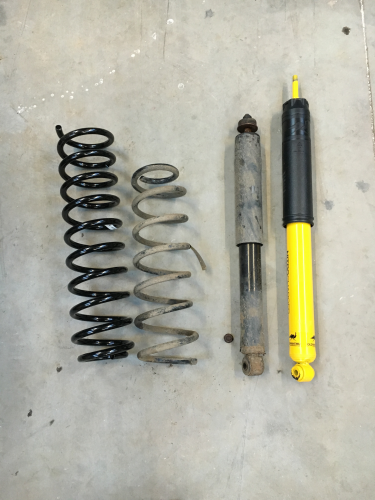
I had a basic set of tools- Spanners, Wrenches, a Socket set, one pillar jack and breaker bar.
I was pretty pleased with how it went, it was the first full lift I've ever done.
Last edited by jedg; Jan 20, 2017 at 12:46 AM.
Thread Starter
JK Newbie
Joined: Jan 2017
Posts: 8
Likes: 0
From: Newcastle- GB
Communication
Fitting my CB and Antenna. I know that I've already listed them. But I thought best to show you guys what I've done.
So-
I didn't want it mounted up in the roof as I'm not the biggest fan of that. Nor did I want it in the cubby box, I've done this before and it looses a valuable space.
I went with the Albrecht AE-6891 remote head CB, which meant I was able to mount the main unit somewhere safe and out the way. In this case, I mounted it under my seat. I made a small T bracket and fitted that to the underside of the drivers seat allowing the unit to bolt onto that and be suspended under there and hidden away. As for the monitor and mic- they are mounted up on the dash, which works great for me.
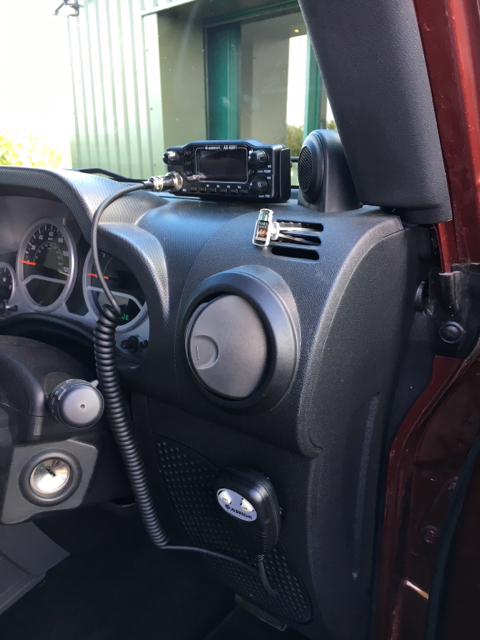
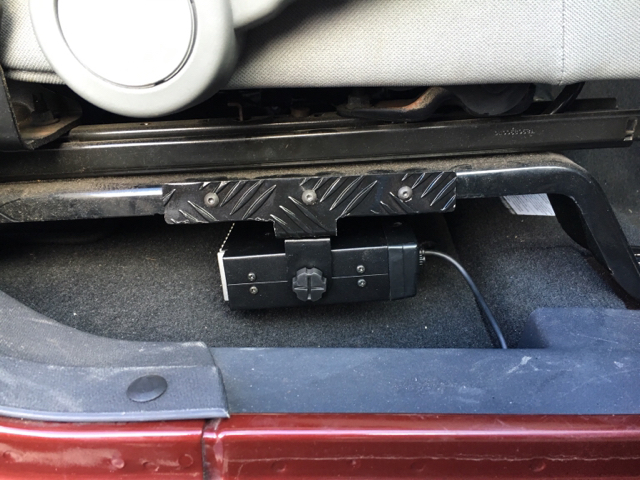
As for the antenna, I went with a Sirio Hi-Power 3000PL Antenna which is a quality powerful piece of kit. Allowing me to get a quality service out of a quality set up. So far I'm really pleased with the way it all works!


So-
I didn't want it mounted up in the roof as I'm not the biggest fan of that. Nor did I want it in the cubby box, I've done this before and it looses a valuable space.
I went with the Albrecht AE-6891 remote head CB, which meant I was able to mount the main unit somewhere safe and out the way. In this case, I mounted it under my seat. I made a small T bracket and fitted that to the underside of the drivers seat allowing the unit to bolt onto that and be suspended under there and hidden away. As for the monitor and mic- they are mounted up on the dash, which works great for me.
As for the antenna, I went with a Sirio Hi-Power 3000PL Antenna which is a quality powerful piece of kit. Allowing me to get a quality service out of a quality set up. So far I'm really pleased with the way it all works!
Last edited by jedg; Jan 20, 2017 at 12:46 AM.
Thread Starter
JK Newbie
Joined: Jan 2017
Posts: 8
Likes: 0
From: Newcastle- GB
Some TLC and cheap mods
Reverse lighting and some TLC
Firstly I bought a Rugged ridge A-Pillar switch cluster... With this, I installed a On/Off/On Carling rocker switch for the new reverse/work flood lights.
Id had the idea a few weeks back that it would be good to somehow inset the lights into the rear stock JK bumper. I did some research and pulled the bumper apart to find that it would only work mounting them at the top, just out from the tyre U shape in the bumper. This is due to the shape of the bumper and mainly the rear cross member.
ANYWAY!! Installed and working brilliantly! I took a feed straight from the battery and also from the Reverse lights meaning that I can operate them manually or automatically when engaging reverse... very slick (Im not sparky so I'm pretty proud of myself!!)
Oh I also gave the stock bumpers some TLC and brought them back to black using a combination of a heat gun a Linseed Oil. Proofs in the pudding, a week on (Plenty of rain and on/off road miles) and they are all still black and shiny!!
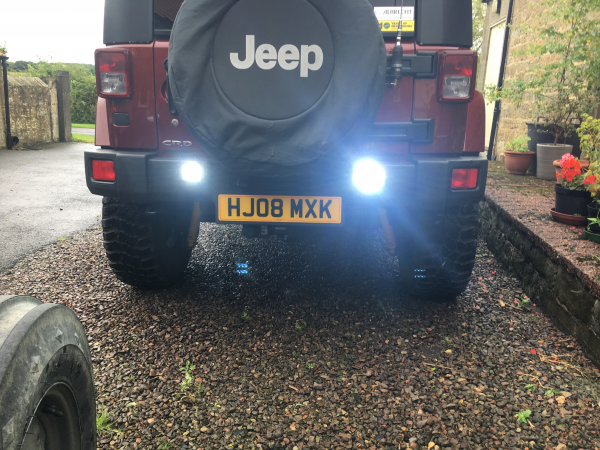
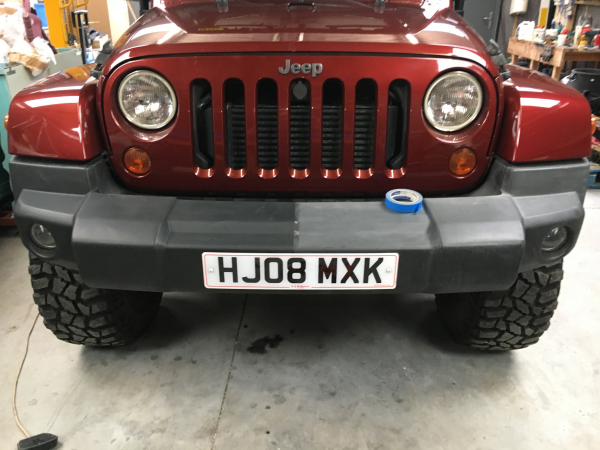
Firstly I bought a Rugged ridge A-Pillar switch cluster... With this, I installed a On/Off/On Carling rocker switch for the new reverse/work flood lights.
Id had the idea a few weeks back that it would be good to somehow inset the lights into the rear stock JK bumper. I did some research and pulled the bumper apart to find that it would only work mounting them at the top, just out from the tyre U shape in the bumper. This is due to the shape of the bumper and mainly the rear cross member.
ANYWAY!! Installed and working brilliantly! I took a feed straight from the battery and also from the Reverse lights meaning that I can operate them manually or automatically when engaging reverse... very slick (Im not sparky so I'm pretty proud of myself!!)
Oh I also gave the stock bumpers some TLC and brought them back to black using a combination of a heat gun a Linseed Oil. Proofs in the pudding, a week on (Plenty of rain and on/off road miles) and they are all still black and shiny!!
Last edited by jedg; Jan 20, 2017 at 12:46 AM.
Thread Starter
JK Newbie
Joined: Jan 2017
Posts: 8
Likes: 0
From: Newcastle- GB
Rear HD tyre carrier by Teraflex
I decided to take the plunge and sort out the rear end, meaning I can now travel around with my full size spare tyre...
After plenty of thought and research, Alex at Buzz-Racing (UK based Jeep specialist) guided me down the right path towards the TeraFlex HD hinged tyre carrier. I placed my order on the Wednesday lunch time and had it Thursday by 10am! Alex was very helpful with the process, his wealth of product knowledge helped to make me confident in my decision to buy. Now I have the kit installed on the Jeep I see why TeraFlex have the rep that they do. Its clean, strong, aesthetic and easy to install. Once on the vehicle with the weight of the 35 on the back, opening the gate feels like stock! You can feel the quality and strength with each open and close of the gate..
Id highly recommend this over the others on the market, I've heard a few bad points on the other HD hinged carriers.. Such as the paint on the hinges chipping off with the first swing open (Resulting in rust over time) I think that with the small difference in price, its worth while going all in and purchasing the Teraflex!
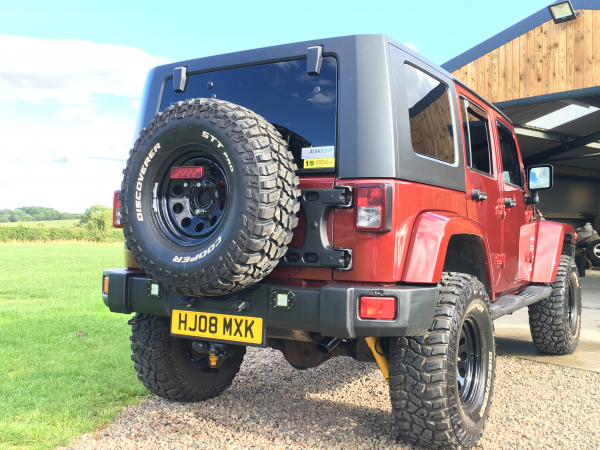
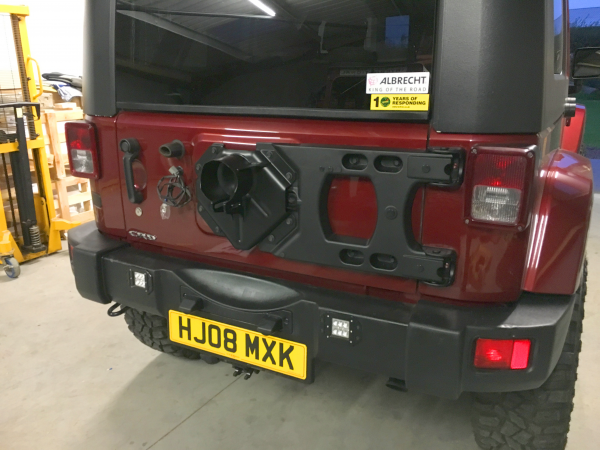
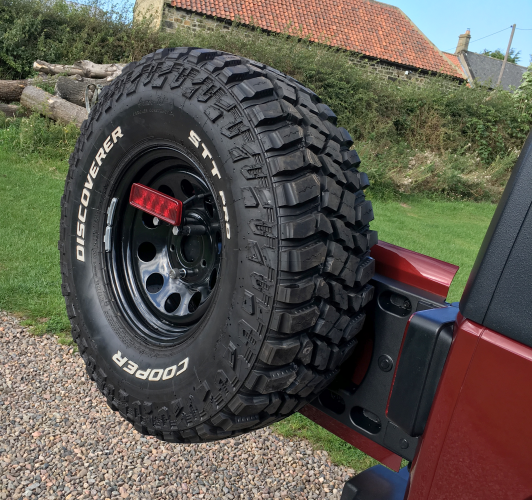

After plenty of thought and research, Alex at Buzz-Racing (UK based Jeep specialist) guided me down the right path towards the TeraFlex HD hinged tyre carrier. I placed my order on the Wednesday lunch time and had it Thursday by 10am! Alex was very helpful with the process, his wealth of product knowledge helped to make me confident in my decision to buy. Now I have the kit installed on the Jeep I see why TeraFlex have the rep that they do. Its clean, strong, aesthetic and easy to install. Once on the vehicle with the weight of the 35 on the back, opening the gate feels like stock! You can feel the quality and strength with each open and close of the gate..
Id highly recommend this over the others on the market, I've heard a few bad points on the other HD hinged carriers.. Such as the paint on the hinges chipping off with the first swing open (Resulting in rust over time) I think that with the small difference in price, its worth while going all in and purchasing the Teraflex!
Last edited by jedg; Jan 20, 2017 at 12:47 AM.
Thread Starter
JK Newbie
Joined: Jan 2017
Posts: 8
Likes: 0
From: Newcastle- GB
Progress
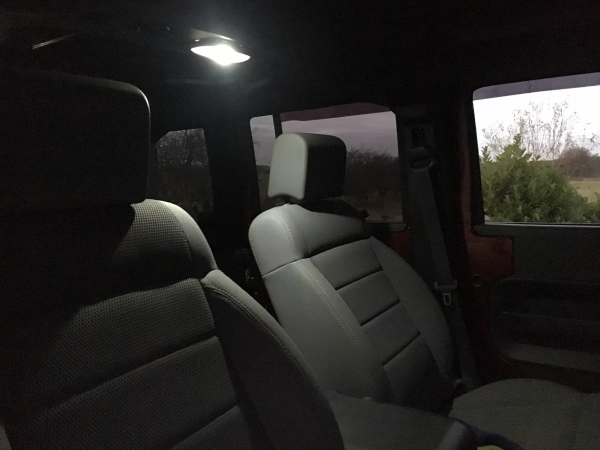
I started swapping out stock bulbs to LED, so far I've changed the interior lights, number plate bulbs and the head lights.
The Headlights, where a set of Chinese copies from eBay... Now before anyone bites my head off, I decided to go with these FOR NOW for the aesthetics. They don't produce any more light than the stock Mopar lights in my opinion. But they don't half look cooler with the DRL halos which switch to an Orange light which flashes with the indicators. Pictures to Follow after this update. However, these will be changed next year , Alex at Buzz has a set of JWs with my name on!
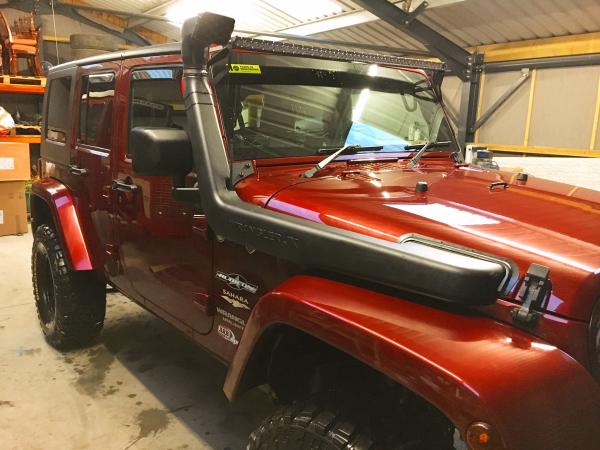
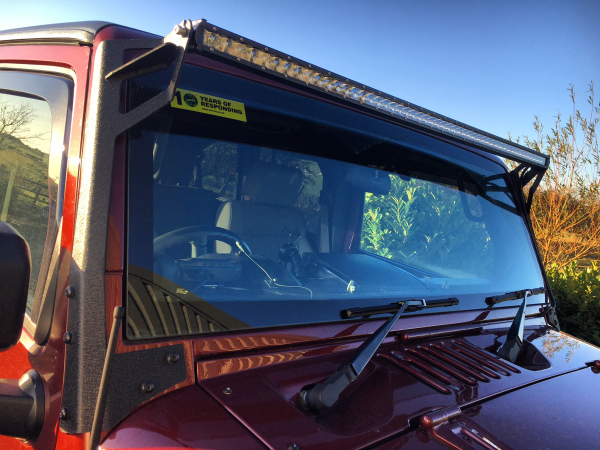
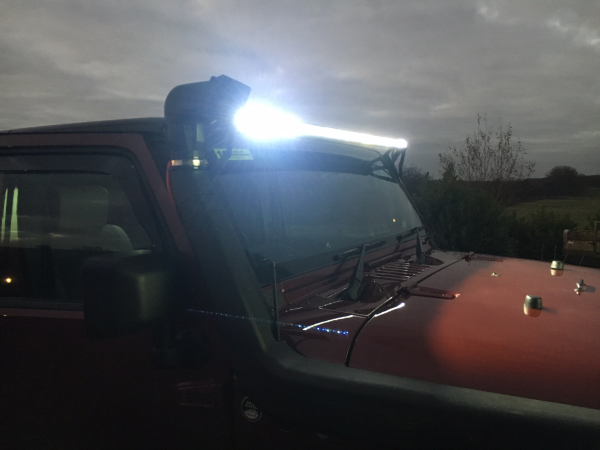
Next, I fitted a 50" LED light bar and mounts to the roof... Damn this thing is like the sun! It honestly makes driving at night a dream (On back roads when theres no on coming vehicles) Ive wired the bar up to a On/Off/On switch. Meaning Its with on with High Beam, Off or toggled manually. I Love this thing!
In the same day I fitted a snorkel to the Jeep. Now this was a worrying hour, nobody likes cutting into clean fresh paint work thats for sure. However now its all plumbed in I'm very happy with the out-come. I also ran my extended breather up to it (ill touch on those next)
BREATHERS... Well these were fun. I had a good look around at off the shelf kits and I decided 'heck' I can make this myself!
I bought all the parts needed from the friendly store of eBay!
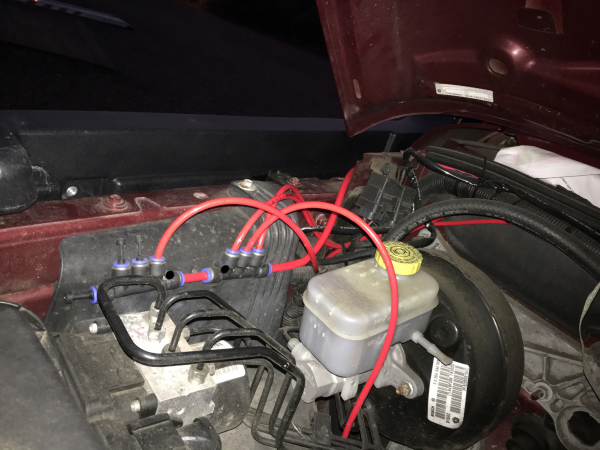
Its was a pretty easy install to do. The way I did it was to source all of the stock breathers, trim them down to about 1" to 2"s then slot on two hose clips onto them and then the hose barbs. Tighten them all down so they are air/water tight. Then run all the new tubing into the engine bay (6mm) to the multi T and then a larger diameter (8mm) up and into the snorkel head. Im really pleased with the way this works. If anyone is after a fully made kit I would be able make one up for you. Or just supply the needed info on where to find the two tricky breathers (Transfer case and Transmission)
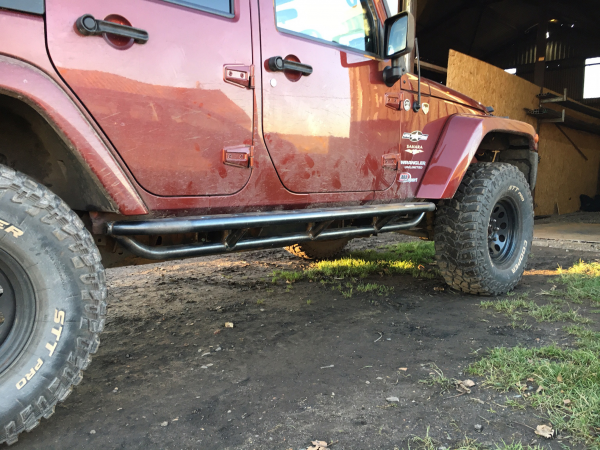
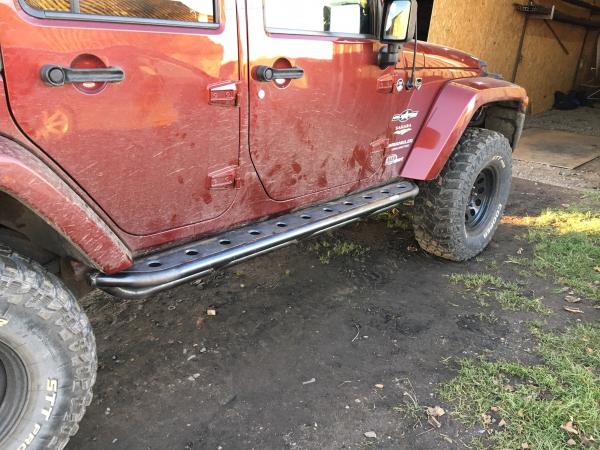
Rock sliders- Well a buddy of mine has started up his own fabrication business. When I say this guy is talented, well its an understatement!! He has built me some bad-ass custom step/sliders. These things are solid, we tested them with a Hi-Lift. We set the jack in the centre of the slider, resulting in lifting the full side of the jeep off the ground, from one jacking point. Now its not like this is really needed, but its nice to know they are strong as hell and down flex under weight!! Ill attach some pictures below, this is them un-painted. Ill be doing that this week. If any of you are interested, Ive shared his Facebook page on the Jeep Enthusiasts page. He's called- JFT Fabrication. He has a website coming in the new year!
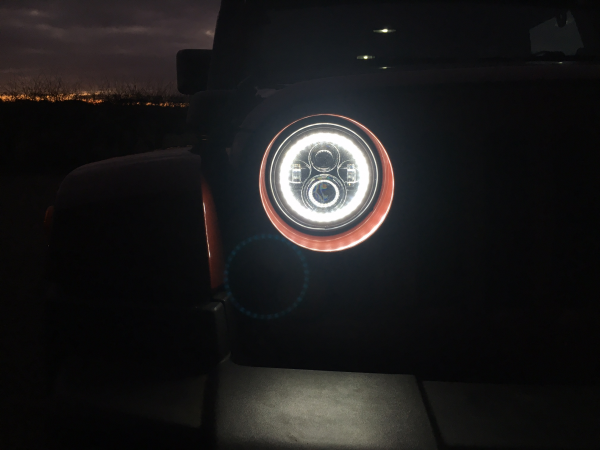
The Headlights, where a set of Chinese copies from eBay... Now before anyone bites my head off, I decided to go with these FOR NOW for the aesthetics. They don't produce any more light than the stock Mopar lights in my opinion. But they don't half look cooler with the DRL halos which switch to an Orange light which flashes with the indicators. Pictures to Follow after this update. However, these will be changed next year , Alex at Buzz has a set of JWs with my name on!
Next, I fitted a 50" LED light bar and mounts to the roof... Damn this thing is like the sun! It honestly makes driving at night a dream (On back roads when theres no on coming vehicles) Ive wired the bar up to a On/Off/On switch. Meaning Its with on with High Beam, Off or toggled manually. I Love this thing!
In the same day I fitted a snorkel to the Jeep. Now this was a worrying hour, nobody likes cutting into clean fresh paint work thats for sure. However now its all plumbed in I'm very happy with the out-come. I also ran my extended breather up to it (ill touch on those next)
BREATHERS... Well these were fun. I had a good look around at off the shelf kits and I decided 'heck' I can make this myself!
I bought all the parts needed from the friendly store of eBay!
Its was a pretty easy install to do. The way I did it was to source all of the stock breathers, trim them down to about 1" to 2"s then slot on two hose clips onto them and then the hose barbs. Tighten them all down so they are air/water tight. Then run all the new tubing into the engine bay (6mm) to the multi T and then a larger diameter (8mm) up and into the snorkel head. Im really pleased with the way this works. If anyone is after a fully made kit I would be able make one up for you. Or just supply the needed info on where to find the two tricky breathers (Transfer case and Transmission)
Rock sliders- Well a buddy of mine has started up his own fabrication business. When I say this guy is talented, well its an understatement!! He has built me some bad-ass custom step/sliders. These things are solid, we tested them with a Hi-Lift. We set the jack in the centre of the slider, resulting in lifting the full side of the jeep off the ground, from one jacking point. Now its not like this is really needed, but its nice to know they are strong as hell and down flex under weight!! Ill attach some pictures below, this is them un-painted. Ill be doing that this week. If any of you are interested, Ive shared his Facebook page on the Jeep Enthusiasts page. He's called- JFT Fabrication. He has a website coming in the new year!
Last edited by jedg; Jan 20, 2017 at 12:47 AM.
Thread Starter
JK Newbie
Joined: Jan 2017
Posts: 8
Likes: 0
From: Newcastle- GB
A Detailed look at the Sliders
The Rock/Tree Sliders
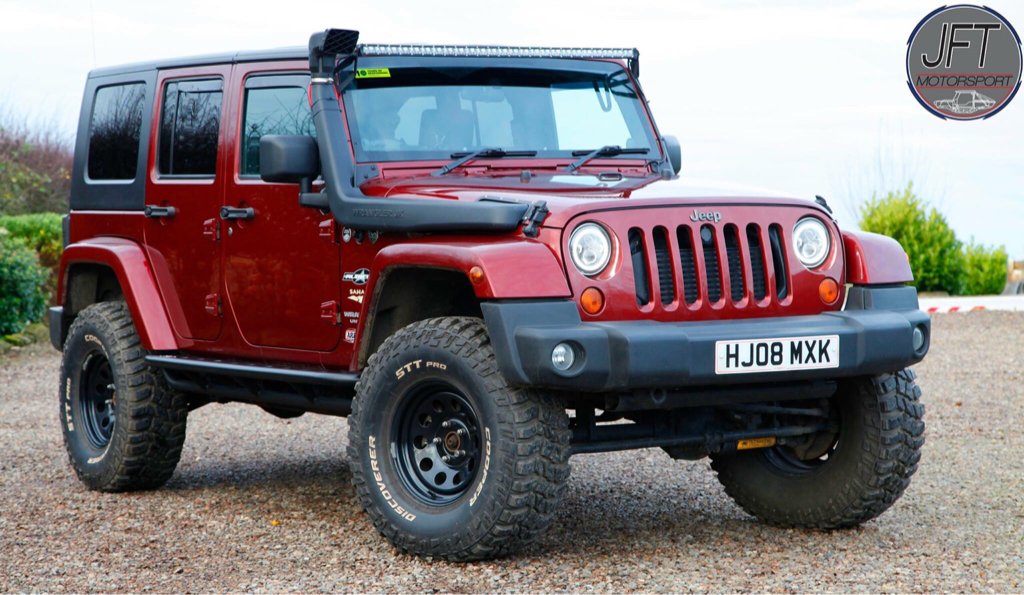
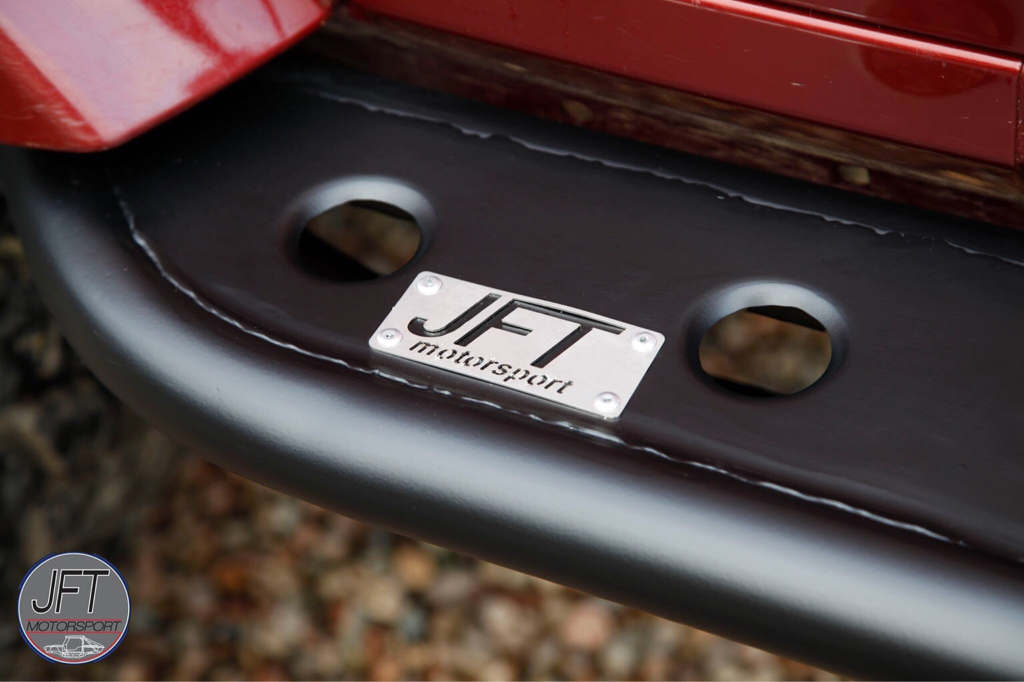
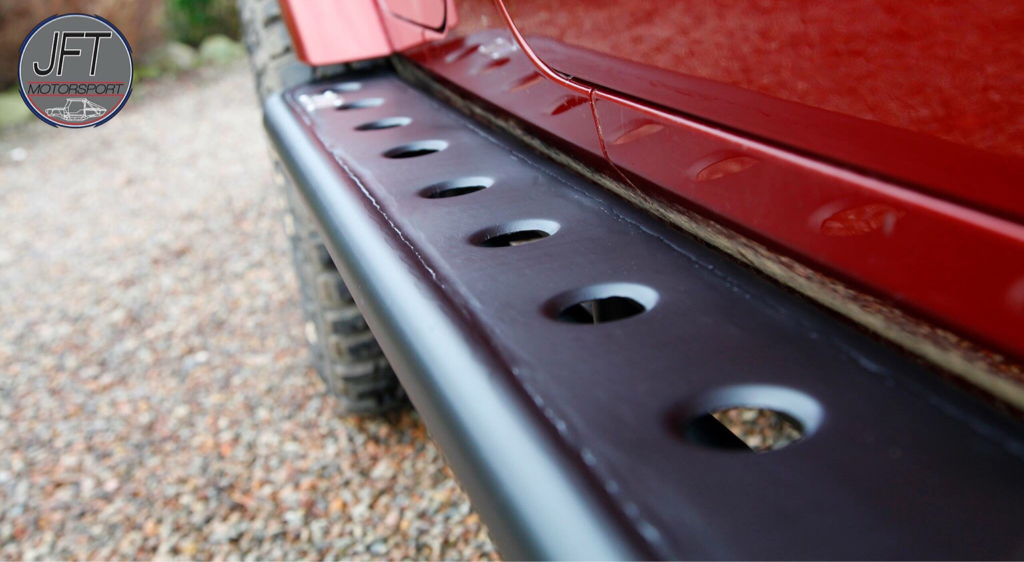
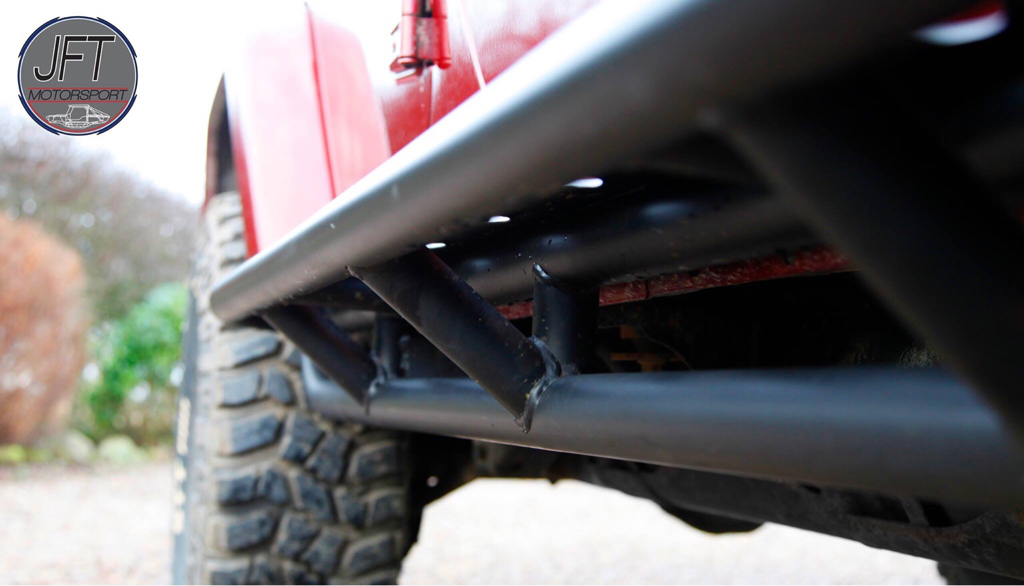
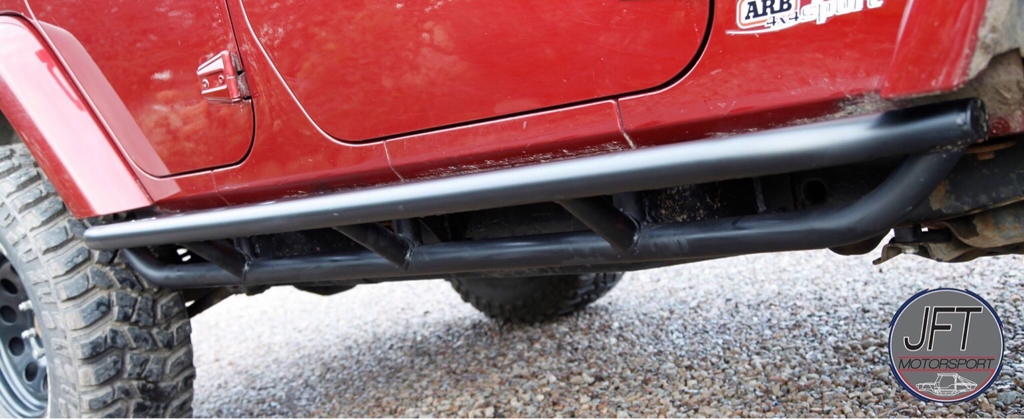
So I've finally found time to upload some photos of the Rock/Tree sliders built by JFT Fabrication painted and installed.
The sliders are secured to the frame using two hefty 6mm Steal plates which are drilled with nuts welded to the inside. The sliders then bolt to these plates with 8x M12 50mm bolts. Needless to say, these things do not move!
I've had to use them a few times already, they really do take a beating!
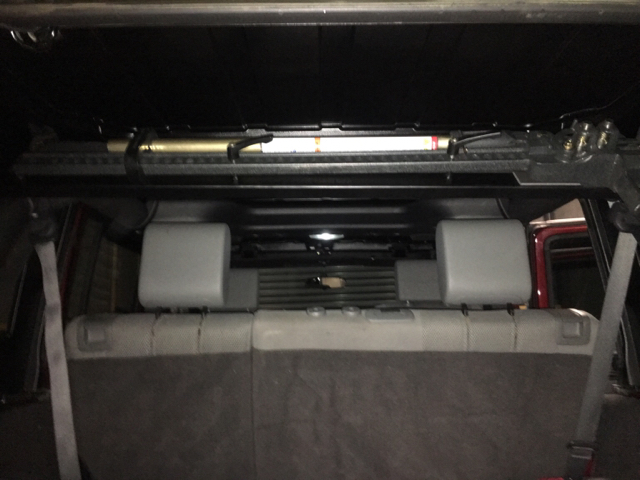
Over Christmas I treated the jeep to a new Hi-Lift Extreme 48" and a new LED Maglite. I made up a bracket for the Hi-Lift so that it can sit inside the truck where it's dry and safe. The bracket goes full length across the cage and I think I'll be using this main beam to mount other things off in future.
Next on the list of cheap mods is some Bush cables for Pay n Play sites. Don't worry, not for on the main roads.

So I've finally found time to upload some photos of the Rock/Tree sliders built by JFT Fabrication painted and installed.
The sliders are secured to the frame using two hefty 6mm Steal plates which are drilled with nuts welded to the inside. The sliders then bolt to these plates with 8x M12 50mm bolts. Needless to say, these things do not move!
I've had to use them a few times already, they really do take a beating!
Over Christmas I treated the jeep to a new Hi-Lift Extreme 48" and a new LED Maglite. I made up a bracket for the Hi-Lift so that it can sit inside the truck where it's dry and safe. The bracket goes full length across the cage and I think I'll be using this main beam to mount other things off in future.
Next on the list of cheap mods is some Bush cables for Pay n Play sites. Don't worry, not for on the main roads.
Last edited by jedg; Jan 20, 2017 at 12:48 AM.