WxNerd2015's Never Ending Build -
 04-06-2017, 09:50 AM
#201
JK Enthusiast
Thread Starter
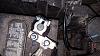
Once again, I have another modification done! Been a productive few weeks with the Jeep! This was a fairly simple installation, however one part was extremely difficult to get right. It was a simple step, but complicated to get it right. Ultimately though, I am very happy with the Hood Lift kit, and love not having to grab the hood prop to hold the hood open now! It just lifts itself up.
Also, before I start I will also highlight, that there are 2 different hood lift kits from Rugged Ridge, but they have the same part number. The one I got was from Extreme Terrain, and is also the updated version straight from Rugged Ridge. The updated version has the bracket that attaches the lower stud to the body, where the older version attaches the lower stud directly to the body. I preferred the bracket option as I believe it provided a bit more strength there and made the angle of the strut a bit better for force exerted. In no way is this a scientific analysis, just my feelings on it. Either way, it is a very convenient and nice kit from Rugged Ridge at a good price!
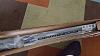
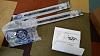
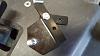
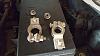
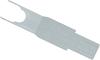
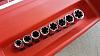
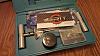
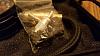
First off, Here are some pics of the kit unboxed. It came wit hate two struts, 2 lower mounting brackets, 2 upper mounting brackets, 2 nut plates, and the rest of the necessary hardware for attaching to the Jeep.
First up, you need to grab a 10 mm and 13 mm socket, as well as a 10 mm and 13 mm wrench.

Go ahead and grab your 10 mm socket and remove the 10 mm bolt attached to the fender closest to the firewall
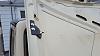
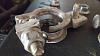
Grab you bracket, and line of the hole in the tab with that hole, and so that the main body of your bracket goes inside the body panel. Then go ahead and grab your nut that was in the body and loosely tighten it down, allowing the bracket to still move slightly. Now grab one of your 2 M6 bolts, and 2 of the M6 washers, and 1 M6 nut to attach the rest of the bracket to the Jeep. Line the further back hole on the bracket up with the hole in the body and insert your bolt from the outside utilizing 1 washer, and attach the other washer and nut from the inside. Grab your 10 mm wrench and socket and tighten down.

Once that nut and bolt are tightened, finish tightening the body bolt as well and make sure the bracket is secure. Once that is done, there is one hole left in the bracket, that is for the lower ball stud for the strut. Grab the lower ball stud bolt and the corresponding nut. insert the threaded side of the ball stud from the inside portion of the Jeep so the ball is facing in, and thread the nut from the other side. Grab the 13 mm socket and wrench and tighten down.
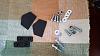
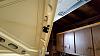
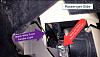
Wit that bracket attached, go ahead and move to the passenger side following the exact same steps, and you will have both lower brackets attached. (For the passenger side, I had to remove some wiring I had run through that hole, but that was the only extra step I had) You can now move to the upper brackets, and these mount in existing holes in the hood using a bracket and nut plate. First, take the cover off the adhesive backing on the gasket and stick the gasket to the on the back of the upper bracket. Then, make sure you have these pieces.
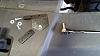
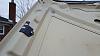
The first step of the upper bracket is to get the nut plate into the hole. Now, Rugged Ridge recommends using the method pictured below to "fish" the nut plate into the hole and not drop it.
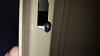
I struggled with this for a while as it was an extremely tight fit to get the nut plate in the hole and rotate all the bracketry exactly where it needed to go, but the end result ended up looking like this!
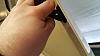
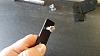
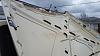
On the passenger side however, I ready someone else's write-up on this installation, and tried their method for getting the nut plate in, and it went much easier. The method that I tried was inserting a bolt just into the nut plate, not the bracket itself, like seen below.
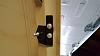
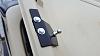
Once the nut plate is in the hole, you can allow it to hang, and grab your bracket. Thread a nut and washer through the other hole and hand tighten. Then remove the initial bolt, and thread it through the bracket with a washer too, and tighten down. If you are going to get this kit and do this install, I highly recommend the latter method! It will make your life much easier! The final result on the passenger side appears as below.
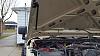
The last step now is to grab your struts, and snap them onto the ball mounts. Make sure the larger diameter part is snapped in at the top and smaller diameter at the bottom. And there ya have it! You no longer need to use the annoying hood prop and it won't get in the way anymore!

I will post a video of the hood lift system working soon too. So stay tuned for that! But I am very happy with it, and it functions quite well!
Also, before I start I will also highlight, that there are 2 different hood lift kits from Rugged Ridge, but they have the same part number. The one I got was from Extreme Terrain, and is also the updated version straight from Rugged Ridge. The updated version has the bracket that attaches the lower stud to the body, where the older version attaches the lower stud directly to the body. I preferred the bracket option as I believe it provided a bit more strength there and made the angle of the strut a bit better for force exerted. In no way is this a scientific analysis, just my feelings on it. Either way, it is a very convenient and nice kit from Rugged Ridge at a good price!
First off, Here are some pics of the kit unboxed. It came wit hate two struts, 2 lower mounting brackets, 2 upper mounting brackets, 2 nut plates, and the rest of the necessary hardware for attaching to the Jeep.
First up, you need to grab a 10 mm and 13 mm socket, as well as a 10 mm and 13 mm wrench.
Go ahead and grab your 10 mm socket and remove the 10 mm bolt attached to the fender closest to the firewall
Grab you bracket, and line of the hole in the tab with that hole, and so that the main body of your bracket goes inside the body panel. Then go ahead and grab your nut that was in the body and loosely tighten it down, allowing the bracket to still move slightly. Now grab one of your 2 M6 bolts, and 2 of the M6 washers, and 1 M6 nut to attach the rest of the bracket to the Jeep. Line the further back hole on the bracket up with the hole in the body and insert your bolt from the outside utilizing 1 washer, and attach the other washer and nut from the inside. Grab your 10 mm wrench and socket and tighten down.
Once that nut and bolt are tightened, finish tightening the body bolt as well and make sure the bracket is secure. Once that is done, there is one hole left in the bracket, that is for the lower ball stud for the strut. Grab the lower ball stud bolt and the corresponding nut. insert the threaded side of the ball stud from the inside portion of the Jeep so the ball is facing in, and thread the nut from the other side. Grab the 13 mm socket and wrench and tighten down.
Wit that bracket attached, go ahead and move to the passenger side following the exact same steps, and you will have both lower brackets attached. (For the passenger side, I had to remove some wiring I had run through that hole, but that was the only extra step I had) You can now move to the upper brackets, and these mount in existing holes in the hood using a bracket and nut plate. First, take the cover off the adhesive backing on the gasket and stick the gasket to the on the back of the upper bracket. Then, make sure you have these pieces.
The first step of the upper bracket is to get the nut plate into the hole. Now, Rugged Ridge recommends using the method pictured below to "fish" the nut plate into the hole and not drop it.
I struggled with this for a while as it was an extremely tight fit to get the nut plate in the hole and rotate all the bracketry exactly where it needed to go, but the end result ended up looking like this!
On the passenger side however, I ready someone else's write-up on this installation, and tried their method for getting the nut plate in, and it went much easier. The method that I tried was inserting a bolt just into the nut plate, not the bracket itself, like seen below.
Once the nut plate is in the hole, you can allow it to hang, and grab your bracket. Thread a nut and washer through the other hole and hand tighten. Then remove the initial bolt, and thread it through the bracket with a washer too, and tighten down. If you are going to get this kit and do this install, I highly recommend the latter method! It will make your life much easier! The final result on the passenger side appears as below.
The last step now is to grab your struts, and snap them onto the ball mounts. Make sure the larger diameter part is snapped in at the top and smaller diameter at the bottom. And there ya have it! You no longer need to use the annoying hood prop and it won't get in the way anymore!
I will post a video of the hood lift system working soon too. So stay tuned for that! But I am very happy with it, and it functions quite well!
 04-12-2017, 05:35 AM
#202
JK Enthusiast
Thread Starter
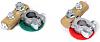
Hey Guys, just another quick update! i did the Marker Light Mod on my Jeep last night! I know that this is well known throughout the JK community so no need for too much detail, but man is it simple, and make the Jeep the way it should have come from the factory. All you have to do is cut the Black wire from the Side Marker Light in the flare (And cut as close to the connector plug up inside the body as you can, not by the light), then locate the wire on the opposite side of the turn signal connector from the Black wire (so driver side is white with green stripe and passenger side is white with Yellow on my 11 JK) and splice the Black wire (the part that still runs to the light to turn signal wire wire. Simple as that! Here are a couple of diagrams showing my work:
And I also put together a short video showing the lights functioning in all different scenarios:
https://www.youtube.com/watch?v=RZtqdBuQ03s&feature=youtu.be Overall, I am very happy with how this turned out, and it works great! I highly recommend it! And hey, it's another reason to go work on the Jeep! AND it's free! What's better? Haha! Anyways, enjoy the short clip, and more write-ups to come so stay tuned!
And I also put together a short video showing the lights functioning in all different scenarios:
https://www.youtube.com/watch?v=RZtqdBuQ03s&feature=youtu.be Overall, I am very happy with how this turned out, and it works great! I highly recommend it! And hey, it's another reason to go work on the Jeep! AND it's free! What's better? Haha!
Anyways, enjoy the short clip, and more write-ups to come so stay tuned!
04-13-2017, 04:34 AM
#203
JK Enthusiast
Thread Starter
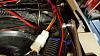
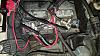
Yesterday I my new battery terminal leads came in so i was able to install them real quick after work! Over the weekend, I had noticed that my positive battery terminal lead was almost completely cracked, and I did not want to have a battery issue because of a broken terminal, but not quite sure how it cracked like that as I never remove or touch the lead, just the bolt to connect wires too on the top. I guess they are just a cheap piece that was used here. But anyways, I order the JK HD terminal leads from Quadratec for the '07-'11 JKs, and man are they nice! They weigh considerably more than I expected and are completely solid! So I should no longer have any issues with em!
Quadratec JK-HDBT Extreme Duty Battery Terminals for 07-11 Jeep Wrangler and Wrangler Unlimted JK
Changing the leads was actually more simple than I thought, and only took me about 15-20 minutes. Here's a few before shots highlighting the broken/cracked positive terminal:
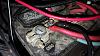
If you look just to the right of the nut, up against the terminal, you can see the cracked piece.
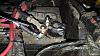
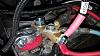
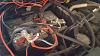
Start off by first disconnecting any wires from negative battery terminal lead, and then remove the terminal lead itself from the terminal. Then do the same process on the positive lead. And make sure you remember where everything goes for reassembly! For removal, I needed a socket wrench and a 10 mm and 12 mm socket. Here's what the leads look like removed from anything:
As you can now see a bit easier, that positive thread was only holding on by a few mms on the bottom ring...not good! Anyways, So i opened up the new kit, and this is what the contents looked like:

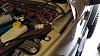
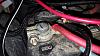
Additionally, For installation of the new terminals, I needed a 10 mm, 13 mm, and 14 mm socket and the socket wrench from earlier. You first slide the anti corrosion rings over the terminals, then you place the proper terminal lead on each terminal. The terminal lead with the 3/8s hole goes on the positive lead, and the terminal with the 5/16s hole goes on the negative. I wish these terminals would have been labeled or color coded to make this step a bit easier, because that is such a small different that it is hard to tell, but obviously, the smaller lead would not fit over the larger terminal at all, so you can figure it out.
Start with the Positive lead. Slide the lead over the terminal and tighten the clamp down to the terminal. Then go ahead and attach the vehicles power cables (red and green) to the 10mm bolt on the top of the terminal lead. Then attach any positive accessory wires to the end of the terminal lead with the 10mm bolt as well. Then follow the same steps for the negative terminal. The final product looks like this:
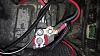
Overall, I am happy with the new leads and feel much more comfortable that these will last for a long time and have no issues. There is a version for the '12-'17 version of the JK too if anyone is interested in these. But I believe that I would recommend these, and at the very least, make sure you check your terminal leads, as these seems like a pretty weak part that came stock on the JK. It's a small thing, but if that would have broken, it could have caused a big issues, so I am glad I caught it when I did! Anyways, if there are any questions on this, let me know! I have not seen a lot of info on JK battery terminal leads, so doesn't seem like a common issue, but nontheless, wanted to share my info! Stay tuned for more!
Quadratec JK-HDBT Extreme Duty Battery Terminals for 07-11 Jeep Wrangler and Wrangler Unlimted JK
Changing the leads was actually more simple than I thought, and only took me about 15-20 minutes. Here's a few before shots highlighting the broken/cracked positive terminal:
If you look just to the right of the nut, up against the terminal, you can see the cracked piece.
Start off by first disconnecting any wires from negative battery terminal lead, and then remove the terminal lead itself from the terminal. Then do the same process on the positive lead. And make sure you remember where everything goes for reassembly! For removal, I needed a socket wrench and a 10 mm and 12 mm socket. Here's what the leads look like removed from anything:
As you can now see a bit easier, that positive thread was only holding on by a few mms on the bottom ring...not good! Anyways, So i opened up the new kit, and this is what the contents looked like:
Additionally, For installation of the new terminals, I needed a 10 mm, 13 mm, and 14 mm socket and the socket wrench from earlier. You first slide the anti corrosion rings over the terminals, then you place the proper terminal lead on each terminal. The terminal lead with the 3/8s hole goes on the positive lead, and the terminal with the 5/16s hole goes on the negative. I wish these terminals would have been labeled or color coded to make this step a bit easier, because that is such a small different that it is hard to tell, but obviously, the smaller lead would not fit over the larger terminal at all, so you can figure it out.
Start with the Positive lead. Slide the lead over the terminal and tighten the clamp down to the terminal. Then go ahead and attach the vehicles power cables (red and green) to the 10mm bolt on the top of the terminal lead. Then attach any positive accessory wires to the end of the terminal lead with the 10mm bolt as well. Then follow the same steps for the negative terminal. The final product looks like this:
Overall, I am happy with the new leads and feel much more comfortable that these will last for a long time and have no issues. There is a version for the '12-'17 version of the JK too if anyone is interested in these. But I believe that I would recommend these, and at the very least, make sure you check your terminal leads, as these seems like a pretty weak part that came stock on the JK. It's a small thing, but if that would have broken, it could have caused a big issues, so I am glad I caught it when I did! Anyways, if there are any questions on this, let me know! I have not seen a lot of info on JK battery terminal leads, so doesn't seem like a common issue, but nontheless, wanted to share my info! Stay tuned for more!
04-18-2017, 05:00 AM
#204
JK Enthusiast
Thread Starter
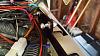
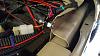
Just a quick and simple addition, but wanted to share nonetheless! Order a few Contura IX Rockers from OTRATTW for the sPod for everything that I have wired up there. I redid a lot of my wiring last weekend and cleaned it up, still need to get some weatherproofing on it and labels (as I want it to look as professional as possible, as well as be able to find what I need and keep everything where it needs to be), but I added the A-Pillars lights into the sPod too on two switches. The included rockers are fine, but I wanted to have the labels on there, and OTRATTW makes really nice laser etched rockers! I ended up with one for the CB, One for the Compressor, and 2 windshield lights customized by beam pattern (Spot and Flood). I love the fact that the rockers match how my jeep looks, and the text and pictures looks better than just the blank switches...but now I want to fill em all! Haha!  Anyways, here's a few pics of em installed, with back light on and off too!

I also decided that I wanted to grab the rocker removal tool instead of just trying to pry the switch covers off, and I am very glad I did! It was cheap, and worked fast and well! I highly recommend using this if you will be swapping switch covers, very safe and easy! This is the one I got off Amazon:
Blue Sea Systems Contura Removal Tool
Anyways, here's a few pics of em installed, with back light on and off too!I also decided that I wanted to grab the rocker removal tool instead of just trying to pry the switch covers off, and I am very glad I did! It was cheap, and worked fast and well! I highly recommend using this if you will be swapping switch covers, very safe and easy! This is the one I got off Amazon:
Blue Sea Systems Contura Removal Tool
04-23-2017, 02:11 PM
#205
JK Enthusiast
Thread Starter
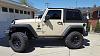
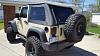
Took some time this weekend, and look! TWSTR's got her summer clothes back on! Bye to the hard top and hello to the Trektop NX again!
Now, all the windows are the same, but I was having an issue with this top flapping on the sound bar badly last year, and contacted Bestop about it. They said it should not be doing that and sent me a new "Safari" piece (the roof). So i now have the brand new roof piece on wit the old windows and such and if for some reason i ever need it, I have an extra top piece! Bestow was very nice and easy to work with to correct it! So i am very happy with them!
Now, all the windows are the same, but I was having an issue with this top flapping on the sound bar badly last year, and contacted Bestop about it. They said it should not be doing that and sent me a new "Safari" piece (the roof). So i now have the brand new roof piece on wit the old windows and such and if for some reason i ever need it, I have an extra top piece! Bestow was very nice and easy to work with to correct it! So i am very happy with them!
05-23-2017, 11:51 AM
#206
JK Enthusiast
Thread Starter
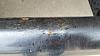
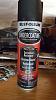
Haven't updated in a while, but been busy with house work and wedding planning and just been enjoying the Jeep, but this past weekend i did get a bit of work done! I noticed some rust on my step boards (just surface rust, but was bubbling the paint up and starting to chip off) and I can't stand looking at rust. So i made a trip to Autozone and got some undercoat and sandpaper and got to work.
Here's a shot of one of the rust spots on the step board, and you can see all the scratches and stuff too:
I started by removing the bolts holding the bar to the brackets, 2 in the front and two in the rear of each bar. I then got to work with a wire brush and a drill and hit all the rust spots down to the metal to have no rust left...and I found a lot more rust that i couldn't see when on the Jeep, so good thing I got to it when I did! And after the wire brush, I grabbed some automotive sandpaper and sanded the entire painted surface on the step boards down to scuff it up to get a good adhesive surface, then sprayed the boards down with the house, let em air dry, then wiped em down with some shop towels to make sure the surface was clean, and then grabbed the Rustoleum Undercoating Spray!
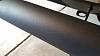
And man, 3 coats each board, a couple hours to dry, and I absolutely love how it came out! The finish matches the factory fenders and bumpers so much better now, and that undercoating is going to be so much tougher! Check out the finished product:
This should have only taken an hour or so, but ended up taking 6 because I originally started trying to remove the brackets from the Jeep, and one of the 4 bolts that go through the rocker panel/pinch seam got stuck and i tried every possible method to get it off or back tight because it was stuck loose. Then finally I asked a neighbor for their Dremel Saw and just cut the bolt and went and got a new bolt and nut. That was the most frustrating part of that whole day, but the work was worth it in the end and I am so much happier with how it looks now! And teh step boards look so much better!
Here's a shot of one of the rust spots on the step board, and you can see all the scratches and stuff too:
I started by removing the bolts holding the bar to the brackets, 2 in the front and two in the rear of each bar. I then got to work with a wire brush and a drill and hit all the rust spots down to the metal to have no rust left...and I found a lot more rust that i couldn't see when on the Jeep, so good thing I got to it when I did! And after the wire brush, I grabbed some automotive sandpaper and sanded the entire painted surface on the step boards down to scuff it up to get a good adhesive surface, then sprayed the boards down with the house, let em air dry, then wiped em down with some shop towels to make sure the surface was clean, and then grabbed the Rustoleum Undercoating Spray!
And man, 3 coats each board, a couple hours to dry, and I absolutely love how it came out! The finish matches the factory fenders and bumpers so much better now, and that undercoating is going to be so much tougher! Check out the finished product:
This should have only taken an hour or so, but ended up taking 6 because I originally started trying to remove the brackets from the Jeep, and one of the 4 bolts that go through the rocker panel/pinch seam got stuck and i tried every possible method to get it off or back tight because it was stuck loose. Then finally I asked a neighbor for their Dremel Saw and just cut the bolt and went and got a new bolt and nut. That was the most frustrating part of that whole day, but the work was worth it in the end and I am so much happier with how it looks now! And teh step boards look so much better!
06-01-2017, 04:43 AM
#207
JK Enthusiast
Thread Starter
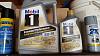
I am ashamed to admit it, with all the other work i have done, but this past weekend was the first time I had ever changed my own oil!  I just have always taken it to the Valvoline location by me and not thought twice about it. But I finally decided it was time to give it a try and do it myself! I ran to Autozone and got 6 quarts of 5W-20 and my filter and I was ready to go!

I quickly found out the disadvantage of doing my own oil change after one of the quick lube places though...I tried to remove the drain plug and it did not budge. I went and got a bigger wrench, still no luck, and then I gave the breaker bar one shot, and sure enough, in one turn, it rounded the enter drain plug off. I could no longer get any grip on it, and it had not bodges...WAAAAAY over torqued! So anyways, I went ahead and headed back over to Autozone and ended up with a set of grip sockets to give it a shot to remove, and over coarse, a new drain plug!
I was doubtful that these sockets would work that well, i wasn't fully understanding how they gripped but figured I had to give it a shot because I really did not have any other options. But man! Those things work great! I used the 13 mm grip socket, and slide right on the bolt snugly, like a normal socket would, but when I gave it a pull with the breaker bar, it dug into that drain plug head really good! I had to give a good bit of force, even with the breaker bar, that's how tight it was on there, but it gave a quarter turn finally and after that i could once again remove it by hand! And i am extremely impressed with the sockets! Here's what the Plug looked light after I got it out:
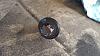
You can see where the teeth in the socket dug in, but that head was near completely rounded! Anyways though, have the first quarter turn and I realized this would work, I grabbed the rest of my stuff, creeper, drain pan, filter wrench, etc. and go to work with the rest of the change!
It was uneventful and went exactly how it should. Insert the new drain plug and made sure it was torqued with a torque wrench only to 20 ft/lbs as specified by Jeep (Engine Torque specs) swapped out the oil filters, and filled up 6 Quarts of 5W-20 and TWSTR's all good to go again!
Additionally though, I found out about a company who does oil analysis (additionally not just engine, but Transmission, Diffs, and T-Case too) called Blackstone Labs. I ordered a couple of analysis containers from them, and took samples of both the old oil and the current Trasmission fluid. Very simply, they can tell a lot about the health of your vehicle from analyzing the different oils and such and what is seen in them, as well as provide advice on when to change fluids, and potential early warning signs for bigger issues that can be prevented much cheaper early on. I am waiting on my analyses from them, but interested to see what comes out of it and what i can learn about the engine and transmission. Each analysis costs $28, and to me, that cost is worth knowing what is going on in my engine and potentially being able to fix something before it becomes a big or expensive issue! I learned about it watching the "ChrisFix" channel on YouTube, love that channel, and here's teh video that covers what this analysis is and gives you more of a visual and example of what you can get from the analysis! Pretty neat!
https://www.youtube.com/watch?v=oIG_BdsffcU&t=0s I will post what I found out when i get my analysis!
I just have always taken it to the Valvoline location by me and not thought twice about it. But I finally decided it was time to give it a try and do it myself! I ran to Autozone and got 6 quarts of 5W-20 and my filter and I was ready to go! I quickly found out the disadvantage of doing my own oil change after one of the quick lube places though...I tried to remove the drain plug and it did not budge. I went and got a bigger wrench, still no luck, and then I gave the breaker bar one shot, and sure enough, in one turn, it rounded the enter drain plug off. I could no longer get any grip on it, and it had not bodges...WAAAAAY over torqued! So anyways, I went ahead and headed back over to Autozone and ended up with a set of grip sockets to give it a shot to remove, and over coarse, a new drain plug!
I was doubtful that these sockets would work that well, i wasn't fully understanding how they gripped but figured I had to give it a shot because I really did not have any other options. But man! Those things work great! I used the 13 mm grip socket, and slide right on the bolt snugly, like a normal socket would, but when I gave it a pull with the breaker bar, it dug into that drain plug head really good! I had to give a good bit of force, even with the breaker bar, that's how tight it was on there, but it gave a quarter turn finally and after that i could once again remove it by hand! And i am extremely impressed with the sockets! Here's what the Plug looked light after I got it out:
You can see where the teeth in the socket dug in, but that head was near completely rounded! Anyways though, have the first quarter turn and I realized this would work, I grabbed the rest of my stuff, creeper, drain pan, filter wrench, etc. and go to work with the rest of the change!
It was uneventful and went exactly how it should. Insert the new drain plug and made sure it was torqued with a torque wrench only to 20 ft/lbs as specified by Jeep (Engine Torque specs) swapped out the oil filters, and filled up 6 Quarts of 5W-20 and TWSTR's all good to go again!
Additionally though, I found out about a company who does oil analysis (additionally not just engine, but Transmission, Diffs, and T-Case too) called Blackstone Labs. I ordered a couple of analysis containers from them, and took samples of both the old oil and the current Trasmission fluid. Very simply, they can tell a lot about the health of your vehicle from analyzing the different oils and such and what is seen in them, as well as provide advice on when to change fluids, and potential early warning signs for bigger issues that can be prevented much cheaper early on. I am waiting on my analyses from them, but interested to see what comes out of it and what i can learn about the engine and transmission. Each analysis costs $28, and to me, that cost is worth knowing what is going on in my engine and potentially being able to fix something before it becomes a big or expensive issue! I learned about it watching the "ChrisFix" channel on YouTube, love that channel, and here's teh video that covers what this analysis is and gives you more of a visual and example of what you can get from the analysis! Pretty neat!
https://www.youtube.com/watch?v=oIG_BdsffcU&t=0s I will post what I found out when i get my analysis!
06-01-2017, 05:55 AM
#208
JK Enthusiast
Thread Starter
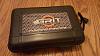
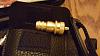
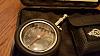
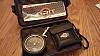
I also managed to come across a newer company called Grit Performance though watching some YouTube channels and just clicking around on the web. I got a great deal, and signed up to be a VIP member, which got me a 15% off coupon, and you get early access to new deals and chances at some 75% off coupons! Products come with a lifetime warranty they say, but at 75% off, I got $100 worth of stuff for only $25! I am in no way affiliated with anyone at the company and I do not get any benefit from sales or anything and i bought everything with my own money (just a disclosure), just wanted to share the great deal I found! Go a nice, heavy duty cargo net, Tire Repair Kit, and Two different kinds of deflators (Type 1, Type 2)! The kits seems nice, products seem quality, and the extras that come with them, like valve stems caps, valve stems, gloves, etc. are a really nice touch! And I just can't pass up on a good deal! Here's some pick of the new goodies I got!
06-12-2017, 09:29 AM
#209
JK Enthusiast
Thread Starter
Check this out! I think it came out awesome! My fiance just finished up this blanket that she has been working on for a while! She did a great job! I love it! Just thought I would share, because it came out perfect!
06-21-2017, 07:09 AM
#210
JK Enthusiast
Thread Starter
I go my oil analysis back from Blackstone and everything came out pretty dang good for me! 54k on the engine and trans and going strong! The summary of my reports basically should that it's time to swap trans fluid, but wear is all normal (had not changed that in the Jeep yet), so looking into if I want to do that myself or not, and also looking in to the potential of swapping out the transmission pan for a new pan with a drain plug. The engine oil analysis should a bit above average iron content in the engine with a slightly below average oil change interval. Additionally to note, when i changed the oil, I had only 2 qts of oil come out, where it holds 6 qts, and changed the oil just over 4k in this oil change interval. So definitely something I will be keeping a close eye on, as that seemed like a lot of oil to go through in only 4k in mileage and no drips or smoke out the exhaust to indicate burning oil off. I put 6 back in and it filled to the correct mark, so I did not miss any oil in the system either. But viscosity and all other wear characteristics of the oil were good, and I changed exactly when I needed to there! Blackstone is a great company and can provide some great insight into your vehicle that can definitely help prevent potential issues down the road and maybe save some money too! Plus, I just think finding this info out is cool! The trans and oil reports are attached below!
J37227 (1).pdfJ37125.pdf
J37227 (1).pdfJ37125.pdf