
What was done to your JK this week?

JK Enthusiast

Joined: Mar 2010
Posts: 396
Likes: 0
From: Volusia County, FL
Haha yea its just such an easy mod to do. Its a weird one though because after its done you dont even notice it. It just looks like thats the way its suppost to be anyhow. Then you look at the pics from before it was painted and it looks terrible.

JK Enthusiast
Joined: Feb 2009
Posts: 138
Likes: 0
From: San Antonio, TX
Installed my Hella 500FFs on the Rock Hard winch hoop tabs. Drilled into the tube to run the wires clean - gained a new respect for the strength of the bumper. Yes... without the proper tools (are there proper tools?) it took 5 hrs, but worth every minute, lights work great, and no fires (yet)!!! 
Wish list for next time: right angle drill attachment, high speed steel stubby drill bits, some type of solution other than a coat hanger to run up through the bar to run the wires with.
Wish list for next time: right angle drill attachment, high speed steel stubby drill bits, some type of solution other than a coat hanger to run up through the bar to run the wires with.

JK Junkie
Joined: Jan 2008
Posts: 2,319
Likes: 0
From: Long Island, NY
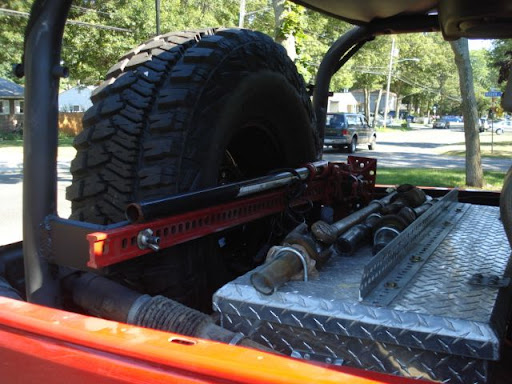
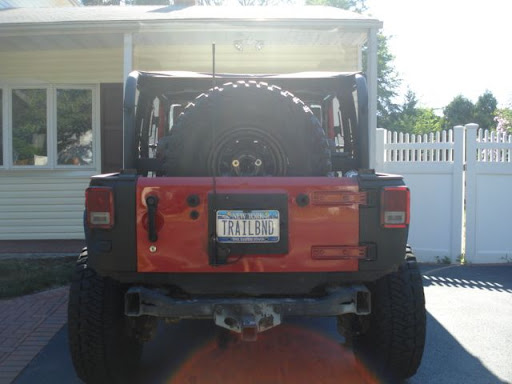
Since I hated the departure angle on the Rancho carrier, I wanted to completely remove the spare and move it inboard. Since I only have the truck box in the rear and don't really need space for carrying stuff, I fabricated a simple in cab carrier.
Used 1"x3"x1/8" wall box. Relief cut the corners to bend the 90* angles. Welded the seams and welded it to the "cage". Used 1/2"-13 stud and bolts, welded to the box, to secure the tire and hi-lift.
Now, I can chop the rear crossmember and frame and fabricate to be higher clearance. Gives me less of a chance of getting hung up on the frame and/or carrier that used to be there. Now I don't have to worry about climbing a steep ledge in fear of getting stuck due to my carrier bottoming out.
JK Super Freak
Joined: Jan 2010
Posts: 1,141
Likes: 0
From: joplin, MO
dude your rig is BA bro. i love the in cab carrier. 
Since I hated the departure angle on the Rancho carrier, I wanted to completely remove the spare and move it inboard. Since I only have the truck box in the rear and don't really need space for carrying stuff, I fabricated a simple in cab carrier.
Used 1"x3"x1/8" wall box. Relief cut the corners to bend the 90* angles. Welded the seams and welded it to the "cage". Used 1/2"-13 stud and bolts, welded to the box, to secure the tire and hi-lift.
Now, I can chop the rear crossmember and frame and fabricate to be higher clearance. Gives me less of a chance of getting hung up on the frame and/or carrier that used to be there. Now I don't have to worry about climbing a steep ledge in fear of getting stuck due to my carrier bottoming out.

JK Enthusiast
Joined: Sep 2009
Posts: 146
Likes: 1
From: San Diego, CA
* Swapped out my X shocks and springs for a 2010 Rubicon 4 door set and added 3/4 in spacers. Love it!
*Cleaned and greased my sway bar bushings solving a months old mystery squeak.
*Drilled out and added real screws to the gear shift bezel.
* Cleaned the throttle body which resolved some power and idling issues
*Cleaned and greased my sway bar bushings solving a months old mystery squeak.
*Drilled out and added real screws to the gear shift bezel.
* Cleaned the throttle body which resolved some power and idling issues
JK Enthusiast
Joined: Feb 2009
Posts: 138
Likes: 0
From: San Antonio, TX
Finally got my Hellas installed!
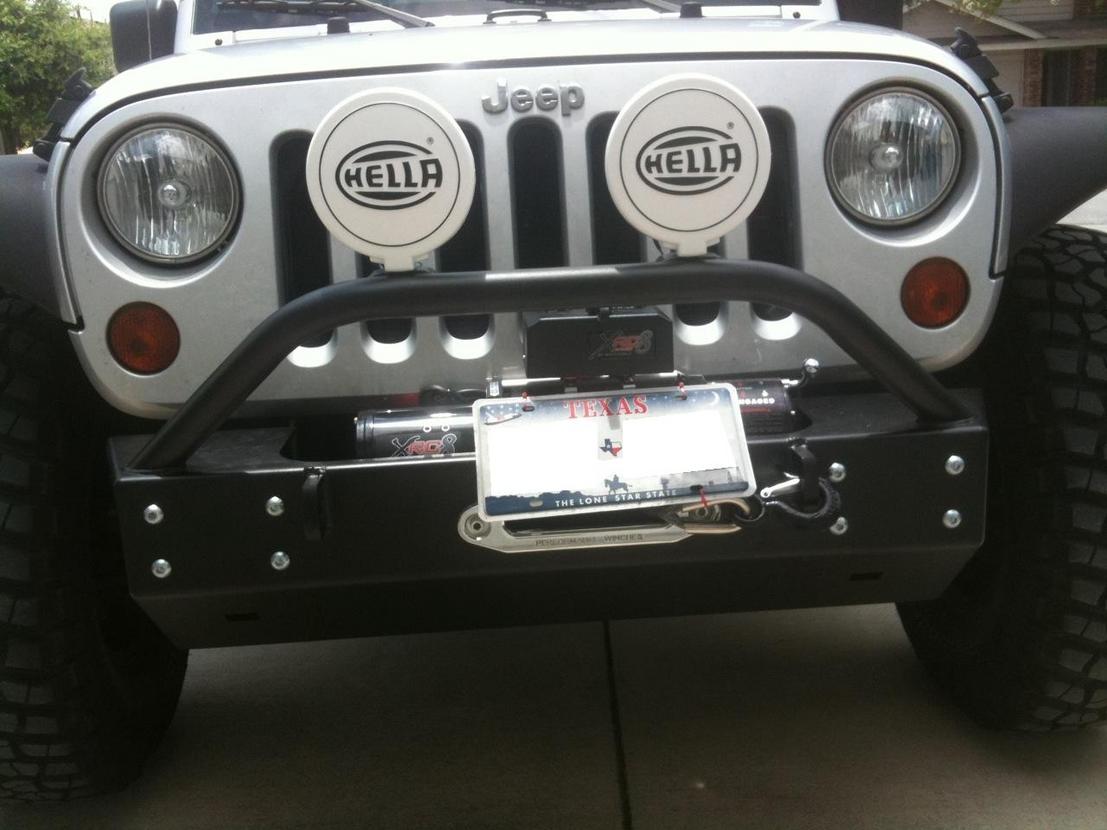
Was a blast ... didn't have a right angle drill attachment or good set of bits so it took about 5 hrs... result: CLEAN install and very happy!
(sorry for the junk iPhone pic)
Was a blast ... didn't have a right angle drill attachment or good set of bits so it took about 5 hrs... result: CLEAN install and very happy!
(sorry for the junk iPhone pic)
JK Enthusiast
Joined: May 2009
Posts: 178
Likes: 0
From: Delmarva
Ok so far i installed lod's front and rear Riddler diff covers rough country Stabilizers evo sliders rock hard skids best top soft doors full set best top mesh bikini high lift jack front discos hid head lights mygig lockpick with reverse cam whats next????????? [IMG][IMG][IMG][IMG][IMG] [/IMG][/IMG][/IMG][/IMG][/IMG]
JK Newbie
Joined: Oct 2007
Posts: 81
Likes: 0
From: Kitchener, ON
Installed a Tuffy Security Deck and Full Security Console
Security Deck was pretty straight forward.
Console was a bit more challenging. Was worth it
Thanks to Dave and Stan @ Northridge 4x4 for hooking me up
Hopefully next week I'll get the Superchips Flash Paq
Cheers,
Security Deck was pretty straight forward.
Console was a bit more challenging. Was worth it
Thanks to Dave and Stan @ Northridge 4x4 for hooking me up
Hopefully next week I'll get the Superchips Flash Paq
Cheers,