
2 Door & Freedom Top Panel Storage Rack - DIY

Thread Starter
JK Junkie
Joined: Jan 2011
Posts: 3,817
Likes: 4
From: Covington, LA
I've been looking around at those super expensive Storage Carts to hold my doors when i remove them so i don't have to lay them on the ground somewhere and scratch them up anymore. After doing some research, I've seen what others have done in the DIY aspect and never saw anyone who actually did a write-up. I then decided to design my own. I was not really looking for a rolling cart because i really have no need for that. After beginning my design, i decided that i would also like storage for my freedom top panels when my soft top is not on, as they have been neglected when they are laying around like my doors on the ground or on towels in my garage or in the dirt at the campsite. This is what i came up with.
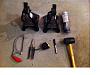
Tools you will need:
-Rubber Mallet
-Hack Saw
-Sharpy
-Measuring Tape
-Snips or Scissors
-Jack Stands (Optional - it made cutting easier)
Materials Needed:
-30 Feet of 1" PVC
-12, 1" 90 Degree PVC Elbows
-8, 1" T PVC Connections
-12 Feet of 1" Foam Pipe Insulation
-Zip Ties
** All materials cost me $23 at Lowes **
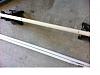
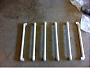
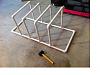
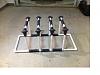
Step 1:
Measure out your cuts. I used jack stands to support the PVC while i was cutting it to make it easier.
Make cuts as follows:
-4, 10" Cuts (outside base)
-6, 8" Cuts (inside base - bottom door supports)
-6, 20" Cuts (depth of the rack)
-8, 18.5" Cuts (height of the rack)
** See the picture below**
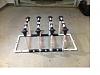
Step 2:
Lay out your cuts and begin assembly with the 90 degree elbows and T connections. Make sure you put everything together before you make the connections solid so you can align everything properly. This is pretty self explanatory, see the picture below:
Step 3:
Once you have the rack assembled, straighten up all of the connections and use a rubber mallet to drive them home. **Note: I did not use any glue, the connections were more than tight enough without it**
** NOTE: This design is for a 2 Door, not a 4 door! **
Tools you will need:
-Rubber Mallet
-Hack Saw
-Sharpy
-Measuring Tape
-Snips or Scissors
-Jack Stands (Optional - it made cutting easier)
Materials Needed:
-30 Feet of 1" PVC
-12, 1" 90 Degree PVC Elbows
-8, 1" T PVC Connections
-12 Feet of 1" Foam Pipe Insulation
-Zip Ties
** All materials cost me $23 at Lowes **
Step 1:
Measure out your cuts. I used jack stands to support the PVC while i was cutting it to make it easier.
Make cuts as follows:
-4, 10" Cuts (outside base)
-6, 8" Cuts (inside base - bottom door supports)
-6, 20" Cuts (depth of the rack)
-8, 18.5" Cuts (height of the rack)
** See the picture below**
Step 2:
Lay out your cuts and begin assembly with the 90 degree elbows and T connections. Make sure you put everything together before you make the connections solid so you can align everything properly. This is pretty self explanatory, see the picture below:
Step 3:
Once you have the rack assembled, straighten up all of the connections and use a rubber mallet to drive them home. **Note: I did not use any glue, the connections were more than tight enough without it**
Last edited by GreenJK07; Feb 11, 2012 at 06:37 PM.
Thread Starter
JK Junkie
Joined: Jan 2011
Posts: 3,817
Likes: 4
From: Covington, LA
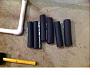
Step 4:
Next, take the foam pipe insulation, measure and make cuts as follows:
-14, 8" cuts (corners and base cuts)
-4, 7.5" cuts (top middle arms)
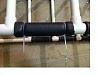
Step 5:
-Assemble the 14, 8" cuts on all corners and the base of where the doors and freedom top panels will sit. Use zip ties to secure them along with the adhesive that comes on the pipe insulation. **Note: be careful not to over tighten the zip ties because they will slice through the foam insulation**
Step 6:
-Assemble the 4, 7.5" cuts in the middle on the top of the rack. **Note: I did not use zip ties on these because i wanted to be able to move them back in forth as needed - The adhesive on the pipe insulation is what secures it**
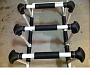
Step 7:
Enjoy!! You can use any combination you like, but when i made this design, i planned on putting the doors on the right and left sides of the rack with the freedom top panels in the middle. Since i did not use any glue on the PVC, the rack base can easily be disassembled to put in the back of your jeep to bring out to the camp site or wherever you like!


Next, take the foam pipe insulation, measure and make cuts as follows:
-14, 8" cuts (corners and base cuts)
-4, 7.5" cuts (top middle arms)
Step 5:
-Assemble the 14, 8" cuts on all corners and the base of where the doors and freedom top panels will sit. Use zip ties to secure them along with the adhesive that comes on the pipe insulation. **Note: be careful not to over tighten the zip ties because they will slice through the foam insulation**
Step 6:
-Assemble the 4, 7.5" cuts in the middle on the top of the rack. **Note: I did not use zip ties on these because i wanted to be able to move them back in forth as needed - The adhesive on the pipe insulation is what secures it**
Step 7:
Enjoy!! You can use any combination you like, but when i made this design, i planned on putting the doors on the right and left sides of the rack with the freedom top panels in the middle. Since i did not use any glue on the PVC, the rack base can easily be disassembled to put in the back of your jeep to bring out to the camp site or wherever you like!
Last edited by GreenJK07; Feb 11, 2012 at 06:31 PM.
Thread Starter
JK Junkie
Joined: Jan 2011
Posts: 3,817
Likes: 4
From: Covington, LA
Originally Posted by KY HILTOPR
A great little mod & sooo lightweight, too. Write-up & Pictured detail w/ deminisions are so helpful.
Good Job, bro!
Good Job, bro!

JK Enthusiast
Joined: Jan 2011
Posts: 156
Likes: 0
From: In the Hills of KY
This may be a duplicate post - sorry. Computer acting up.
It's a great write up ..and with the detailed pictures, it's worth a thousand word. Simple, Lightweight and best of all: It looks Neat & is Inexpensive !
It's a great write up ..and with the detailed pictures, it's worth a thousand word. Simple, Lightweight and best of all: It looks Neat & is Inexpensive !
Trending Topics
Thread Starter
JK Junkie
Joined: Jan 2011
Posts: 3,817
Likes: 4
From: Covington, LA
Originally Posted by Sirisa0408
that looks amazing. i am definately going to add this to my todo list before the summer for my doors. great write up. btw got any pics of it in use?
.
