
2012 JKU heated seat write up


Thread Starter
JK Enthusiast
Joined: Apr 2009
Posts: 265
Likes: 0
From: Mt Vernon, MO
Ok, this write up is going to evolve. I installed the heaters and the round toggle switch last night in the passenger seat, but it is not wired up. I could not figure out how to get the armrest portion of the console apart to access the 12 power at the outlet found inside that console.
I could access power form the wiring harness along the floor, but I don't wish to have splices in my wiring harness down low. Just in case I get water in the jeep ever. I figure if it is elbow high I have bigger problems, but the floor in a jeep does get wet from time to time.
Here is the heated seat kit I bought. I dont know these guys, I am not affiliated with the company. I do not care if anyone ever buys from them. In fact I have no idea what kind of quality their products are, so I prefer you dont buy form them that way if it is crap I wont feel bad. I bought it because it was cheap, they said they will waranty it for 3 years ( if they are in business in 3 years) and they are highly rated on eBAy. But still you never know. So I am not promoting them. Is that clear?
here it is
ebay.com/itm/170725877597?ssPageName=STRK:MEWAX:IT&_trksid=p398 4.m1423.l2649
I started on the passenger side because this kit is a gift for my wife. She is always cold so natuarlly I figured she would love it. So I did her side first.
I first took out the passenger seat. It is 4 bolts with good thread lock. I used a half inch ratchet and an 18 metric socket (I believe), and stubborn elbow grease. I have read that many use a cheater bar. I have a cheater bar, but I wanted to see if it could be done with out it. It can, but you have to want to. After about 2 to 3 turns it is broken free and much easier to turn.
Ok now the seats are unbolted. There is a wiring harness for the seatbelt indicater under the seat. Pull back the red tab and squeeze the little thingy and it comes right apart. Forget to squeeze the little thingy and you will break the zip tie that holds it in place. Ask me how I know that. As I said earlier I did not have to use the cheater bar on the ratchet, that is not always a good thing. It did not break anything this time, but just an FYI.
Now the seat is free to come out of the Jeep. I made a work table with saw horses. You have to sort of finagle the seat to get it out with out scratching any of the new plastic, but it is easy enough. If you used a cheater bar for part one, you may want another person for the seat removal. It is not overly heavy but somewhat awkward. I can not spell nor do I type well (because I hurry), sorry for that. If that bothers you, avoid any of my reviews or write ups, I promise they will drive you crazy.
Ok, so you have the seat out and on the work table. You will need a 3/8 inch ratchet and a 15 metric socket (I think, I'll check when I get home and correct this if I am remembering wrong). Your half inch ratchet will work here too. I just like to use a pile of tools.
So you take the 4 bolts out of the sides of the lower portion of the seat back. There are 2 on each side. Again these are put in there pretty well with thread locker. I did not need the cheater bar even with the smaller ratchet so it can be done, but you have to want to.
Now that your seat is in two parts and the seat back is tethered to your Jeep by the seat belt (dont worry it stretches a quarter mile), you will need a 3/8 inch spade drill bit. Dont worry you arent drilling anything here. The spade bit is great for prying the little plastic clips off the seat. these hold the fabric tight. I like using the spade bit because it has a flat surface like a screw driver, but it also has a sharp tip to dig in and not slip off. Use your imagination and select any tool of your choice. I like this one. I did not find it nessesary to remove the front clips from the lower seat. I only put my butt heater under the back 2/3's of the seat bottom. My heater is large enough to do the whole seat bottom. I did not want to take the hog clips out of the seat at this point. I may change my mind in the future. I just folded the excess under for now. At another time I may elect to have the full seat heated so folding it under will still alow for this. The manufacturer says you can cut the the pad and you can also put the hog clips through it. I elected to fold mine for now.
So the bottom heater is installed. Run the wire over to the side of the seat (preferrably the side that will face the console) and reattach the plastic clips. Press down the seams in the seat to reattach the velcro that gives the seat it's conforming shape.
Now to the plastic clip on the bottom of the seat back. It is one long plastic clip. It is a little trickier to remove, but apply downward pressure on the fabric just above the clip. That seperates the locking mechanism of the clip. Now insert the spade bit from earlier, and start to separate the clips. Now using your free hand (you know your third hand, every one has one). Completely separate the clips starting near the spade bit and sliding across the clip. Now that the clips are seperated, roll the fabric up a bit and slip your seat heater up there. When you have it up where you want it use one hand to hold it in place and the other to gently pull the adhesive backing off the top strip on the heater. Press down and make sure it is well stuck in place. Repeat for the other two stips. Now run your wire down the side of the seat and replace the long plastic clip.
Now bolt the top and bottom back together. And you are done with the easy part.
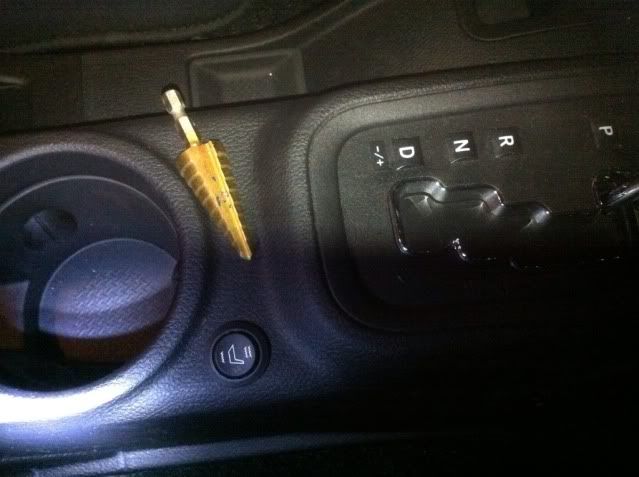
Now you get to drill a hole in your new $30K plus rig. This is much more intimidating than it should be. Just be sure to select the perfect spot for your rocker switches and never look back. I decided to put my switches just infront of my cup holders. I was planning to put them in the dash in the available blanks. But I was not sure how to get the bottom dash bezel out, and the switch blanks arent flat so I was not sure how it would look. Ergonomically I think I chose the better spot. Plus removing the center portion of the console around the cup holders, shifters and E brake is quite simple. Just lift near the floor and it pops right out. Now shift your transfer case selecter in to 4 low, and grasp with both hands give a meaningful tug and it will pop right off. Cut your fingernails first even if they dont seem long. Ask me why. Now you are free to lift the center portion of the console out. Drill your holes. I used this bit form Harbor Freight.
harborfreight.com/3-piece-titanium-nitride-coated-high-speed-steel-step-drills-91616.html
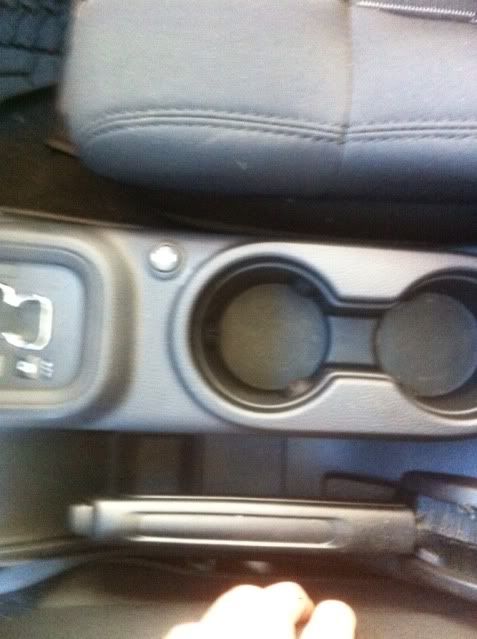
I used the largest one. It was the exact size hole my switch required (mostly). For the passenger side you will have to drill a hole through the base under the console as well so you can run the wire down to the floor. After you have done this put you wire thourgh your holes and and pop the switch in place. Now run the wire down to the floor and along the console and back to the back of the console. Roll up your excess wire and zip tie it into a bundle. Now zip tie it to some convienient anchor.
here is a picture of what it wil look like at this point.

Now as I said before I am not sure about wiring the electrical portion so Ill come back and edit when I figure out how to get the armrest portion of the console apart so I can tap into the 12 volt power at the outlet.
Now reinstall the seat, and if you have everything wired up, you can enjoy a heated seat with a very nice factory looking install.
When I do the driver seat this weekend, Ill take more pictures and update this thread. Maybe it will help my story make more sence. I hope this was helpful, and reasonably understandable. Again I am sorry I type to fast, and my sentence structure is probably poor. Each of us have different tallents, and and those are not my strong suit.
I could access power form the wiring harness along the floor, but I don't wish to have splices in my wiring harness down low. Just in case I get water in the jeep ever. I figure if it is elbow high I have bigger problems, but the floor in a jeep does get wet from time to time.
Here is the heated seat kit I bought. I dont know these guys, I am not affiliated with the company. I do not care if anyone ever buys from them. In fact I have no idea what kind of quality their products are, so I prefer you dont buy form them that way if it is crap I wont feel bad. I bought it because it was cheap, they said they will waranty it for 3 years ( if they are in business in 3 years) and they are highly rated on eBAy. But still you never know. So I am not promoting them. Is that clear?
here it is
ebay.com/itm/170725877597?ssPageName=STRK:MEWAX:IT&_trksid=p398 4.m1423.l2649
I started on the passenger side because this kit is a gift for my wife. She is always cold so natuarlly I figured she would love it. So I did her side first.
I first took out the passenger seat. It is 4 bolts with good thread lock. I used a half inch ratchet and an 18 metric socket (I believe), and stubborn elbow grease. I have read that many use a cheater bar. I have a cheater bar, but I wanted to see if it could be done with out it. It can, but you have to want to. After about 2 to 3 turns it is broken free and much easier to turn.
Ok now the seats are unbolted. There is a wiring harness for the seatbelt indicater under the seat. Pull back the red tab and squeeze the little thingy and it comes right apart. Forget to squeeze the little thingy and you will break the zip tie that holds it in place. Ask me how I know that. As I said earlier I did not have to use the cheater bar on the ratchet, that is not always a good thing. It did not break anything this time, but just an FYI.
Now the seat is free to come out of the Jeep. I made a work table with saw horses. You have to sort of finagle the seat to get it out with out scratching any of the new plastic, but it is easy enough. If you used a cheater bar for part one, you may want another person for the seat removal. It is not overly heavy but somewhat awkward. I can not spell nor do I type well (because I hurry), sorry for that. If that bothers you, avoid any of my reviews or write ups, I promise they will drive you crazy.
Ok, so you have the seat out and on the work table. You will need a 3/8 inch ratchet and a 15 metric socket (I think, I'll check when I get home and correct this if I am remembering wrong). Your half inch ratchet will work here too. I just like to use a pile of tools.
So you take the 4 bolts out of the sides of the lower portion of the seat back. There are 2 on each side. Again these are put in there pretty well with thread locker. I did not need the cheater bar even with the smaller ratchet so it can be done, but you have to want to.
Now that your seat is in two parts and the seat back is tethered to your Jeep by the seat belt (dont worry it stretches a quarter mile), you will need a 3/8 inch spade drill bit. Dont worry you arent drilling anything here. The spade bit is great for prying the little plastic clips off the seat. these hold the fabric tight. I like using the spade bit because it has a flat surface like a screw driver, but it also has a sharp tip to dig in and not slip off. Use your imagination and select any tool of your choice. I like this one. I did not find it nessesary to remove the front clips from the lower seat. I only put my butt heater under the back 2/3's of the seat bottom. My heater is large enough to do the whole seat bottom. I did not want to take the hog clips out of the seat at this point. I may change my mind in the future. I just folded the excess under for now. At another time I may elect to have the full seat heated so folding it under will still alow for this. The manufacturer says you can cut the the pad and you can also put the hog clips through it. I elected to fold mine for now.
So the bottom heater is installed. Run the wire over to the side of the seat (preferrably the side that will face the console) and reattach the plastic clips. Press down the seams in the seat to reattach the velcro that gives the seat it's conforming shape.
Now to the plastic clip on the bottom of the seat back. It is one long plastic clip. It is a little trickier to remove, but apply downward pressure on the fabric just above the clip. That seperates the locking mechanism of the clip. Now insert the spade bit from earlier, and start to separate the clips. Now using your free hand (you know your third hand, every one has one). Completely separate the clips starting near the spade bit and sliding across the clip. Now that the clips are seperated, roll the fabric up a bit and slip your seat heater up there. When you have it up where you want it use one hand to hold it in place and the other to gently pull the adhesive backing off the top strip on the heater. Press down and make sure it is well stuck in place. Repeat for the other two stips. Now run your wire down the side of the seat and replace the long plastic clip.
Now bolt the top and bottom back together. And you are done with the easy part.
Now you get to drill a hole in your new $30K plus rig. This is much more intimidating than it should be. Just be sure to select the perfect spot for your rocker switches and never look back. I decided to put my switches just infront of my cup holders. I was planning to put them in the dash in the available blanks. But I was not sure how to get the bottom dash bezel out, and the switch blanks arent flat so I was not sure how it would look. Ergonomically I think I chose the better spot. Plus removing the center portion of the console around the cup holders, shifters and E brake is quite simple. Just lift near the floor and it pops right out. Now shift your transfer case selecter in to 4 low, and grasp with both hands give a meaningful tug and it will pop right off. Cut your fingernails first even if they dont seem long. Ask me why. Now you are free to lift the center portion of the console out. Drill your holes. I used this bit form Harbor Freight.
harborfreight.com/3-piece-titanium-nitride-coated-high-speed-steel-step-drills-91616.html
I used the largest one. It was the exact size hole my switch required (mostly). For the passenger side you will have to drill a hole through the base under the console as well so you can run the wire down to the floor. After you have done this put you wire thourgh your holes and and pop the switch in place. Now run the wire down to the floor and along the console and back to the back of the console. Roll up your excess wire and zip tie it into a bundle. Now zip tie it to some convienient anchor.
here is a picture of what it wil look like at this point.
Now as I said before I am not sure about wiring the electrical portion so Ill come back and edit when I figure out how to get the armrest portion of the console apart so I can tap into the 12 volt power at the outlet.
Now reinstall the seat, and if you have everything wired up, you can enjoy a heated seat with a very nice factory looking install.
When I do the driver seat this weekend, Ill take more pictures and update this thread. Maybe it will help my story make more sence. I hope this was helpful, and reasonably understandable. Again I am sorry I type to fast, and my sentence structure is probably poor. Each of us have different tallents, and and those are not my strong suit.
Last edited by Sharkey; Dec 13, 2011 at 06:20 PM. Reason: No links to non-sponsors please

Thread Starter
JK Enthusiast
Joined: Apr 2009
Posts: 265
Likes: 0
From: Mt Vernon, MO
Just to update. I have them installed. But I have so far failed to tap into power successfully. I pulled the console apart. I connected to the two wires on the 12 volt. That did not work and I decided I should connect to power that is off with the key off. I pulled the dash apart attached the red hot wire for the seats to the black wire on the 12 volt in the dash and the black to a ground on the chassis. No power still. Evidently the power is not the black wire on the 12 volt in the dash. I am beginning to get frustrated. Not sure where to go at this point.
I read on another thread about a blue wire to the right of the console that is switched off with the key. I am considering trying that. But I am not wanting to splice any more wires if they aren't correct.
Sent from my iPhone using Tapatalk
I read on another thread about a blue wire to the right of the console that is switched off with the key. I am considering trying that. But I am not wanting to splice any more wires if they aren't correct.
Sent from my iPhone using Tapatalk
Thread Starter
JK Enthusiast
Joined: Apr 2009
Posts: 265
Likes: 0
From: Mt Vernon, MO
I used the orange and purple wire on the 12 volt accessory in the dash. My driver seat works wonderfully. The passenger seat is not yet working. I discovered a breach in the red wire from the switch. The manufacturer is sending me a new switch and wire harness. I suspect that will resolve the issue with the passenger seat.
Sent from my iPhone using Tapatalk
Sent from my iPhone using Tapatalk


Trending Topics
Thread Starter
JK Enthusiast
Joined: Apr 2009
Posts: 265
Likes: 0
From: Mt Vernon, MO
THese have been great this winter. The seller did send me the parts I need to get this working for the other seat.
One thing that would make the install easier is to order the Iggee seat covers. they look great and install easily. You could attach the heaters to the Iggee's adn not even have to pull the seats. Under $500 complete. FYI, i fyou are affraid of the install.
One thing that would make the install easier is to order the Iggee seat covers. they look great and install easily. You could attach the heaters to the Iggee's adn not even have to pull the seats. Under $500 complete. FYI, i fyou are affraid of the install.
JK Junkie
Joined: Feb 2011
Posts: 2,818
Likes: 3
From: Folsom, CA
Great thread! I have these same seat heaters sitting in my garage - ready to go in. They were cheap at about $114 for the pair and the work to put them in is pretty reasonable.
I'm actually switching my 2008 interior out to the 2012 interior and doing my seat heaters then since I'll already have the seats apart.
How about some more pics?
I'm actually switching my 2008 interior out to the 2012 interior and doing my seat heaters then since I'll already have the seats apart.
How about some more pics?
JK Enthusiast
Joined: Sep 2012
Posts: 251
Likes: 0
From: Okc
I think I will be attempting this soon too. Has anyone done this with just using seat covers? Instead of messing with the original seats just lay the heaters down on top of them then put the seat covers on top?