
Corner damage from wheeling? How to fix: (picture heavy)

Thread Starter
JK Freak
Joined: Mar 2015
Posts: 712
Likes: 67
From: McLean, VA
Hey all,
After hours of searching, I have yet to find a nice write up for patching up damaged corners prior to installing armor. Figured I'd document my process, and hopefully someone else can use it as a guide in the future.
Background
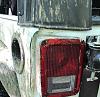
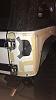
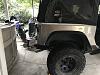
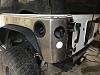
After a long day of wheeling, my buddy high centered in the middle of a red trail. After winching him off, I reversed carelessly and managed to smack a small tree with my driver side tail light.
Damage
Directly after the hit:
Cause
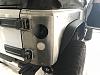
What caused such a nasty crease dent? Factory JK tail lights have a detachable plastic piece on the rear, solely intended to fill the gap between the body and the tail light. Unfortunately, this plastic piece has the perfect amount of leverage to cause a nasty dent like this.
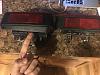
I would remove this piece now if you wheel your rig hard. My buddy removed his and ended up smacking a tree like I did just a few weeks later; There was no damage to the body, and only the tail light was busted.
Fix
While I strongly considered filing an insurance claim and just letting a body shop handle it, it just didn't sit right with me. I wheel the piss out of this Jeep, thus it makes no sense to me to have it fixed back to showroom condition and consequently have my rates hike. While the corner armor is more expensive than going the body shop route, I also kind of just....wanted them
Therefore
I ordered the 4 door Poison Spyder Crusher Corners and their tail light package (with the plug-and-play harness). Before I can install them, I need to pop the dent so there isn't a gap between the crusher corners and the body at the top.
Keep in mind, I am a noob when it comes to body work, so be easy.
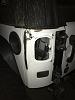
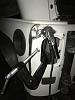
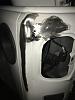
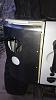
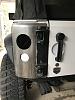
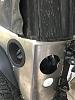
I first began by removing the tail light, and drilling pilot holes for the slide hammer:
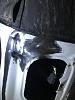
The slide hammer didn't do much, and the crease dent remained. Time to get creative...
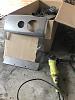
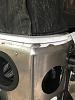
I ended up drilling the holes to 5/16th, modified the slide hammer to take a bolt instead of a sheet metal screw, and tried again. This was working, but was too slow for my liking. So I ended up strapping the slide hammer to a tree, and crawled away in 4Lo. This popped the deepest part of the dent back out:
Unfortunately at this point I ran out of daylight. I have a few more spots to hit with the slide hammer tomorrow, and then comes time to fill the holes I drilled.
I went ahead and ordered .023 wire and roller, as I plan on properly patching these holes via Mig welding this weekend. No way I'm using a body filler to plug holes on a 2015 JK...I don't want to deal with a rust bucket a few years down the road.
After the holes are filled I will grind them flat, use a body filler to even the area out, prime, install the corners, remove the corners, prime over the new cuts/holes, color match the body paint, clear coat, paint the corners in a rattle can black, and finish install. Given that I am running the Genright tire carrier, I will have to take a few more steps, and yes...I will be repainting the latch . I'll be documenting everything, and hopefully it'll look as clean as possible.
Stay tuned for more.
After hours of searching, I have yet to find a nice write up for patching up damaged corners prior to installing armor. Figured I'd document my process, and hopefully someone else can use it as a guide in the future.
Background
After a long day of wheeling, my buddy high centered in the middle of a red trail. After winching him off, I reversed carelessly and managed to smack a small tree with my driver side tail light.
Damage
Directly after the hit:
Cause
What caused such a nasty crease dent? Factory JK tail lights have a detachable plastic piece on the rear, solely intended to fill the gap between the body and the tail light. Unfortunately, this plastic piece has the perfect amount of leverage to cause a nasty dent like this.
I would remove this piece now if you wheel your rig hard. My buddy removed his and ended up smacking a tree like I did just a few weeks later; There was no damage to the body, and only the tail light was busted.
Fix
While I strongly considered filing an insurance claim and just letting a body shop handle it, it just didn't sit right with me. I wheel the piss out of this Jeep, thus it makes no sense to me to have it fixed back to showroom condition and consequently have my rates hike. While the corner armor is more expensive than going the body shop route, I also kind of just....wanted them
Therefore
I ordered the 4 door Poison Spyder Crusher Corners and their tail light package (with the plug-and-play harness). Before I can install them, I need to pop the dent so there isn't a gap between the crusher corners and the body at the top.
Keep in mind, I am a noob when it comes to body work, so be easy.
I first began by removing the tail light, and drilling pilot holes for the slide hammer:
The slide hammer didn't do much, and the crease dent remained. Time to get creative...
I ended up drilling the holes to 5/16th, modified the slide hammer to take a bolt instead of a sheet metal screw, and tried again. This was working, but was too slow for my liking. So I ended up strapping the slide hammer to a tree, and crawled away in 4Lo. This popped the deepest part of the dent back out:
Unfortunately at this point I ran out of daylight. I have a few more spots to hit with the slide hammer tomorrow, and then comes time to fill the holes I drilled.
I went ahead and ordered .023 wire and roller, as I plan on properly patching these holes via Mig welding this weekend. No way I'm using a body filler to plug holes on a 2015 JK...I don't want to deal with a rust bucket a few years down the road.
After the holes are filled I will grind them flat, use a body filler to even the area out, prime, install the corners, remove the corners, prime over the new cuts/holes, color match the body paint, clear coat, paint the corners in a rattle can black, and finish install. Given that I am running the Genright tire carrier, I will have to take a few more steps, and yes...I will be repainting the latch
. I'll be documenting everything, and hopefully it'll look as clean as possible.Stay tuned for more.
Last edited by BoraBora; Dec 14, 2017 at 05:46 PM.
Thread Starter
JK Freak
Joined: Mar 2015
Posts: 712
Likes: 67
From: McLean, VA
Unfortunately Poison Spyder discontinued their 2 door corners. I'm okay with the corner armor cutting off right after the rear wheel well before the door.
My decision process was as follows:
1. EVO corners are brake bent, leaving a huge gap. I don't plan on running any silicone/rtv behind the skins. I know a lot of people do this, but I think it causes more harm than good by trapping moisture and other crap back there (not to mention it's a PITA to remove and can sometimes stick like cement). I plan on removing them the 1 or 2 times a year when I do a thorough cleaning (removing the rocker armor, compound on scratches, wax, etc). While they would successfully tie the corners into my EVO rocker armor and are 3/16" thick, they just looked cheap and incomplete IMO.
2. River Raider corners are very expensive, and require a lot more cutting of the body. No thanks.
3. AEV: just don't seem complete enough for me to justify their price tag. I know the PSC corners use the same die so the fit is great...but I need and want the corners to tie into the body more. Plus they keep the stock tail lights. No thanks.
4. Genright: way too expensive, but nice! They also use the same die as PSC and AEV.
5. Poison Spyder: fit the body lines of the JK nearly perfectly, works great with the Genright latch plate (requiring very little modification), only $50 more than the AEV corners while offering more coverage, and have cutouts for back-up lights.
It was a no-brainer for me. I don't see the 1/8" vs. 3/16" steel being a problem as this isn't a structural part. Besides, both would give/dent under the full weight of the Jeep. $380 for the bare 4 door corners (with backup light cutouts) is a great deal.
Last edited by BoraBora; Dec 14, 2017 at 06:39 PM.
JK Jedi

Joined: Oct 2010
Posts: 6,222
Likes: 376
From: Southwest Reno, NV
The metal cloak corners would do the job and they really look much better in person then in photos. Pricey but a good option for your set up. The EVO guards are priced right and offer good protection. All PSC did was buy AEV corners and weld about $5 worth of steel bar on each side. It would not be much work to make a copy of theirs. Bushwacker has plastic covers for cheap that would cover the dent if you dont care about corner protection.
Thread Starter
JK Freak
Joined: Mar 2015
Posts: 712
Likes: 67
From: McLean, VA
Yeah, I eyeballed the Metalcloak ExoCorners. Wasn't a huge fan of the 3 piece design and how it doesn't cover up to the soft top rails, not to mention a lot of the holes I'd have to drill for the nutserts/rivnuts would be directly into the dented area I'm patching up now. Not the case with the PSC corners. Besides, by the time I got that "ExoCorner kit" and the "2 door rear ExoSkin" and paid the $78 shipping from Metalcloak ( ) I would be over $1,000 in parts. The PSC corners and lights ran me $550 total with free shipping from Northridge.
Yeah the PSC corners are AEV with some extra material welded on, but they're still cheaper than the Metalcloak, River Raider, and Genright options. If it wasn't the holiday season and below freezing outside, I would have bought the builders kit and welded my own extension to it.
Not doing this for 'looks' so the plastic Bushwhacker crap was never in the cards .
.
) I would be over $1,000 in parts. The PSC corners and lights ran me $550 total with free shipping from Northridge.Yeah the PSC corners are AEV with some extra material welded on, but they're still cheaper than the Metalcloak, River Raider, and Genright options. If it wasn't the holiday season and below freezing outside, I would have bought the builders kit and welded my own extension to it.
Not doing this for 'looks' so the plastic Bushwhacker crap was never in the cards
.
Last edited by BoraBora; Dec 15, 2017 at 08:04 AM.
Thread Starter
JK Freak
Joined: Mar 2015
Posts: 712
Likes: 67
From: McLean, VA
Well...the corners show up tomorrow and I got a lot of work done. I plugged the holes with my mig, and it came out superb. I just tried to post pictures from 4 different browsers, and even uploaded to a 3rd party site. Still getting an error message with no explanation.
I'm baffled that the user experience actually decreased after the new layout, RIP old write-ups. Changing something that isn't broken is one thing...but actually replacing it with something worse is an ignominy and one of the first lessons you learn as a digital marketer. What a shame, maybe I'll try again in a few days.
I'm baffled that the user experience actually decreased after the new layout, RIP old write-ups. Changing something that isn't broken is one thing...but actually replacing it with something worse is an ignominy and one of the first lessons you learn as a digital marketer. What a shame, maybe I'll try again in a few days.
JK Jedi


Joined: Jun 2013
Posts: 11,365
Likes: 2,091
From: Willow Park, TX
I'm baffled that the user experience actually decreased after the new layout, RIP old write-ups. Changing something that isn't broken is one thing...but actually replacing it with something worse is an ignominy and one of the first lessons you learn as a digital marketer. What a shame, maybe I'll try again in a few days.
Following to see pics of the progress......hopefully
Trending Topics
Thread Starter
JK Freak
Joined: Mar 2015
Posts: 712
Likes: 67
From: McLean, VA
Alright JK-Forum seems to be working again.
So here's how I filled the holes I drilled from the slide hammer:
The c-clamp is holding a block of aluminum, which I used as a heat sink/backing plate.
Slowly spot welding, then quickly hit it with a flapper wheel:
And alas, the corners arrived. The passenger side went on smoothly, and to my relief the new crusher corners no longer wrap around the hinge like they used to. Thus, I didn't have to modify the passenger side at all.
Chop chop:
Last edited by BoraBora; Dec 22, 2017 at 11:54 AM.
Thread Starter
JK Freak
Joined: Mar 2015
Posts: 712
Likes: 67
From: McLean, VA
Right side corners on:
Now, the driver side corner was not nearly as friendly. This is as close as I got the top hole in the corner to align with the hole in the sheet metal from the Genright carrier:
My plan was to drill through the corners to bolt the latch over, as this is what others on forums have done in the past....or so they claim. The bolts weren't nearly long enough, so it was time for plan b: trim the corners for the latch:
Thread Starter
JK Freak
Joined: Mar 2015
Posts: 712
Likes: 67
From: McLean, VA
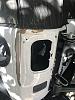
Post trimming test fit:
At this point in time I realized there's really no reason to pop that last crease dent, or use any body filler. The corners concealed it, especially with the soft top on. This is one of the main reasons I went with the PSC crusher corners:
Soooo now I wait. Somehow no Home Depot or hardware store near me stocks 2 3/4" hole saws (to cut the bottom home for the reverse lights), so I Amazon primed it along with resistors to wire up the lights. Unfortunately no lights until Northridge opens on Tuesday (the ones I ordered are on backorder, and somehow PSC has NO ETA on them), so I'll be ordering some basic LED lights and wiring them myself. Corners go off to powder coat, along with the tire carrier (damn that latch looks uggllyyyyy) on Tuesday of next week. I'll be priming, color matching, and clear coating the Jeep sheet metal tomorrow in the 64 degree weather.