
DIY JKU Screen replacement of freedom panels.

Thread Starter
JK Newbie
Joined: Jul 2011
Posts: 98
Likes: 0
From: Southern California
I bought my JKU after enjoying a rental where I removed the freedom panels. It was a year ago and while it was cold, driving without the freedom panels in place was a joy.
When I got my JKU, I of course immediately removed the freedom panels. Back and forth to work, stores, etc. Got a little old being beat up by both the sun and wind.
First discovery was the screen top that is made with screen, bungee balls and grommets. Was nice, but a pain to remove and install for a freedom top only application. Threading the footman loops was a little rough, but the 4 bungees for the rear edge of the screen were a real pain.
I saw nothing like what I wanted on the web, either in stores or DIY ideas. I knew what I wanted, but wasn't sure how to attach it to the car, or what to make it out of.
So, the point of this is to share my idea and the technique I used to make it. If you decide to make one, please not that I make no assurances regarding the safety of this, only that to date, I have had no issues with mine. I used high quality plywood and didn't make any edge area too thin and weak.
First of all, the completed, installed roof panel.
From the top:
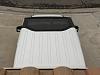
From the side:

The top is held on by 4 bolts. I like bungee balls, but had the bungee give way on my trampoline style shade and beat me in the neck a few times on the freeway! The bolts are all the same, but the two in the roll over bar near the sound bar get larger diameter washers.

Soundbar eye bolt view:

The eyebolts on the side pass through existing holes in the roll over bar. You can pull the cover over the eyebolt to hide it. This is the passenger side with the door open.

This is a top view of the screen frame. This shows the screen in the middle, wood slats screwed over the groove the spline lies in and the nut insert.

Lastly some interior shots.


Material list:
Plywood, screen, spline, 1x2 wood, bolts, washers, nut inserts ( furniture parts ) , flat black spray paint, screws, template material.
Tool List:
Jigsaw, router, drill, sander, spline tool, appropriate bits and sand paper.
This is what I did to make my screen
Make panel template
Cut exterior dimensions
Rout area for middle front footman loop
Rout area for weatherstripping in middle of rear edge
Decide shape of interior cutout. Respect strength, location of bolts, use of 1x2 to keep spline in routed holes. Cut interior.
Rout groove for spline.
Drill holes for nut inserts.
Sand all surfaces, round sharp edges of interior screen-hole.
Paint what you want painted.
Screen.
Screw 1x2 over spline groove.
After a test run, I noticed vibration between the screen and the edge of the plywood. I "grouted" this with spline material and stopped the vibration dead.
My future plans are to close the side gaps.
Paul
Sorry about some big, some small pics. The editor and I had a little battle. I lost.
When I got my JKU, I of course immediately removed the freedom panels. Back and forth to work, stores, etc. Got a little old being beat up by both the sun and wind.
First discovery was the screen top that is made with screen, bungee balls and grommets. Was nice, but a pain to remove and install for a freedom top only application. Threading the footman loops was a little rough, but the 4 bungees for the rear edge of the screen were a real pain.
I saw nothing like what I wanted on the web, either in stores or DIY ideas. I knew what I wanted, but wasn't sure how to attach it to the car, or what to make it out of.
So, the point of this is to share my idea and the technique I used to make it. If you decide to make one, please not that I make no assurances regarding the safety of this, only that to date, I have had no issues with mine. I used high quality plywood and didn't make any edge area too thin and weak.
First of all, the completed, installed roof panel.
From the top:
From the side:
The top is held on by 4 bolts. I like bungee balls, but had the bungee give way on my trampoline style shade and beat me in the neck a few times on the freeway! The bolts are all the same, but the two in the roll over bar near the sound bar get larger diameter washers.
Soundbar eye bolt view:
The eyebolts on the side pass through existing holes in the roll over bar. You can pull the cover over the eyebolt to hide it. This is the passenger side with the door open.
This is a top view of the screen frame. This shows the screen in the middle, wood slats screwed over the groove the spline lies in and the nut insert.
Lastly some interior shots.
Material list:
Plywood, screen, spline, 1x2 wood, bolts, washers, nut inserts ( furniture parts ) , flat black spray paint, screws, template material.
Tool List:
Jigsaw, router, drill, sander, spline tool, appropriate bits and sand paper.
This is what I did to make my screen
Make panel template
Cut exterior dimensions
Rout area for middle front footman loop
Rout area for weatherstripping in middle of rear edge
Decide shape of interior cutout. Respect strength, location of bolts, use of 1x2 to keep spline in routed holes. Cut interior.
Rout groove for spline.
Drill holes for nut inserts.
Sand all surfaces, round sharp edges of interior screen-hole.
Paint what you want painted.
Screen.
Screw 1x2 over spline groove.
After a test run, I noticed vibration between the screen and the edge of the plywood. I "grouted" this with spline material and stopped the vibration dead.
My future plans are to close the side gaps.
Paul
Sorry about some big, some small pics. The editor and I had a little battle. I lost.
Last edited by melor; Dec 30, 2012 at 03:19 PM.