
EVO Hood Breach Install

Thread Starter
JK Newbie
Joined: Feb 2017
Posts: 80
Likes: 0
From: Oakdale, CA
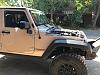
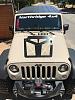
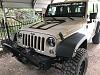
Installed my EVO Hood Breach yesterday. It's a pretty straight forward install, but I thought I'd share a few pics from the install.
First I removed the hood for easier access when cutting and bolting the breach down. I used an xacto knife around the paint on the torx holding the hood to the hinges for easier bolt removal.
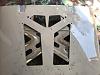
Next I used the overlay piece to mark the holes to be drilled and openings to be cut.
Center punched the holes and drilled them out.
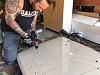
Now onto the fun part. Started cutting with a dremel since there are some sharp corners to cut. After I roasted 5 dremel wheels in a few minutes I decided to pull out the angle grinder with cut off wheel for the long straight lines and go back to the dremel for the corners.
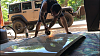
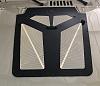
Sanded the rough edges and hit the open cuts with rustoleum. Decided not to paint the substructure as it is a tan color already and blends in well with my powder coated vents.
Next was lining it up and bolting it down.
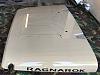
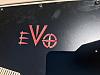
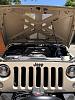
Very happy with the end result. Had the pieces power coated in tan for the piece with the vents and black for the overlay piece. I also added a piece of red vinyl to the hood under the EVO logo.
First I removed the hood for easier access when cutting and bolting the breach down. I used an xacto knife around the paint on the torx holding the hood to the hinges for easier bolt removal.
Next I used the overlay piece to mark the holes to be drilled and openings to be cut.
Center punched the holes and drilled them out.
Now onto the fun part. Started cutting with a dremel since there are some sharp corners to cut. After I roasted 5 dremel wheels in a few minutes I decided to pull out the angle grinder with cut off wheel for the long straight lines and go back to the dremel for the corners.
Sanded the rough edges and hit the open cuts with rustoleum. Decided not to paint the substructure as it is a tan color already and blends in well with my powder coated vents.
Next was lining it up and bolting it down.
Very happy with the end result. Had the pieces power coated in tan for the piece with the vents and black for the overlay piece. I also added a piece of red vinyl to the hood under the EVO logo.
JK Freak
Joined: Mar 2011
Posts: 536
Likes: 1
From: Sunny San Diego
Usually water comes down from the sky!!(water cycle)... lol. ... All kidding aside, it does not seem to be an issue since the engine has a cover on it. I am doing the poison spyder louver this Wednesday. All the reviews I have read, there have been no issues with water and all are happy with the engine bay running cooler. They have been around for a few years now. I just wish they would stop plastering the company name on everything or give you an option to op-out, kinda kills the chance to add your own touch.
... All kidding aside, it does not seem to be an issue since the engine has a cover on it. I am doing the poison spyder louver this Wednesday. All the reviews I have read, there have been no issues with water and all are happy with the engine bay running cooler. They have been around for a few years now. I just wish they would stop plastering the company name on everything or give you an option to op-out, kinda kills the chance to add your own touch.

JK Freak
Joined: Jan 2012
Posts: 658
Likes: 19
From: sparks,nevada
I have a scoop on the hood of one of my Jeeps and I hate it because of the water that gets in. It does have a V8 though and the water goes right onto and into the air filter. I wish it had openings on the side of the hood . Also, I don't like it when they put their name on stuff either, they should charge you less for advertising for them.
JK Freak
Joined: Mar 2011
Posts: 536
Likes: 1
From: Sunny San Diego
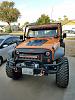
Just installed mine. Not bad, the only issue was that 2 of the screws where going to require drilling way more into the hood, just left them out. They fall right on top of the cross membrane. Maybe my OCD will kick in and I will install later. The other was my fault. I used a crappy 1 inch circular drill bit, the bit only lasted 1 hole. Did not really need the bit, used a cutting wheel. Looks good and it keeps the temps down. I been using a Bullydog tuner to monitor the temps for a while now. Jeep always took a while to bring temps down. 225 was the norm. Now its 205ish. Temps come down really quick now.
JK Jedi


Joined: Jun 2013
Posts: 11,367
Likes: 2,091
From: Willow Park, TX
Just installed mine. Not bad, the only issue was that 2 of the screws where going to require drilling way more into the hood, just left them out. They fall right on top of the cross membrane. Maybe my OCD will kick in and I will install later. The other was my fault. I used a crappy 1 inch circular drill bit, the bit only lasted 1 hole.
Trending Topics
Thread Starter
JK Newbie
Joined: Feb 2017
Posts: 80
Likes: 0
From: Oakdale, CA
Just installed mine. Not bad, the only issue was that 2 of the screws where going to require drilling way more into the hood, just left them out. They fall right on top of the cross membrane. Maybe my OCD will kick in and I will install later. The other was my fault. I used a crappy 1 inch circular drill bit, the bit only lasted 1 hole. Did not really need the bit, used a cutting wheel. Looks good and it keeps the temps down. I been using a Bullydog tuner to monitor the temps for a while now. Jeep always took a while to bring temps down. 225 was the norm. Now its 205ish. Temps come down really quick now.
Attachment 673443
Attachment 673443