
Installation: Bushwacker TrailArmor Rocker Panels

Thread Starter
JK Freak
Joined: May 2010
Posts: 535
Likes: 1
From: Kingston, NY
So this weekend after my back brake wouldn't build pressure on the Harley, I decided to finally install my Bushwacker TrailArmor. I'll share that adventure with you folks now.
Step 1) This is the worst part for most of you. Clean your jeep. It hurts, I know. I cleaned the area the armor would be going (It was hot today and I'm lazy)
step 1.5) If you have door sill guards already... Remove them (not fun). If not, skip to step 2
step 1.75) sell recently removed door sill guards on JK-forum (https://www.jk-forum.com/forums/jk-a...p-logo-233959/)
Step 2)Make sure you really cleaned the area under the doors, inside the door sill, under the fenders and that little piece of pinch weld that most people cut to fit larger tires.
-If you plan on cutting it or have already cut it, this armor will need to be trimmed.
They give you these alcohol prep pads:
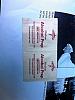
They didn't work, so I had a beer.
*But seriously. 2 of these pads is not anywhere near enough to prep the surface. So before you start, buy more alcohol pads or rubbing alcohol and thoroughly clean the are where the armor will go*
Step 3). Open the sweet little envelope they gave you with the screws and tabs in it.
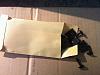
See that staple?:
I didn't.
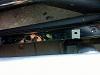
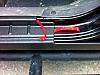
Step 4)Push the clips over the six holes on your pinch weld
Step 6)Place the armor in place leaving all the red tape coverings hanging over so you can access them with the armor in place.
Step7) Start the screws but don't tighten them.
Step 8) pull the tape covers off the lower pieces of tape. NOT the part that goes in the door sill
Step 9) set the sill part in place and then remove the tape covers for this part
Step 10) press firmly to set all the tape. The instructions say 30lbs of pressure. I personally don't have a pressure gauge in my arm, so I winged it.
Step 11) Tighten all the screws (6)
Step 12) Stand back and take a look at your handy work. Oh, and then you have to do the other side. (if you need instructions for the other side just hold up a mirror to the pictures I provided.
Thanks for reading, I hope this helps anyone looking into this product.
Step 1) This is the worst part for most of you. Clean your jeep. It hurts, I know. I cleaned the area the armor would be going (It was hot today and I'm lazy)
step 1.5) If you have door sill guards already... Remove them (not fun). If not, skip to step 2
step 1.75) sell recently removed door sill guards on JK-forum (https://www.jk-forum.com/forums/jk-a...p-logo-233959/)
Step 2)Make sure you really cleaned the area under the doors, inside the door sill, under the fenders and that little piece of pinch weld that most people cut to fit larger tires.
-If you plan on cutting it or have already cut it, this armor will need to be trimmed.
They give you these alcohol prep pads:
They didn't work, so I had a beer.
*But seriously. 2 of these pads is not anywhere near enough to prep the surface. So before you start, buy more alcohol pads or rubbing alcohol and thoroughly clean the are where the armor will go*
Step 3). Open the sweet little envelope they gave you with the screws and tabs in it.
See that staple?:
I didn't.
Step 4)Push the clips over the six holes on your pinch weld
Step 6)Place the armor in place leaving all the red tape coverings hanging over so you can access them with the armor in place.
Step7) Start the screws but don't tighten them.
Step 8) pull the tape covers off the lower pieces of tape. NOT the part that goes in the door sill
Step 9) set the sill part in place and then remove the tape covers for this part
Step 10) press firmly to set all the tape. The instructions say 30lbs of pressure. I personally don't have a pressure gauge in my arm, so I winged it.
Step 11) Tighten all the screws (6)
Step 12) Stand back and take a look at your handy work. Oh, and then you have to do the other side. (if you need instructions for the other side just hold up a mirror to the pictures I provided.
Thanks for reading, I hope this helps anyone looking into this product.
Last edited by Ario56; May 28, 2012 at 03:47 PM.
